November 14, 2025
•
•
Posted in: Japanese, sweet potato
Baked Japanese sweet potatoes are the best sweet potato you’ll ever eat: nutrious, creamy, and sweet.
What is yaki imo?
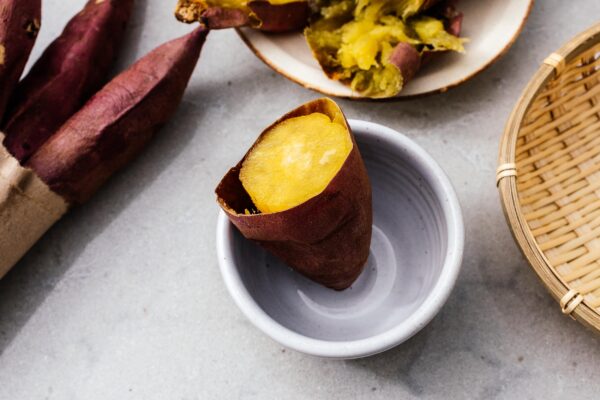
Yaki imo is a baked Japanese sweet potato! Yaki imo translates to baked (or roasted) potato. Most people in Japan, when they’re referring to yaki imo, they’re talking about Satsuma imo, which are Japanese sweet potatoes, named after the Satsuma region on Kyushu island. Satsuma imo have dusty pinkish-purple skin and pale cream insides. When they’re roasted, the insides turn a beautiful golden yellow. They’re quite a bit smaller than your usual orange sweet potatoes. If you’ve seen the sweet potato emoji, you know exactly what a satsuma imo looks like: 🍠 . They’re super sweet and delicious, incredible and satisfying.
What is the best way to cook a Japanese sweet potato?
Baking! It’s the absolute best way: the subtle sweet and toasty aroma that will fill your house is absolutely irresistible.
Types of sweet potatoes
In Japan, there are hundreds of varieties of Satsuma imo, each with different sweetness levels, textures, and skins. Here in North America, the sweet potatoes we usually see are orange skinned sweet potatoes. Orange sweet potatoes are completely different, both in looks, taste, and texture. Japanese sweet potatoes start out their lives with pale creamy insides that turns golden after being cooked. They’re also a lot starchier, fluffier, and a bit more dry than orange sweet potatoes. When you bake them, their incredible sweetness caramelizes and condenses into a slightly, sweet, soft texture.
Where to buy Japanese sweet potatoes
They sell Japanese variety sweet potatoes at Asian grocery stores, Whole Foods, Trader Joe’s, and farmer’s markets. Sometimes speciality stores will actually import in potatoes that have been grown in Japan, but usually what you’ll find are the Japanese variety of sweet potato that’s been grown in North America. If you have the chance and see imported Japanese sweet potatoes that have been grown in Kagoshima, please get them!
I just did a side by side taste test and they are SO MUCH BETTER. Creamier, softer, sweeter, and more custard-y. I found imported Kagoshima Honey Potato Beniharuka and they were amazing. They were labeled as small and were very slender. I would have preferred the medium size, but even having access to Japanese grown potatoes is amazing so I’m not complaining!
Pro tip: If you live near an Asian grocery store such as
H-Mart or a
Japanese grocery store, they may sell yaki imo. They keep roasted sweet potatoes in brown bags in a heated box and sell them as snacks. If you don’t have time to roast your own, you can grab some ready to go.
How to choose good sweet potatoes
Choose firm, smooth skinned potatoes that are dense and not too big. The smaller potatoes are sweeter and have the bonus of not taking as long to bake!
How to store
Keep your raw sweet potatoes in a cool, dry, dark space for up to 4 weeks.
How to bake Japanese sweet potatoes
Making yaki imo at home is incredibly easy: simply bake and allow the starch in the potatoes to break down and caramelize, becoming soft and sweet.
Start off by scrubbing and drying your sweet potatoes. If desired, use a fork to lightly poke a couple of holes in the potatoes.
Place them on a wire rack and bake in the oven, naked and without foil, until the skins are crisp and the insides are very tender and soft.
Baking at different temperatures will give you different potato textures.
325°F. Bake for 1-1.5 hours depending on size for a super sweet fluffy cake-like texture.
375°F. Bake for 1-1.15 hours depending on size for a super sweet tender custard inside and crisp caramelized outside.
I personally like baking at 375° which makes the outsides super crisp and caramelized with a very tender, very sweet, buttery dessert, custard-like texture.
Stove top yaki imo
If you don’t have an oven, you can also make yaki imo on the stove top.
Place the sweet potatoes in a cast iron pan and cover the potatoes and cook over low, turning every 20 minutes until they’re soft and cooked through, about 1 hour and 15 minutes.
Nutritional information and health benefits
Japanese sweet potatoes are super healthy complex carbs. They’ll fuel you with energy and keep you full because they’re high in dietary fiber. They’re also rich in Vitamin A, C, and B6. Because they’re so satisfying, they make a great snack, side, or main.
How to eat yaki imo
Just like that! Enjoy them warm out of the oven after they’ve rested a bit. You can hold them, peel the skin, and eat them, or you can eat the skins too. Sometimes I like to use a spoon to scoop out the insides then eat the crispy skin at the end when I’m done scooping out the creamy middles. Seriously SO GOOD.
How to store cooked roasted sweet potatoes
If you have any extra yaki imo left over, wrap them up and place them in air tight container in the fridge. You can enjoy them straight from the fridge or reheat them in the microwave for a warm potato.
I love yaki imo so much. We’ve even been to Kagoshima, where satsuma imo are from to enjoy super local sweet potatoes. I love them so much that I have a favorite yaki imo shop in Ginza. It’s called Tsubo Yaki-imo. They sell Japanese sweet potatoes that roast in traditional pots. They are absolutely amazing. Lots of people buy them for omiyage and their imo is one of the things I miss most about Japan. If you love Japanese sweet potatoes and are ever in Tokyo, please go! I hope you find some Japanese sweet potatoes and roast them at home. You’ll love them, trust me!
The Best Yaki Imo Recipe
The best sweet potato you’ll ever eat: nutrious, creamy, and sweet.
- 6 Japanese sweet potatoes
Heat the oven to 325°F or 375°F depending on sweet potato texture preference. Wash and dry the Japanese sweet potatoes. Lightly prick the surface with a fork, if desired. I find that the potatoes don’t need it.
325°F for 1-1.5 hours depending on size for a super sweet fluffy cake-like texture or 375°F for 1-1.15 hours depending on size for a super sweet tender custard-y inside and crisp caramelized outside.
Let rest for 10 minutes then enjoy warm! You can either peel the skins and eat the insides or you can enjoy the skins too.
Read More →
November 12, 2025
•
•
Posted in: cocktails, negroni
To me, the Negroni is the iconic holiday drink.
There are cocktails, then there is the Negroni, for many, the cocktail. No other cocktail is as tasty and refreshing in summer, so cheerful and pretty during the holidays, and so easy and simple to make into countless variations.
For me, a Negroni is the ultimate holiday cocktail. Firstly, you can make a lot of it at the same time, should you have a larger group. Secondly, it’s pretty and colorful. And finally, it’s perfect with a little spice should you want to go there. Give me a Negroni over gluhwein or eggnog with rum any day.
Some people will say they don’t like Negronis because they are too bitter or too sweet. More than likely, they had their first Negroni at a bar that didn’t care. Here is how to make Negroni the right way, one sip and you'll see why it’s the most popular cocktail of the last 100 years and looking to be the most popular cocktail for the next 100 too.
What is a Negroni cocktail
A Negroni is a sweet and slightly bitter tasting drink that's reminiscent of an aperitif, but packs a huge punch, unlike most aperitifs. It’s perfect as a cocktail pre- or during dinner, as the bitter notes highlight the flavors of food really well.
The invention of the Negroni goes to a count named Camillo Negroni who wanted something stronger than his usual drink, a Mi-To, named after the twin cities of Milano and Torino, later named the Americano because Americans loved it so much during WW1. A Mi-To was made up of campari, vermouth, and soda. To make the drink stronger, he subbed out the zero ABV soda for gin, and just like that, magic was made.
Negroni ingredients
Although most sources will tell you that a Negroni has 3 ingredients, a Negroni actually has 5 ingredients: gin, campari, vermouth, ice, and orange peel, and I argue, a glass too. Which is to say, the ice you use matter, and so does the garnish.
For those who love cocktails (and mocktails), there's nothing sadder than top dollar drinks in a paper cup with ice-machine ice chips. You don't need to break the bank, but definitely look for some decent glassware, and invest in a larger ice cube mold.
Classic Negroni recipe
The classic Negroni recipe is equal parts gin, campari, and red vermouth, built over ice and served with an orange peel garnish.
Negroni Sbagliato
Recently, it's become popular on tiktok to swap the gin for a sparkling wine (ideally, Prosecco). It makes for a lighter, fizzier, more fun cocktail. This one is great both in summer and during the holidays, especially if you love the taste but don’t want to be completely wasted around family. It's also just a great cocktail to serve to people with a lower tolerance for alcohol.
Gin
Most people splurge on the gin, and in most bars you’ll find they are very proud of the gin they use. I disagree though, the gin is important, but the punch of the campari and vermouth pretty much kill any subtle herbal nuances top shelf gin will get you. I use whatever gin I have on hand, but usually I use Beefeater. Currently I'm drinking Drumshanbo, a gin with Asian inspired botanicals (star anise and cardamom) that is excellent in a Negroni.
Campari
Campari is absolutely needed for a proper Negroni. Accept no substitutes.
Vermouth
Here is where, in my opinion, the biggest difference between a good and a great Negroni is made. I try to stay away from the bottom shelf vermouth such as Martini. I’d rather spend my money on a good vermouth over a top shelf gin any day. My favorites are Punt e Mes, Cocchi Torino, and especially Carpano Antica.
When I first started drinking Negronis, Punt e Mes was $75+. I was over the moon when we were in Buenos Aires one year and they were the equivalent of $5 a bottle. I brought home 6 bottles. It's thankfully gone down in price as it's gone up in popularity since then.
Of the three, I really like Carpano Antica because it comes in a smaller bottle. Vermouth is a wine based liqueur, which means the moment you open it, it starts to degrade. You should keep vermouth in the fridge, and buy only a size you know you can finish in under a month.
You know the old maxim never cook with a wine you wouldn’t drink? My experience is that most people have never tasted vermouth on its own. The difference in price between a higher end vermouth and a bottle shelf vermouth is usually just a few dollars, but the taste difference is out of this world.
Ice
Invest in a good 2” covered ice cube tray for your cocktails. You don’t need to go crazy and make clear ice, but traditionally, these cocktails were served with large ice cubes from the days before plastic ice trays and nugget ice machines. A covered ice cube tray protects your ice from any stray freezer smells. If your tap water doesn't taste great, consider using filtered or bottled water for your ice, even though it seems like overkill.
Garnish
One of the key parts of a Negroni is the orange peel, which complements the campari and adds a bit of acid to offset the sweetness of the vermouth, especially if you took my advice and got a more premium vermouth, which tends to be sweeter. When I was younger, I skipped the orange peel (because you needed a fresh orange, which I never had) and the first time I tried it, I was amazed at the difference it made. For extra flair, you can squeeze, spritz, or even flame your orange peel, but I prefer the subtle purity of a clean orange peel myself.
Shaken or Stirred
Please never shake a Negroni.
How to make a Negroni
- Prepare a rocks glass with a large ice cube.
- Peel a 1” x 4” strip of orange peel and trim as needed.
- Build the drink over ice.
- Stir for 30 seconds.
- Garnish, and enjoy immediately.
Negroni Glass
A Negroni should never be served up or in a flute. Properly it should be in a low ball/rocks/
old fashioned bar glass. A correctly sized Negroni is 3oz plus ice, so a double glass is just about the right size.
My Best Negroni recipe
If you’re at all a drinker, you’ll find the classic 1:1:1 ratio of a Negroni a little too sweet. If you aren’t a drinker, you might find it really bitter. Once, I served a Negroni for the first time to a wine snob friend of mine who had never had one. This was in the dark ages when appletinis were popular. He found it unbearably bitter, though in the decades since, he’s started serving them before dinner.
But if you prefer your Negroni on the more balanced side, my go-to Negroni recipe that I've been drinking for years is 3/4 oz Carpano Antica Formula Vermouth, 3/4oz Campari, and 1.5oz gin.
The Boulevardier
I used to order this one in bars exclusively, and for the first few years, no bartender really knew what it was. Then, overnight, it was more popular on bar menus than the Negroni – which is either off-menu at most places or served with some variation, like sake. A boulevardier swaps the herbaceous gin for earthy, spiced bourbon, which makes for a darker drink that’s kind of the lovechild of a Negroni and a Manhattan, combining them into the best of both worlds, like New York Italian food.
The Negroni is one of my favorite cocktails of all time, and I’ve been drinking this version for decades. I hope you give it a try, especially with the right vermouth.
Non alcoholic negroni mocktail (aka nogroni or NAgroni)
If you are avoiding alcohol or just don't like it, the Negroni happens to be one of the best mocktails you can make because both gin and vermouth lend themselves well to non alcoholic versions. Sadly, unlike with alcohol, non alcoholic brands seem to be highly regional right now, so I can't recommend specific brands easily, but your local non alcoholic gin is likely to be a good one.
If you are comfortable buying online, these are the most easily ordered brands of non alcoholic Negroni ingredients:
Cheers!
Mike
My Best Negroni
What it lacks in the purity of equal measures, it gains in deliciousness
- 1 ice cube (2"x2")
- 1 orange peel (trimmed)
- 1.5 oz gin (such as beefeater)
- 3/4 oz Campari
- 3/4 oz Carpano Antica Formula Vermouth
Prepare a rocks glass with a large ice cube. Peel a 1” x 4” strip of orange peel and trim the edges. Twirl around a chopstick or skewer if desired.
Build the drink over ice.
Stir for 30 seconds or until cold, garnish with the prepared orange peel, then enjoy immedidately.
Read More →
November 10, 2025
•
•
Posted in: char siu, chinese bbq, ham, large format
This year make this Chinese BBQ inspired char siu honey baked ham.
If you’ve never glazed your own ham before or if you’ve only ever eaten dry ham, you’re probably wondering why I think ham is so delicious. Trust me when I say this perfectly glazed char siu ham is just the right amount of salty balanced with sweet, with full hammy flavor.
What's a char siu ham?
Classic honey baked hams are delicious but if you’re going to take the time glaze your own ham, then it’s your chance to shine and get creative. If you've ever had any Chinese BBQ, or even
fried rice, you know
char siu: smoky sweet Chinese BBQ pork. Originally I was going to make a brown sugar bourbon apricot glaze but Mike made a comment about how he thought I was going to char siu the ham and this is the beauty we came up with!
Honey baked char siu ham is a perfect balance of sweetness and umami thanks to a combination of brown sugar and honey, a splash of soy sauce, hoisin sauce, and a hint of five spice. Seriously so good.
How to make honey baked ham:
- Buy a ham: Hams come fully cooked at the store making this the simplest meat dish you’ll ever prepare. Get a bone-in spiral cut ham, more on that below.
- Let the ham temper: Take your ham out of the fridge and let it come to room temp for 2-3 hours, which will help your ham heat through evenly without drying it out.
- Make a glaze: combine all the glaze ingredients together in a saucepan and bring to a gentle simmer.
- Prep your pan: add 1 cup of water and a rack to a roasting pan. The water will steam the ham, making it nice and juicy.
- Bake the ham: Place the ham cut side down and bake in a low oven, glazing every 20 minutes, until the ham is warmed through.
- Caramelize: For the last little bit, brush on extra glaze and turn the heat up to caramelize. Let rest and enjoy!
Char siu honey baked ham ingredients
If you love the sweet and smoky flavors of Chinese char siu, you’re going to love this char siu inspired ham. You’ll need: brown sugar, honey, hosin sauce, soy sauce, Shaoxing wine, five spice, white pepper, garlic, ginger, and a spiral cut bone in ham. The glaze is so addictive and full of umami you’re going to want to save the extra (there will be extra) to serve alongside the ham!
Brown sugar and honey
We’re going with a combination of brown sugar and honey so the brown sugar can add dark caramel notes while the honey adds light golden notes.
Hoisin sauce
Hoisin sauce is a thick, sweet brown Chinese sauce that’s used in marinades and as a dipping sauce. It’s super flavorful: sweet and savory, tangy, and full of umami. They pretty much sell hoisin everywhere now, from Target to your basic grocery store.
Shaoxing wine
This is the secret ingredient that all your Chinese food needs to taste like restaurant style Chinese food.
Shaoxing wine is a rice wine that’s lightly sweet, nutty, earthy and complex. It’s optional for this recipe, but it’ll be 10 thousand times better if you get it. They sell it online and in Asian grocery stores.
Five spice
If you want a savory char siu, don’t forget the five spice. Five spice is Chinese spice mix made up of star anise, cloves, cinnamon, Sichuan peppercorns, and fennel. It’s full of warming spices that are super reminiscent of classic ham spices like cloves and cinnamon.
White pepper
If you don’t have white pepper, don’t sweat it, but if you do, use it here. It’s more fragrant, delicate, and floral. It adds pepperiness without overwhelming.
Frequently asked ham questions
How to make copycat Honey Baked Ham
Did you know that there’s a company that sells fully cooked and glazed honey baked hams? If you want to make a copy cat ham, just make a glaze, cover with foil and bake at 325°F until warm, then add a sugar rub and torch it so it brûlées.
- To make the glaze, stir together 2 tbsp melted butter with 1 tbsp dijon, and 1/3 cup honey. Rub this all over your spiral cut ham and bake as per the recipe below. When the ham is warm, remove it from the oven.
- Make a dry rub with 1 1/2 cups sugar, 1/2 tsp each of nutmeg, cloves, cinnamon, and 1/4 tsp each of paprika, ginger, and allspice. Place half of the dry rub in a small sauce pan and set aside.
- Use the remaining rub and carefully pat it on to the warm ham. Use a kitchen torch to brûlée and crisp up the sugar until it’s bubbly and shiny. It will cool into a crispy shell.
- Add the ham drippings to the reserved dry rub and bring to a boil over medium heat until it thickens into a glaze. Serve alongside the ham.
How long to bake honey baked ham
12-15 mins per pound at 250°F, then blast up the heat to 450 for 5-10 minutes to caramelize the glaze.
Bone-in ham vs boneless ham
- Boneless ham, just like the name implies, doesn’t have a bone in it. The bone is remove before the ham is processed, cooked, and sealed up. Boneless ham has that classic ham shape but isn’t as flavorful or juicy as bone-in ham.
- Bone in ham is ham that has its bone. The bone makes the ham tastier by maintaining and imparting flavors as well as helping it stay moist.
Is bone-in ham better than boneless ham?
No question about it: bone-in ham has more flavor and is much more juicy than boneless. Generally, both bone-in ham and boneless hams are sold fully cooked. Just take a look at the package and make sure it says fully cooked or ready to serve.
Spiral cut vs regular ham
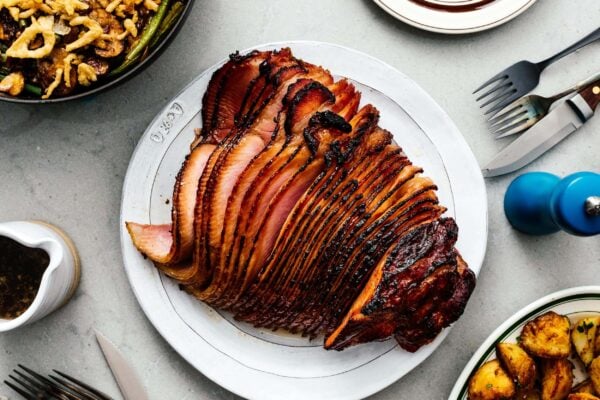
If you’ve never bought ham before, you might be wondering, what is spiral cut ham?! Spiral cut ham are hams that have been cut in a spiral shape making it super easy to carve off the bone. They’re really pretty because the slices fan out nicely. Spiral hams can be both bone-in and boneless. Go for bone-in be cause it’s super juicy. If you want to go super super juicy or are confident in your carving skills, get a non spiral-cut ham, which retain moisture better.
What is honey baked ham?
Simply put, honey baked ham is a ham baked with a honey glaze. A juicy, fully cooked ham is glazed with honey and spices and baked through until warm and cozy and lacquered with sweet honey goodness. It’s the perfect easy show-stopping centerpiece for any dinner celebration.
Honey baked ham also happens to be the name of a super popular ham purveyor that sells honey baked hams, but you can easily make your own at home without shelling out the big bucks.
How much ham per person
If you’re buying a bone-in spiral cut ham, you want to have 3/4-1 pound of ham per person. They sell bone-in spiral cut hams in quarter legs, half legs, and whole legs.
- Bone in quarter hams are 3-4 pounds and serve 6-8
- Bone in half hams are 5-10 pounds and serve 8-22
- Whole hams (bone-in as well, of course) are 10-17 pounds and serve 22-40
How to reheat honey ham in the oven
The best way to reheat honey ham without drying it out is to bake it at a very low temperature. Place your ham in an oven safe dish and give it a couple of spritzes of water or add 1 tbsp to the dish. Cover with foil and bake at 275° until warmed through.
How to reheat honey ham on the stove
Heat a skillet over low heat and a bit of oil or butter. Add a slice of ham and a teaspoon or two of water and warm over low until heated through, flipping once.
What to serve with honey baked ham
What to do with leftover honey baked ham
I love leftover ham! Try it in:
Happy hamming I really hope you try this ham because it’s honestly the best ham I’ve ever made!
sticky saucy ham forever,
xoxo steph
Honey Baked Ham
This char siu inspired honey baked ham is a perfect balance of sweetness and umami thanks to a combination of brown sugar and honey, a splash of soy sauce, hoisin sauce, and a hint of five spice. Seriously SO GOOD.
- 1/2 cup brown sugar (firmly packed)
- 1/2 cup honey
- 2 tbsp hoisin
- 1 tbsp soy sauce (low sodium preferred)
- 1.5 tbsp Shaoxing wine
- 1 tsp five spice (optional)
- 1 tsp white pepper (optional)
- 4 cloves garlic (lightly smashed)
- 4 slices ginger
- 3 lb bone-in spiral sliced ham (at room temp, see notes for scaling)
Heat the oven to 250°F and make the glaze: mix the brown sugar, honey, hoisin, soy sauce, Shaoxing wine, five spice, white pepper, garlic, and ginger in a small pot and heat over medium until it starts to bubble. Set aside.
Grab a roasting pan and fit it with a wire rack. Place 1 cup water in the roasting pan. Put the ham on the wire rack, cut side down, and brush the first coat of glaze on.
Bake, with a piece of foil on top, for 12-15 minutes per pound of ham until the ham is heated through to 130°F. While the ham is baking, brush the glaze on, every 20 minutes, until the ham is heated through. Our ham was 5 lbs and took about 1 hour.
When the inside of the ham is warmed through, turn the oven up to 450°F and brush on more glaze and continue to bake for 5-10 minutes, brushing with glaze every 2-3 minutes until deeply caramelized. Remove from the oven, let rest for 10-15 minutes and enjoy!
While our recipe app can scale your ham to fit the number of people you're serving, you'll most likely be stuck buying quarter, half, or whole hams, which serve the following:
Bone in quarter hams are 3-4 pounds and serve 6-8
Bone in half hams are 5-10 pounds and serve 8-22
Bone in whole hams are 10-17 pounds and serve 22-40
Read More →
November 8, 2025
•
•
Posted in: christmas, spatchcock, thanksgiving, turkey
A spatchcock turkey will be the easiest, fastest, prettiest turkey you will ever make.
Turkey is one of those meats that I love, kind of like a very intense chicken. They're big and you will end up with a lot of leftovers, but I think it's worth it. You can do Christmas with a honey baked ham, prime rib (or any other) roast, or anything you want, but how often can you get a big fresh turkey, perfectly cooked?
What is spatchcock turkey?
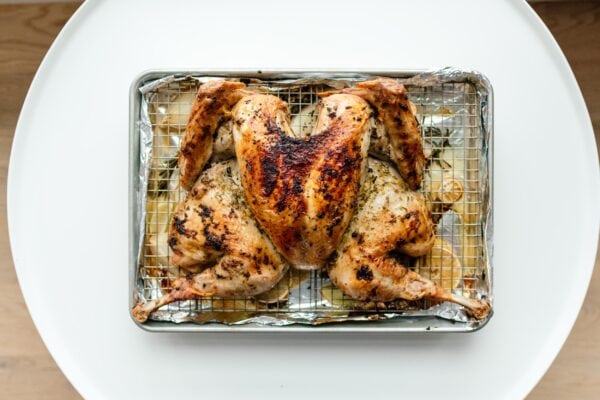
Spatchcocking is a fancy way of saying removing the backbone and flattening the bird before you roast it. It's superior to roasting a bird whole because it makes for even cooking, since the thighs aren't covered by the legs and the delicate white meat isn't exposed right up top. It also makes for crispier skin, better presentation, and lets you use the backbone and other bits to make gravy and stock right away.
How to spatchcock a turkey
- Prep. Pat the turkey dry with paper towels. It might be best to work in a large clean deep sink or in a large roasting pan. Flip the turkey so that it's breast side down.
- Remove the backbone. Hold the turkey firmly and use a pair of kitchen shears (you definitely need kitchen shears) to cut alongside the backbone, starting where the tail meets the thigh. Cut all the way up until the turkey is split up to the neck. Push the turkey open slightly and then repeat on the other side, carefully cutting alongside the other side of the backbone. This side may be a bit trickier, so go slow.
- Trim. Trim off any excess fat or skin you might see. I took off the tail and the hood of fat near the neck. You can use the trimmings to make the best turkey gravy ever.
- Flip and flatten. Flip the turkey over so that the breast is facing up and push down on the ridge breast bone, hard. You should hear a couple of cracks and the turkey should be flatter. Tuck the wing tips behind the breast so they don't burn.
- Season. Place the turkey on your prepared rack and baking sheet and rub with 1 tablespoon of oil. Season with salt and freshly ground pepper.
How long to cook a spatchcock turkey
- 11-12lb turkey: about 75 mins
- 12-14lb turkey: about 1 hour 25 mins
- 14-16lb turkey: about 1 hour 35 mins
- 16-18lb turkey: about 1 hour 50 mins
- 18-20lb turkey: about 2 hours
Oven accuracy varies so you should always use a meat thermometer, especially with a high stakes thing like turkey, especially as the bird gets bigger. They aren't expensive and will save you from microwaving pink meat or eating cardboard turkey.
We like this one. Once you have one, just get your breast meat to 150ºF and your thigh meat to 165ºF. If you can swing it, a
separate oven thermometer is also useful for seeing if your oven is properly calibrated - keep it on the rack you plan on using.
Should you brine your turkey first?
Spatchcock turkey is always juicy and delicious anyway so you don't need to! If you normally brine your turkey, you should keep on doing you - this is no different than roasting the whole bird. If you never have brined a turkey before though, there's no need to and brining can often end up with saltier meat than you're used to.
What size turkey does this work with?
It works best with smaller turkeys, not because larger turkeys don't work as well, but because a big turkey needs a really big oven to lay flat in (not to mention a big baking sheet). If your oven doesn't fit a full size baking sheet (18"x26") you might want to stick with the smaller 14lb birds and load up on sides instead.
Reasons why you should make a spatchcock turkey
- When you cut out the backbone, you get to use it to make gravy and stock, right away without having to wait for the drippings off the bird.
- Flattening the bird helps it cook evenly and quickly – I'm talking about finishing a turkey in about an hour and twenty minutes all-in.
- The flatter profile means that all of the turkey skin is facing up, exposed to the heat which means crispier turkey skin. Bonus, the meat is juicier because the skin renders the fat right into the meat, instead of just falling down into the pan.
- Spatchcocking means even cooking. White and dark meat cook at different rates and flattening out the bird so that the legs and thighs aren't protected underneath the breast means that you're exposing the dark meat to heat that would otherwise not reach it.
How do you carve the turkey like that?
It's easier than it looks!
- Break down the turkey by separating the thighs, drumsticks, and wings from the turkey.
- Debone the thigh meat and set aside.
- Remove the breast from the carcass and slice them nicely into even pieces about 1/2" thick.
- Finally, arrange the breast around the platter. Add the drumsticks and wings to the middle, and fill in the gaps with the deboned thigh meat.
- Save the trimmings for Turkey BBH or Turkey Pho.
Here it is without any garnishes on top:
What about sides and stuffing?
I included a citrus herb butter but you can go ahead and just season with just salt and pepper or whatever you heart desires. Personally, I feel like turkey has a very distinct flavor and doesn't need too much help, much like a very good roast chicken, but feel free to play around. The important part is spatchcocking, so everything else is just
gravy ;)
happy turkey-ing!
xoxo steph
Spatchcock Turkey Recipe
A beautiful roast turkey in under two hours with juicy meat and crispy skin, every time.
- Meat thermometer
- Kitchen Shears
Spatchcock Turkey
- 1 medium onion (peeled and quartered)
- 1 orange (halved)
- 1 lemon (halved)
- 2 stalks celery (roughly chopped)
- 10-12 sprigs fresh rosemary
- 1 11lb-12lb whole turkey (or the smallest you can find, see notes)
- 1 tbsp oil
- salt and freshly ground pepper
Rosemary Citrus Butter
- 1/4 cup butter (room temp)
- 1/4 cup fresh rosemary (leaves only)
- 6 cloves garlic
- 1 orange (zested)
- 1 lemon (zested)
- 1 tbsp fresh lemon juice
- 1 tbsp extra virgin olive oil
- 1/2 tsp kosher salt
- 1/2 tsp black pepper
Adjust your oven rack so that it’s in the middle of the oven. Heat oven to 450°F. Foil line a large deep baking tray. Place the onion, orange, lemon, celery, and rosemary sprigs on the foil, then place a wire rack on top of the vegetables.
Pat the turkey dry with paper towels. Flip so that it’s breast side down. Hold the turkey firmly and use a pair of kitchen shears to cut alongside the backbone, starting where the tail meets the thigh. Cut all the way up until the turkey is split up to the neck. Push the turkey open slightly and then repeat on the other side, carefully cutting alongside the other side of the backbone. This side may be a bit trickier, so go slow.
Trim off any excess fat or skin you might see. I took off the tail and the hood of fat near the neck.
Flip the turkey over so that the breast is facing up and push down on the ridge breast bone, hard. You should hear a couple of cracks and the turkey should be flatter.
Place the turkey on your prepared rack and baking sheet. Tuck the wing tips behind the breast and rub with 1 tablespoon of oil. Season with salt and freshly ground pepper. Transfer to the oven and roast, for about an hour and twenty minutes, rotating halfway, or until the deepest part of the breast is 150°F, and the thighs are at least 165°F.
While the turkey is roasting, blend or food process the rosemary citrus butter ingredients together. At the 50 minute mark, carefully and evenly brush on the rosemary citrus butter. If at any point the turkey skin starts to look too brown, you can tent it with foil and then remove the foil at the end to get the crispy brown skin. When the turkey is cooked, remove from the oven and let rest for 15-20 minutes.
How to carve a turkey
Using a medium sized knife, remove the legs by cutting through where the thigh meets the body. Find the joint between the thigh and the drumstick and cut through the joint. Find the joint of the wing near the top of the turkey’s breast and working the knife through it, removing the wings. You can leave the wings whole or spilt them by cutting along the joints.
Remove the breasts by slicing down the center, near the breast bone, using the tip of your knife to follow along the shape of the bone while peeling the breast away slowly. As you continue to slice, the breast should fall away in one piece. Repeat on the other side. Slice the breast into evenly thick pieces. Remove the thigh meat away from the bones, saving all the bones for stock or soup. Arrange everything on a platter and garnish with oranges, lemons, and rosemary. Enjoy!
See blog post for cooking times for other size birds.
inspired by Serious Eats
Read More →
