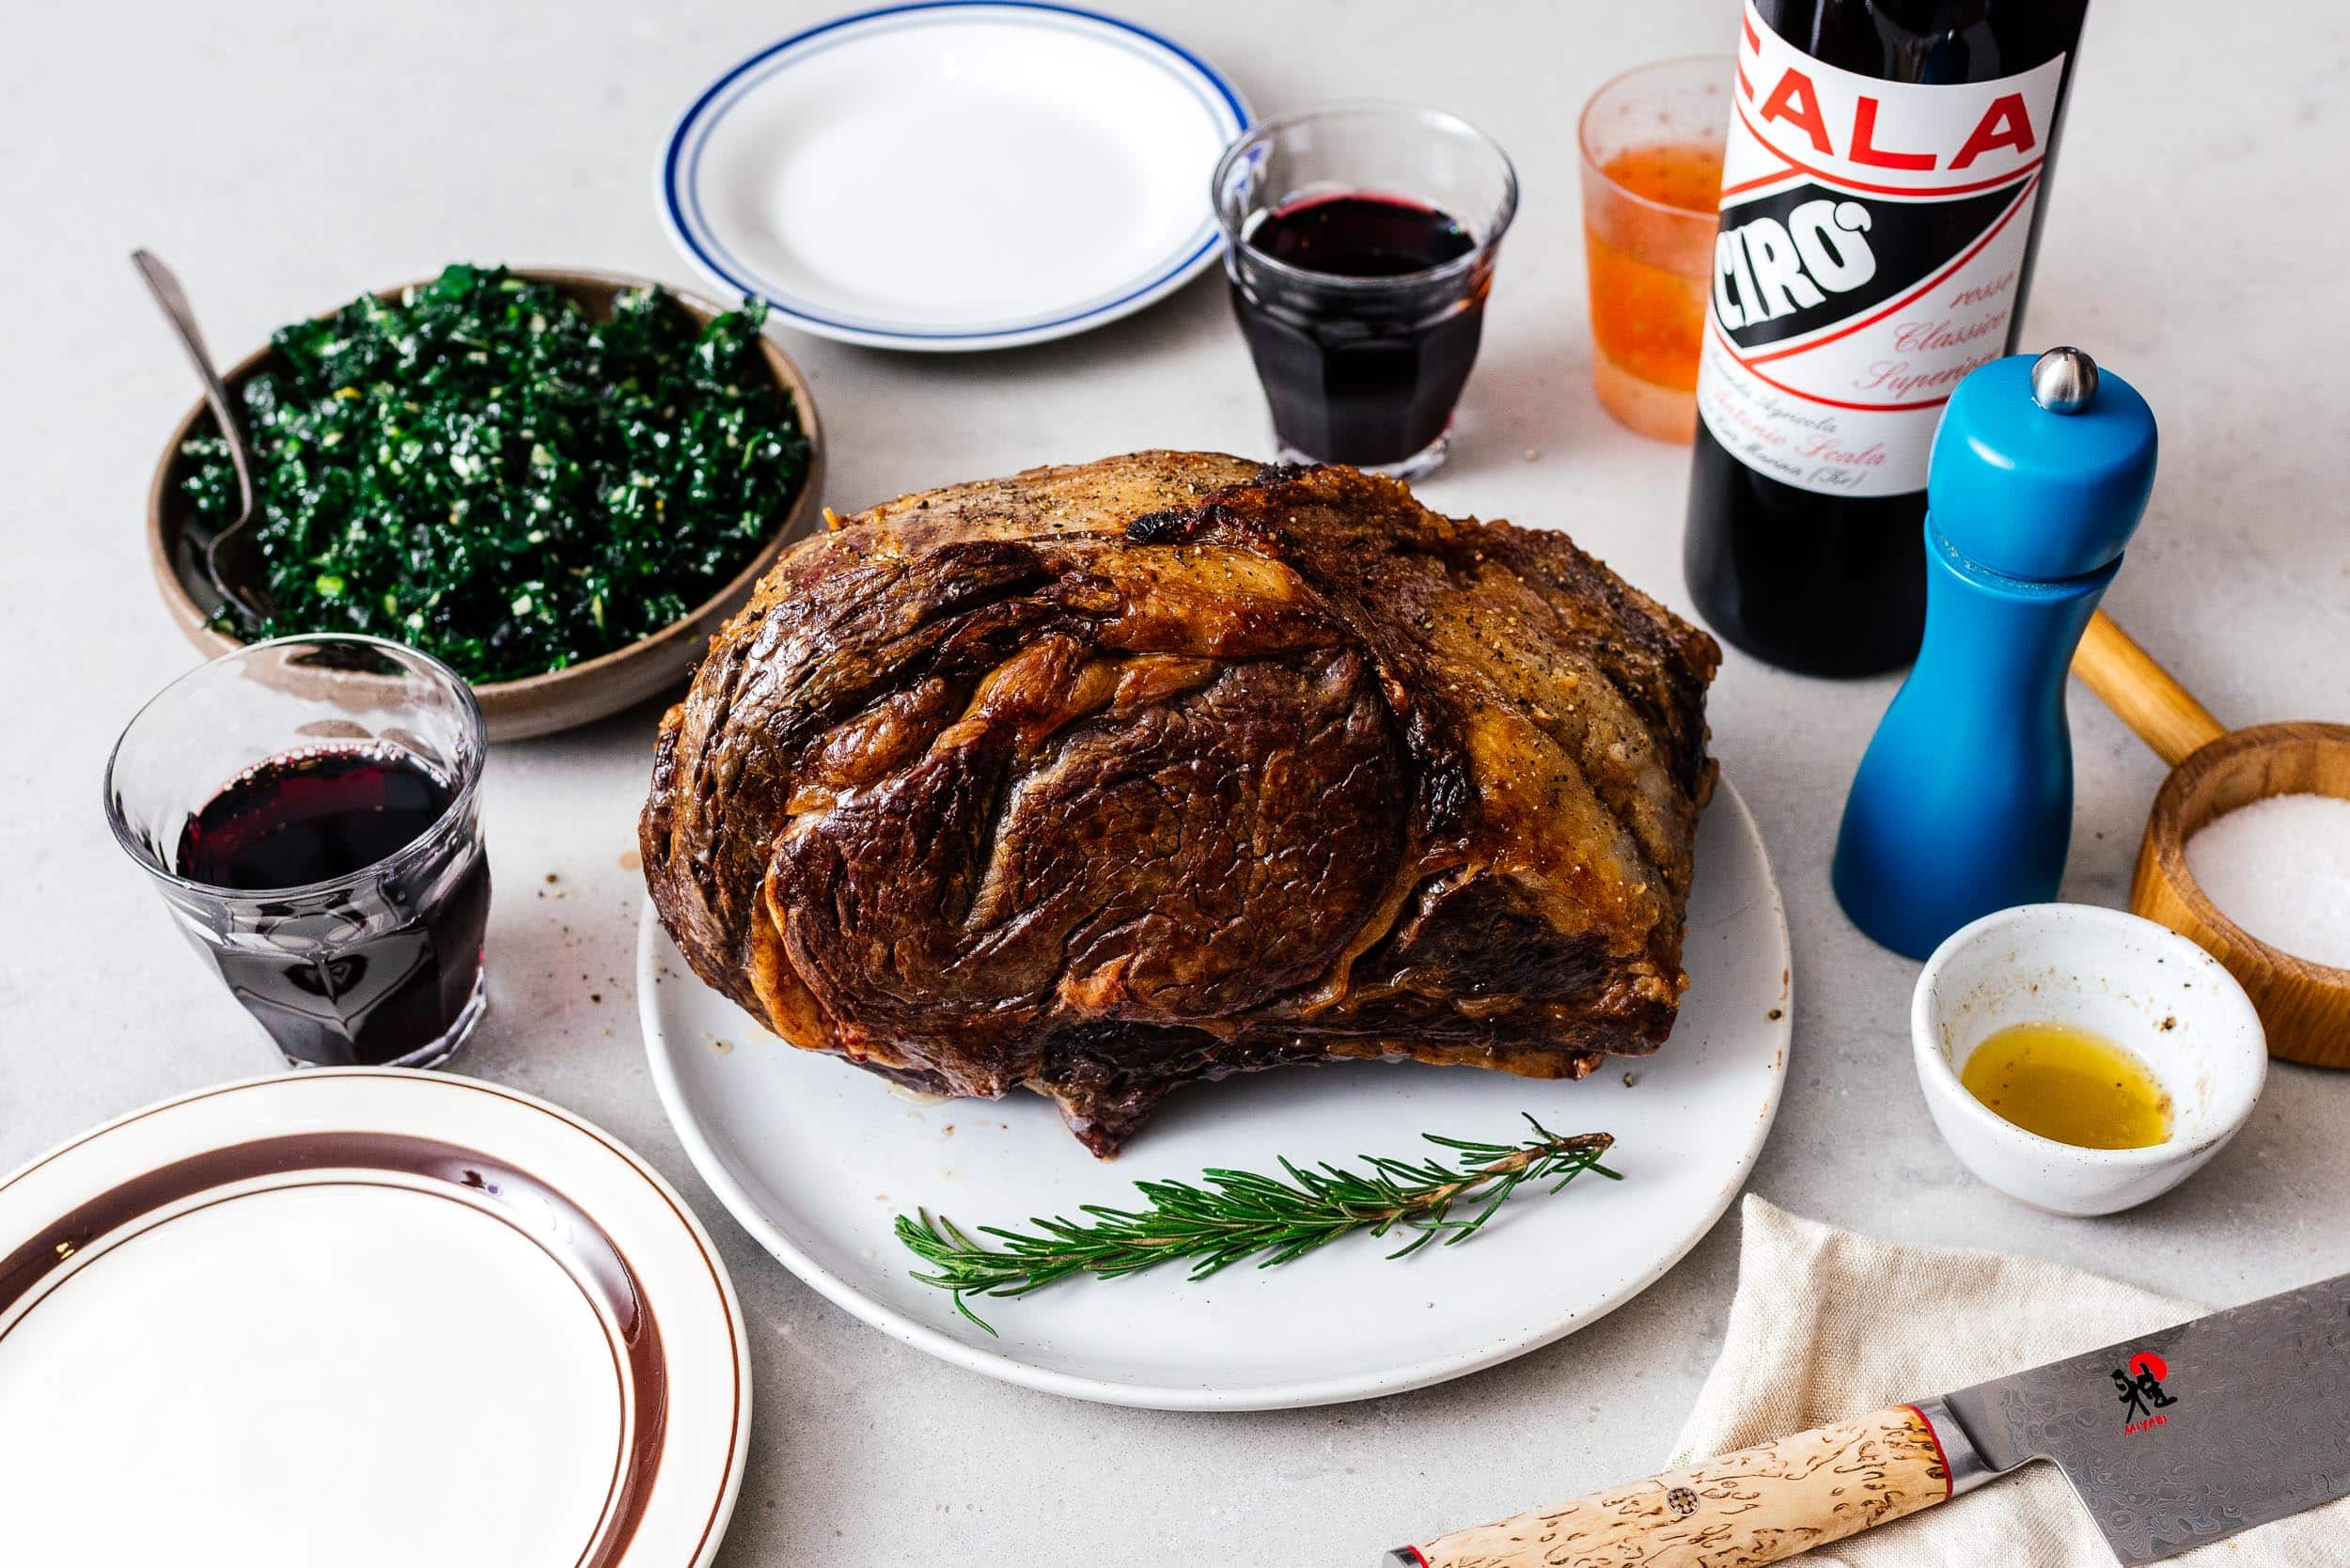
I Am... How to Cook Prime Rib
There is nothing more impressive than a slow roasted and deeply crusted prime rib landing squarely in the center of a full dinner table. Prime rib might be the perfect cut of beef. It’s got a little something for everyone. Intense well-marbled fat forward hits for the fat-is-flavor stans (that’s me). Supple, rosy tender parts for the filet/tenderloin fans. Savory beefiness in bulk for the ribeye-is-king crowd. And, last but not least, a deep dark crust for those guys who need to insert Maillard reaction into any conversation involving beef.
What is prime rib
Prime rib is one of the largest cuts of beef you can buy as a normal home cook. You buy it as a roast made of a full rack of 7 ribs. These ribs are commonly spoken of as being from ribs #6-#12. The best way to think of a prime rib is a super high quality tomahawk or bone-in ribeye, stretched out to a foot thick. It’s true: the meat that comes in a prime rib roast is the same stuff you make ribeyes and tomahawks from.How to cook prime rib
Here's how to cook a perfect prime rib, every time:- Preheat your oven to 450ºF.
- Brown the two sides in a cast iron pan: optional, but highly recommended, especially when you have a smaller roast that's easier to handle. The smoke detector may possibly go off.
- Brush with butter or oil, then sear in the oven at 450ºF for 15 minutes.
- Set the oven to 200ºF and open the oven door for about 15 minutes, or until the oven temp drops to 200ºF if you have an oven thermometer. The smoke detector may possibly go off, again.
- Cook for 20 mins per pound for medium rare, or until your meat thermometer goes off. Temperatures are below.
- Rest for 30 mins, then slice and enjoy!
Prime rib temperatures
Prime rib, like all roasts, continues cooking after it leaves the oven while the thermal energy redistributes. For us, this seems to be a 6 degree rise, but your results may vary based on how warm your house is. Basically, 6 degrees is a pretty good estimate, however, so you want to take your roast out 6 degrees before your target temperature. For a quick reference, my target temps are below.- Rare: 125ºF - remove at 119ºF
- Medium-rare: 130ºF - remove at 124ºF
- Medium: 135ºF - remove at 129ºF
- Medium-well: 140ºF - remove at 134ºF
- Well done: 🥵
Prime rib cooking time
If you are cooking for a hungry house and want to know how to plan on timing such a large roast to be just ready for dinner, there’s a super easy formula based on the doneless you prefer. This isn’t one of those pro-chef-speed formulas that no one can realistically achieve, it’s pretty loose with the times so you can depend on it, even if you are relaxing, drinking wine, and consulting your phone every so often for the next step of the recipe. That said, using a meat thermometer is vitally important. And, so is planning on serving appetizers and drinks before the main course for anyone who is extra hungry. The formula is simple - assume:- 2 hours for temper
- 30 mins for searing
- 15-30 minutes per pound (in 5 minute increments - medium rare is 20 minutes/pound)
- 30 minute rest
The importance of a meat thermometer
A meat thermometer is essential. That old adage about the feel of your ear or touching your thumbs to fingers? Not for important cuts of meat, in my opinion. I recommend an oven probe; one that beeps when the target temp is hit. They can be really cheap, extremely expensive wireless app driven, or something in between. If you have an instant read or thermocouple style, be sure to check often that the roast doesn’t get overcooked.Trimming
How much fat you need to trim away depends on how much you love fat. If you trim all the fat away from the edges, you’ll get a much better sear, but that fat is super flavorful and tender - nothing like the tough chewy fat you might encounter from lesser cuts. My butcher left the fat cap on the spinalis, so I removed and froze that, but left the fat on the iliocostalis for extra flavor.Parts of a prime rib
Prime rib looks like just one big homogenous hunk of meat, but it’s three delicious parts with their own taste and tenderness:- Spinalis dorsi aka rib cap: This is considered a well kept chef’s secret: the greatest cut of steak, bar none. All the complexity of a flank steak, the fatty marbling of a ribeye, and the tenderness of a filet, in one steak. This cut is separated from the main body of the prime rib by a large layer of fat. Back when people vilified fat, spinalis dorsi used to be cut off and saved for the butcher or kitchen so that the ribeye steak could be presented “cleaner”. These days, especially if you order a bone-in ribeye, they just leave it on. It really is the best part.
- Ribeye: This is the main body of a slice of prime rib. It’s literally the same as a ribeye steak. It will be well marbled, tender, and complex tasting.
- Iliocostalis: Some people liken this to a long thin tenderloin. It’s also called the lip or nose of a prime rib. It doesn’t have a good reputation because it’s often smaller, fattier, and not very toothsome, but I think it’s an intensely beefy and tender cut because it sits right next to the bone. Iliocostalis used to be cut off and not served with the prime rib, as it wasn’t considered ‘prime’ enough, but these days, most butchers will leave it on for you to decide on.
Why make prime rib?
But why go to all this trouble instead of just getting seven steaks? Because, prime rib is insanely delicious. It’s basically the cheapest bone-in ribeye you can get at an extremely high quality for price ratio. Done right, it’s easy, forgiving, impressive, and satisfying. The best part is the leftovers can be reheated as some of the best steaks you’ll ever have.Prime rib vs steaks
Why should you make prime rib instead of steak or some other cut? Because, it’s cheaper than steak by two- to three- times, it’s easier to make, and there’s nothing more impressive than a giant roast of beef landing squarely center on the dinner table. The advantage of steak is that you can cater to different doneness preferences, but there are so many disadvantages, such as steaks being more expensive, needing more pans (aka more dishwashing), and being so much messier, smokier, and splatterier. Besides, you can cut down a prime rib into steaks before or after cooking. You can't glue steaks together into a prime rib roast. Overall, if you can justify the initial outlay, prime rib beats steak every time.A smaller prime rib
In fact, prime rib is such a good competitor to steak that I think it’s worth it to consider a smaller prime rib, even if its just for two of you, or even if you live alone. Ask your butcher to cut you 2-3 ribs worth. Where we live, it’s half the cost vs bone in ribeye, and my butcher sells even two ribs, which is just two bone in ribeyes stuck to each other. If you are buying by the rib at a really nice butcher shop, you may get choice of which rib bones you want. The “front” is rib number 12, which is very tender with a large ribeye steak, and the “back” is rib number 6, which is more marbled and complex.Prime rib roast
A prime rib can actually be closer to 24 inches thick, although you don’t have to opt for the full rack. Any good butcher will cut you whatever thickness you need. If you can, you should go for broke and get the full rack because it’s way cheaper than individual steaks of the same quality. A prime rib roast can be split into steaks if you’re so inclined. Even if you are only cooking for 2 people, you can buy a whole rack for cheap and split it up into seven 2” thick steaks for much less than you’d pay if you'd just bought steaks. But, the whole point of a prime rib is to roast it to perfection, with a deep dark crust and tender, rosy pink insides, so I recommend you grab a 2-4 rib segment (or more if you want) and go to roasting town. Roasting is way easier than cooking 7 steaks and so much more impressive too. Even better, with the right tools, it's easy to do it perfectly, every time.Bone in or boneless or tied back
When you ask for prime rib, you might be presented with one of three options: bone-in, boneless, or the bones cut off, but tied back on. Each has its pros and cons:- Bone in: The most flavor, but also the hardest to handle. Besides the weight, you can only cut slices between the bones. If you don’t intend to use the bones, these will also be more expensive, because while they cost less per pound, you still pay for the bones. They have the most flavor by far.
- Boneless: The easiest to handle, the easiest to cook, but a little less impressive. Boneless is great if you’re a crust fan (who isn’t?) because you get maximum crust without any pesky bones getting in the way. You’re also able to slice it to any thickness you like. To me though, this option doesn’t really feel like prime rib, just fancy roast beef.
- Bones cut off and tied back on: This might actually be the version you’re most likely to run into depending on where you live. This one seems to sells the best, and some internet sources say it’s great for seasoning the meat because you can get under the bone.
Where to buy prime rib
Because it’s not a super popular cut and because of how expensive it is, outside of Christmas and Thanksgiving, and maybe Easter, you may have a hard time finding prime rib. The best place to get a prime rib, by far, is your local butcher. Not only will they often have it because they have the whole cow in stock, they'll be more willing to cut you exactly as much as you need. Your other option is a special order from a grocery store’s meat department. I checked with whole foods and they said they were able to get a prime rib the next day. I went with the local butcher, but whole foods was actually cheaper. You can also get some awesome (and awesomely expensive) prime ribs from online meat purveyors like snake river farms or costco. If you’re lucky, you might find some prime rib locally at costco in its appropriately named prime beef department - just ask.How to choose the best prime rib
Believe it or not, prime rib was named before the USDA settled on its grades. Depending on who you believe, prime rib is either called prime because it’s the best cut of beef, or because its a primal cut. Either way, prime rib is not always USDA prime. The difference between a USDA prime and a USDA choice (the second best) prime rib is between 25%-50% more money. Beyond that, if you go to a good butcher, you also have options for organic, dry aged, grass fed, wagyu, and more. So how do you choose a good prime rib? Decent marbling is usually a sign of a happy animal, and that means a good tasting cut of meat. Grass vs corn fed is a matter of opinion, and many people don’t like the extra floral and complex taste of grass fed beef, but I don't think there's anyone who doesn’t like tender, well marbled beef.Do you really need to temper the meat?
Unfortunately, yes, you do really need to temper the meat. Tempering the meat – which is really just a fancy way of saying "leave it out on the counter to come to room temp" – equalizes the temperature of the meat so it cooks evenly, plus it lowers cooking times. You can also use this time to briefly dry-brine the meat (below). For a smaller 2-3 bone roast, you can get away with 2 hours of tempering. For a full rack, you'll want to temper at least 4 hours.Dry brining
Dry brining is just liberally seasoning the meat and leaving it in the fridge for 12hrs to 4 days to let the salt penetrate the meat. This process is supposed to pull out the excess moisture from the beef for a more tender and tasty piece of meat. I'm not sure I personally agree with this. Salt never penetrates that much in a dry brine. But if you have a day or two before you want to cook the beef, it doesn’t hurt. Just lightly sprinkle some salt all around the roast, then place on something to catch the juices. Loosely cover and refrigerate until you are ready to use.Sauces
I don't do a rub with my prime rib. Because it’s such a large piece of meat, most likely you will not get a lot of extra flavor into the inside – just its innate beefiness. For some people that’s more than fine. For others, steak sauces are always welcome. If you’re in that crowd, you should check out our steak sauce roundup.How to reheat prime rib
You’ll probably likely have some leftover prime rib. You’ll also most likely hear that you should reheat the leftovers in a low oven. I disagree: by far the best way to reheat prime rib leftovers is to cut the remaining pieces into 2” thick steaks (if you can). Liberally season any cut sides, then sear 2 minutes per side in a cast iron pan. It makes for amazing steaks.Smoke alarms
Depending on many factors – if your smoke alarm is close to your kitchen, if your oven is less clean, or if your hood fan is a little weaker – you should be prepared for your smoke detector to go off during the browning stages. Be sure to check if your smoke detector has a hush button. Or, have a helpful assistant standing by with a large towel ready to fan when you first drop the roast into the cast iron pan to brown and again when you open the 500ºF oven door. And that's it, perfect prime rib, every time. I hope you enjoyed this guide and you're inspired to make a giant, super satisfying chunk of meaty goodness soon! -MikePrime Rib Recipe
Everything you ever wanted to know about prime rib: what it is, how to buy the best one, and how to cook a prime rib perfectly, every time.
- Meat thermometer with probe
- 6 lb prime rib (2 ribs, see notes)
- 1 tbsp butter (melted, unsalted preferred)
- 1 tsp kosher salt
- 1 tsp freshly ground pepper
Liberally season your roast with kosher salt and let temper on the counter for 2-4 hours. Near the end of the temper time, preheat your oven to 450ºF
Optional: Sear the sides in a cast iron pan with a generous amount of oil. Combine the butter and pepper together, then brush onto the roast. Roast for 15 mins at 450ºF.
Set the oven to 200ºF. Allow oven to cool down with the door open for 15 minutes (or until the oven temp hits 200ºF, then close door and cook at 200ºF until the internal temp hits your target temp (119ºF for medium rare, see post), or approx 2 hours.
Remove and rest for 30 minutes before slicing. Serve with sauces of choice, enjoy!
Bones are assumed to weigh 9oz

I Am... Best Food in Whistler
The best food and drink options in whistler. Mike and I are here in Whistler 2-3 months every year and we always take advantage of all the dining options just to see what's new and of course, to visit old favorites. The food options here in Whistler (we're here right now as I write this) are pretty world class, so if you're here for more than just the skiing, this is the best food in Whistler list for you. Whistler Blackcomb is one of the top rated ski resorts in North America, if not the world. With over 8000 acres of skiable terrain, the world’s longest gondola, and the cutest village ever, Whistler is a must visit. Whether or not you’re a skier or snowboarder doesn’t even matter - there’s so much to see and do in the town Whistler. The vibes, as the kids say, are immaculate. Even more so, the food scene eats and leaves no crumbs. Most of best food and beverage options lie in the main village of Whistler, which is at the base of both Whistler and Blackcomb mountains. It’s a completely walkable, pedestrian village that has super cute architecture with a combination of smaller chalets and castle-looking luxury hotels. There are so many places to eat and drink and because the options seem endless, don’t waste your time on overpriced, bad food. Here’s what you should be eating while you’re in Whistler!
Do you need reservations in Whistler?
Whistler is busy. It’s the biggest resort in North American and it attracts a lot of people. That means, generally, you can’t just walk into a hot ticket place and expect to be seated. Reservations are a must in peak season, which is, obviously, winter, but summer as well. If you have a must-visit restaurant, make a reservation to avoid disappointment. That being said, some of the best food in Whistler are casual options that don’t need reservations, such as pretty much everything on the list below:BeaverTails
Have you even gone skiing if you don’t end your ski day off with a beavertail? Beavertails are a decidedly Canadian treat: irresistibly warm and fresh from the fryer whole-wheat pastries that are a combination of chewy and crisp. Think of them like a giant flat donut, in the shape of - you got it - a beaver tail! My favorite is the classic cinnamon and sugar, but if you’re a toppings person, they have so many to choose from. Really, there’s nothing quite like standing in the snow while the village fairy lights are twinkling, eating a steamy hot and sweet beavertail after a day on the slopes. BeaverTails 4293 Mountain Square, Whistler, BC V0N 1B4 Open: 2pm - 8:45pmChubby Ducks Donair, Kebab & Poutine
If you’re staying in an airbnb or somewhere where you have kitchen but aren’t really looking to cook, but also don’t want to go out to eat, grab some take away from Chubby Ducks! They have THE best poutine in town, no questions asked. It’s not in the middle of the village, but it’s just a short hop through the main road, off to one side. They’re not an eat in place, so keep that in mind. Also, they make the fries to order, so there’s always a bit of a wait, but it’s worth it! You can also order in advance to make it a little more streamlined. Chubby Ducks Donair, Kebab & Poutine 4122 Village Green Unit 9, Whistler, BC V0N 1B4 Open: 11am - 2:30amProvisions
This is a newer fast-casual cafe slash restaurant brought to Whistler by the Toptable group, who also behind Araxi and Bar Oso. It’s an all-day neighborhood cafe with 30 seats that seems perpetually busy. It’s a pretty cute scene, but with that comes the inevitable fight for table seats. I think they intended it to be more of a takeout store, but Whistler has been dying for a cozy, while away the day cafe and it looks like all of the people who don’t ski like to hang out here to peep the scene. That being said, they do great coffee and pastries, so hop in, grab some, and wander around the Village for the ultimate Whistler experience. Provisions 4222 Village Square Unit 120, Whistler, BC V0N 1B4 Open: M-Th 8 am-5 pm, F-S 7:30 am - 5 pm% Arabica Whistler Village
If you’re looking for an aesthetic coffee shop AND good coffee, a stop at % Arabica is a must. Straight from Kyoto, the Whistler location is the first on this side of Canada, with the other two locations in Toronto. % Arabica is cult classic coffee shop in Japan and they’ve brought that success to the rest of the world. Their custom-made espresso machines combined with proprietary coffee blend that has notes of chocolate, nuts, caramel, and wine. The shop itself is sleek, white, and reminiscent of an ice cave, which is exactly what % Arabica was going for. Try their specialty lattes, each which mixes a different coffee blend or single origin bean, amount of sweetness and condensed milk. % Arabica Whistler Village 4295 Blackcomb Way #123, Whistler, BC V0N 1B4 Open: 8 am - 6 pmPortobello
Located in the Upper Village, inside the gorgeous Fairmont Whistler, Portobello is a hidden gem for daytime dining. They have a large cozy room with plenty of large tables for groups and corners to tuck away in. Breakfast and lunch are the times to hit up Portobello, they have a huge amount of freshly baked pastries and construct your own breakfast bowls or sandwiches. During high season, they also open at night with a Smokehouse dinner where they have juicy brisket and a variety of sides including mac and cheese. Portobello 4599 Chateau Blvd, Whistler, BC V0N 1B4 Open: S-Th 7 am - 3 pm, F-S 7 am - 3 pm; 5 - 8:30 pmSplitz Grill
Splitz is a locals favorite and has been since what seems like forever. It’s near the main Whistler grocery store, Fresh Street Market, and while that seems like a long walk from the slopes, it really isn’t, unless you’re in your ski boots. I love it there. Just a classic, mountain burger joint, no fuss, no muss. They have TVs where you can request to watch your favorite team’s games as well as beer on tap. The burgers are juicy and made to order, with plenty of customization options and their fries are crispy and hot. Mike always gets a burger and I always get chicken strips because chicken strips and skiing just go hand in hand in my mind. Splitz Grill 4369 Main St, Whistler, BC V0N 1B4 Open: S-Th 11 am - 9 pm; F-S 11am - 10pm That's it for now! If you're interested in reading and/or eating more, check out our Five Best Restaurants in Whistler. Read More →
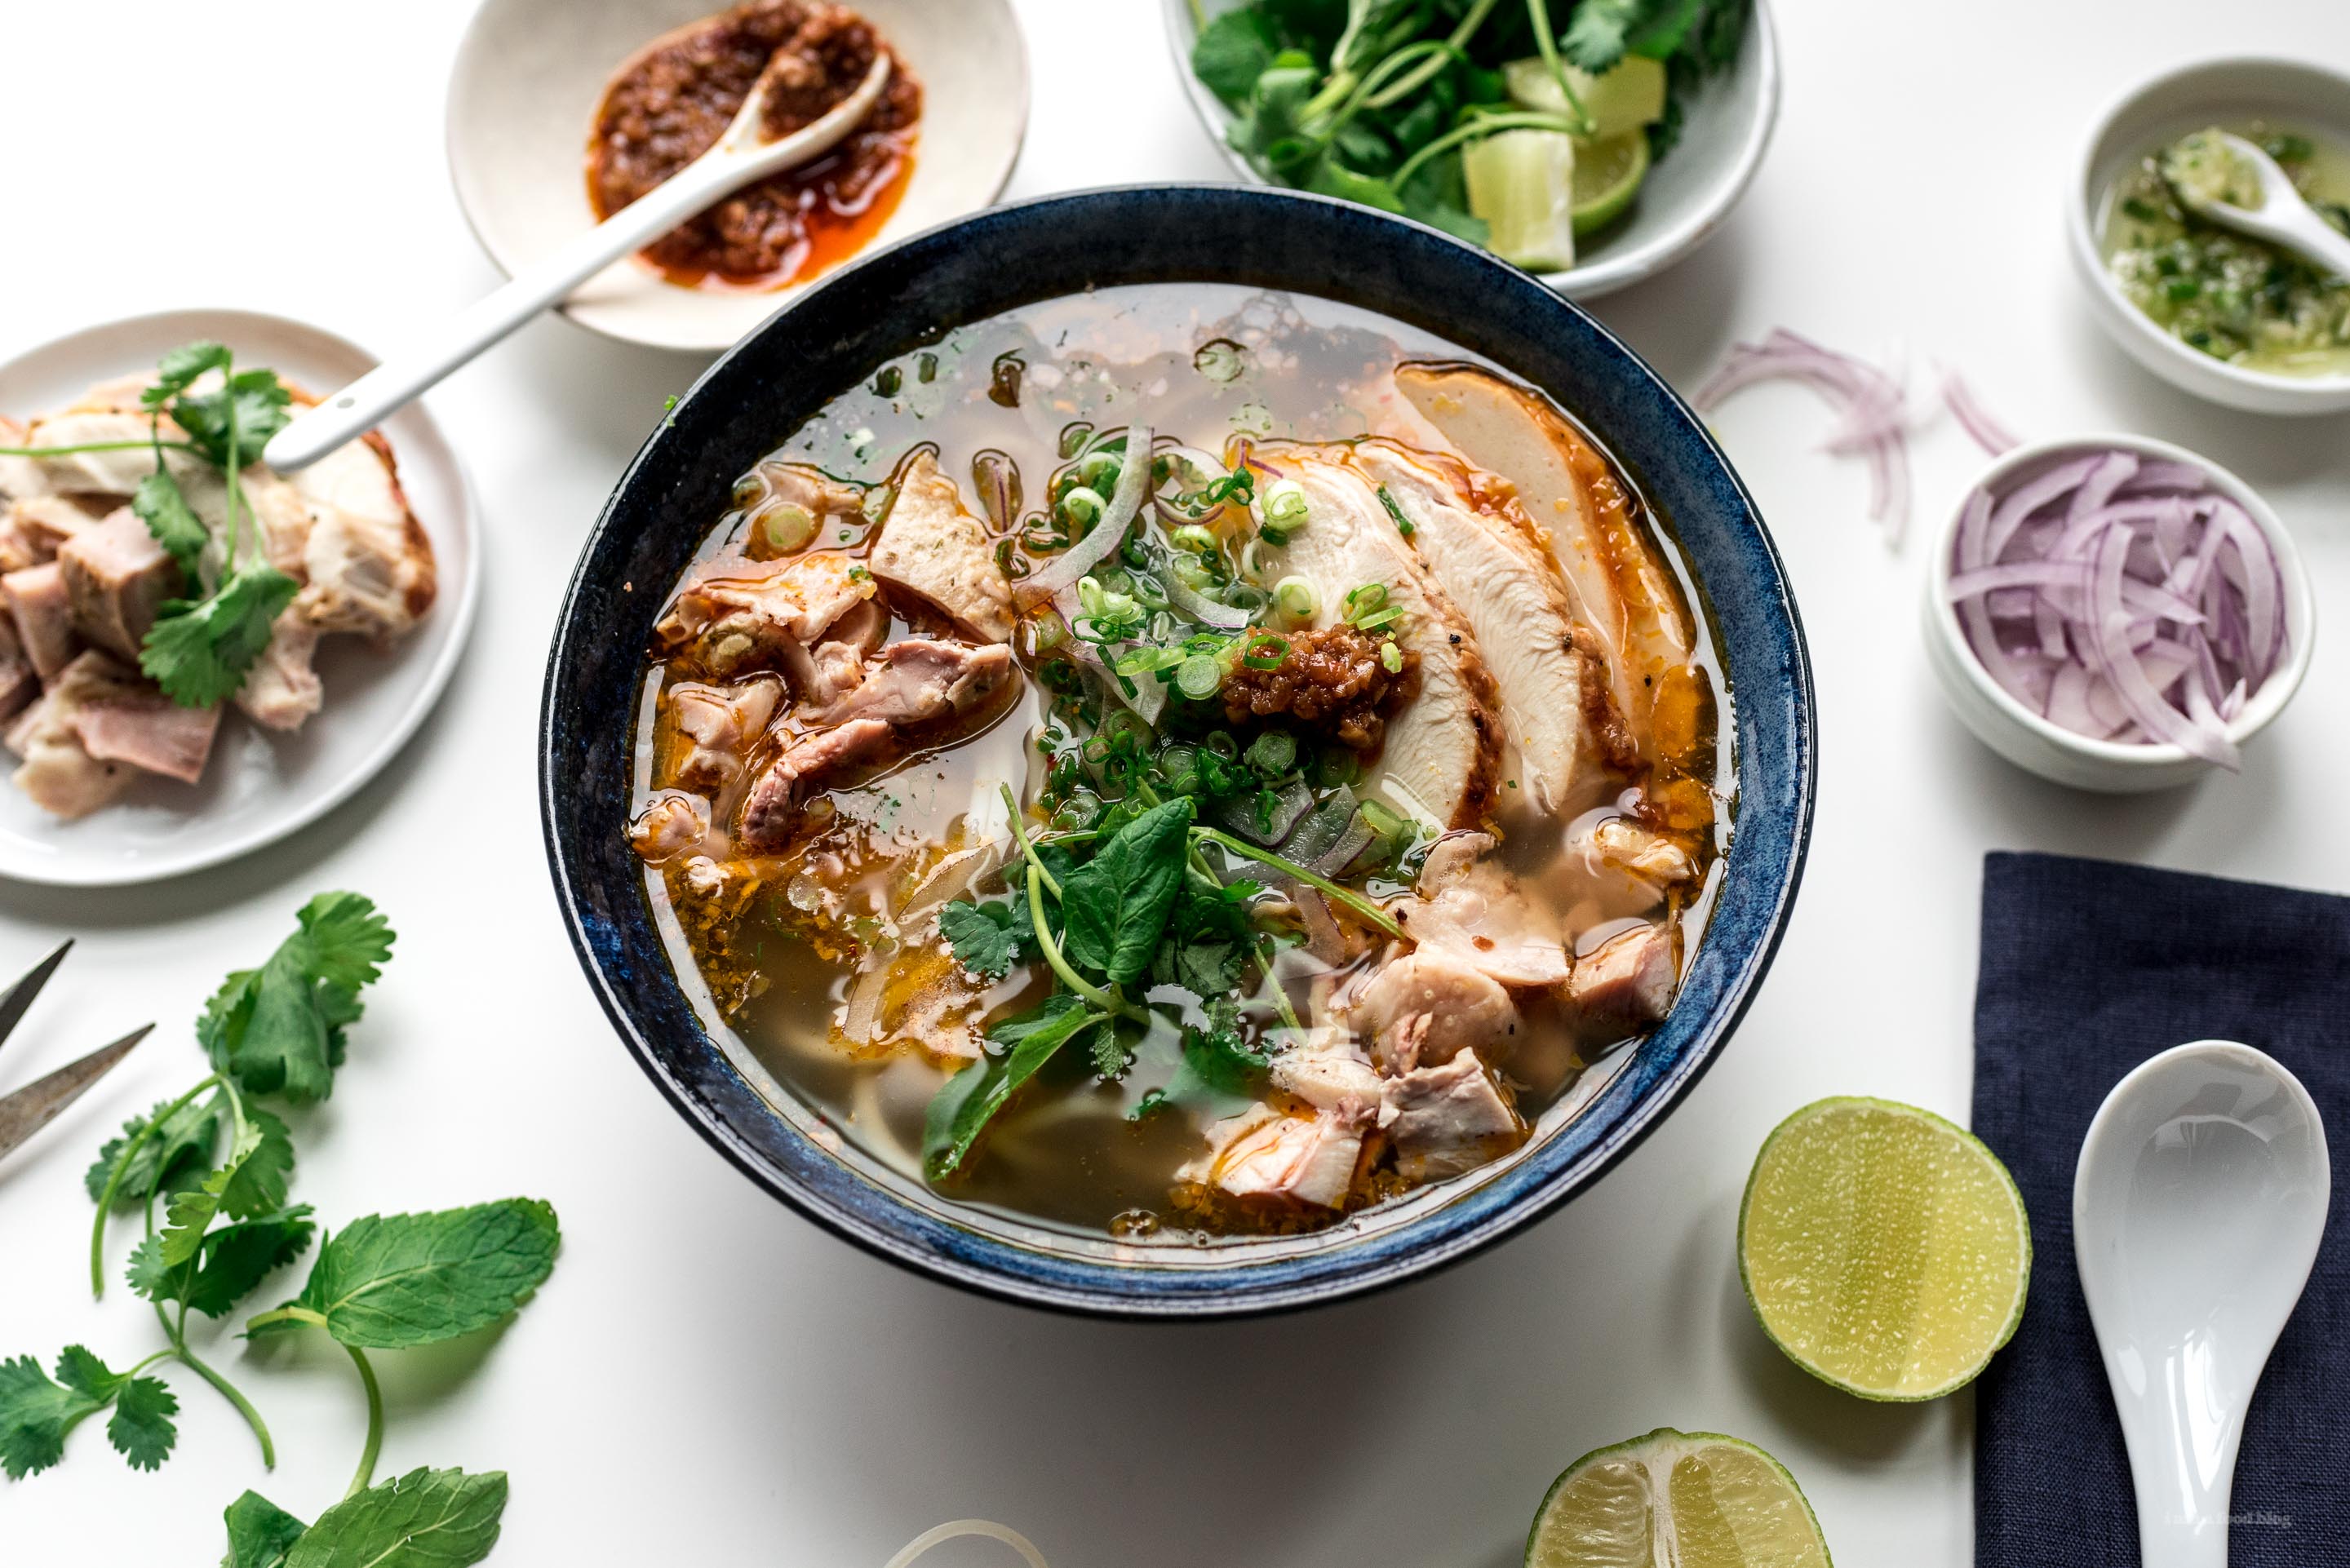
I Am... Swedish Meatballs
Real deal Swedish meatballs, just like in Sweden. A couple of years ago Mike and went to Sweden and the number one item on my Swedish bucket list was eating real Swedish meatballs. We went to a little place called Bakfickan, tucked into a corner of the Royal Swedish Opera House in Stockholm. The meatballs were unreal. They were and still are one of my all time favorite food memories. They were so good we went back the very next day. Super juicy and bursting with meaty flavor, served up with the creamiest mashed potatoes, a rich creamy gravy, lightly picked cucumbers, and freshly crushed lingonberries. Every bite was a revelation. If you like, you can read more about our trip to Sweden here.
How to make Swedish meatballs
- Sauté the onions - cook the onions until just soft in a bit of butter.
- Mix the meatballs - throughly mix together ground pork, ground beef, eggs, panko, salt, pepper, nutmeg, and the cooked onions.
- Make the meatballs - shape into 1 inch meatballs, tightly rolling so they are nice and round.
- Cook the meatballs - melt a bit of butter in a non-stick pan and add the meatballs, cooking in batches, making sure to shake the pan so the meatballs stay round.
- Make the sauce - in the same pan as you cooked the meatballs, melt a bit of butter and stir in some flour. Whisk in beef stock and cream and simmer until slightly thick. Season with a dash of soy sauce (it’s traditional!), salt and pepper.
- Enjoy! - make a meatball plate with the meatballs, gravy, mashed potatoes, thinly sliced cucumbers, and lingonberry sauce.
Ingredients
Swedish meatballs have some pretty standard ingredients: diced onions, ground pork, ground beef, eggs, panko, salt, and pepper, and nutmeg.- Onions - the finer you dice your onions, the more uniform and pretty your meatballs will be. If you have a food processor, feel free to pop them in and give them a whirl.
- Eggs - eggs are the binder that help keep the meatballs together. Panko - I like using panko as the breadcrumbs because panko is larger and flakier than regular breadcrumbs. Meatballs made with panko are lighter than meatballs made with regular breadcrumbs.
- Nutmeg - there’s just a tiny hint of nutmeg in these guys. They give the meatballs an authentic Swedish flavor with just a background hint of warmth.
Swedish meatball sauce
The creamy sauce makes these meatballs next level, but did you know that apparently (according to the internet anyway) Swedish people traditionally did not eat their meatballs with meatball sauce!??! Now, thanks to Ikea, everyone thinks Swedish meatballs come with a creamy brown sauce and to be honest, even the meatballs we had in Sweden did. The sauce is almost the best part?! Swedish meatball sauce is super simple, a butter and flour roux with beef stock and cream, finished off with a tiny bit of soy sauce for color and a touch of umami. I got the soy sauce trick from all the Swedish youtube cooking shows we watched. It’s a sauce game changer.Tips and tricks
- Shape hard. Don’t be gentle when shaping these meatballs. Unlike giant, super tender, fall apart meatballs you get in tomato sauce, the key to the roundness of Swedish meatballs is the fact that they’re compacted enough to be firm on the outside and tender on the inside. Use a cookie scoop to help you portion out the right amount, then roll the balls between the palms of your hand and toss the them back and forth so they come out perfectly round.
- Use non-stick. Using a non-stick pan helps keep your meatballs nice and round. Non-stick gives you the freedom to shake and roll the meatballs while they’re still raw, before they form a crust. If you use a regular stick pan, you’ll have to brown the meatballs before they release and by the time they’re ready, they’ll have slumped down due to heat and gravity and be vaguely lopsided.
- Fry in butter. Frying in butter gives you so much more flavor. I don’t typically fry things in just butter because it has the tendency to get too hot and scorch, but it’s they way they do it in Sweden and trust me when I say, it makes so much sense.
What are Swedish meatballs?
Swedish meatballs are, you guessed it, meatballs, from Sweden. They’re called köttbullar, which means meat buns, literally the cutest name ever. Swedish meatballs tend to be on the smaller side and are made with a mix of beef and pork, simply seasoned with salt and pepper and a touch of nutmeg.Are Swedish meatballs Swedish?
Yes! Swedish meatballs are definitely Swedish and they’re eaten on the regular over in Sweden, both as an everyday meal and sometimes as a special one on holidays such as Christmas.What's special about Swedish meatballs?
Everyone knows about Swedish meatballs from Ikea - Ikea meatballs are pretty famous. I mean, Mike and I used to go to Ikea just to eat the meatballs. And I admit, I’ve bought a frozen bag or three before. But now that I have this Swedish meatball recipe in my back pocket, no more!Swedish meatballs are super savory and full of deliciousness. They’re crisp on the outside with a buttery-meaty crust and tender and soft on the inside. When you bite into them, the juices flood your mouth with flavor and everything is right with the world.
By the way, I’m pretty sure the secret to why Swedish meatballs are so good is the fact that they’re fried in butter. Mike and I watched hours of youtube cooking videos - in Swedish, with subtitles - and all of them stressed the importance of frying your meatballs in butter, in a non-stick pan (more on that later), as well as shaping the meatballs aggressively.What to serve with Swedish meatballs
Swedish meatball plates usually come with creamy brown sauce, mashed potatoes, lightly pickled cucumbers, and lingonberry sauce. I hope you try this recipe. It’s truly one of my favorites. And if you do, please do like the Swedish do and get a little bit of everything in one bite: a meatball, a bit of mash, some gravy, cucumber, and lingonberry. It’ll be like that moment in Ratatouille when Remy gets the fireworks from combining flavors. Swedish meatballs and mashed potatoes forever, xoxo steph PS - If you want to read more about my love for Swedish meatballs, please visit this post!Swedish Meatballs Recipe
Real deal Swedish meatballs, just like in Sweden.
- 2-4 tbsp butter
- 1/2 medium onion (finely diced, about 1/2 cup)
- 1 lb ground pork
- 1 lb ground beef
- 2 eggs (lightly beaten)
- 1/2 cup panko
- 1 tsp salt
- 1 tsp freshly ground pepper
- 1/4 tsp freshly grated nutmeg
Cream Sauce
- 2 tbsp butter
- 2 tbsp flour
- 1 cup beef stock
- 1/2 cup heavy cream
- 1 tsp soy sauce
- salt and freshly ground pepper
Melt 1 tablespoon of butter in a large non-stick frying pan and sauté the onions. When the onions are soft and translucent, move the pan off the heat and allow the onions to cool.
Combine pork, beef, eggs, panko, salt, pepper, and nutmeg in a large bowl. When the onions are slightly cooled, add to the mix then use your hands to mix everything throughly.
Shape into 1 inch meatballs, being sure to tightly roll them around so they keep their round shape. Place meatballs on a plate or tray.
Over medium heat, melt 1-2 tablespoons of butter in the same pan that you cooked the onions in. When hot, add meatballs to the pan, cooking in batches without overcrowding. Immediately shake the pan as you add a batch of meatballs to ensure the balls roll around and maintain their meatball shape.
Fry, shaking the pan every so often, until meatballs are golden brown and cooked through. Remove the meatballs from the pan as they cook.
When all the meatballs are cooked, make the sauce: Add 2 tablespoons of butter to the pan and melt over medium heat. Sprinkle on the flour, whisk and cook for 1-2 minutes. Slowly whisk in the beef stock and cream and cook, whisking constantly, until the sauce starts to thicken. Taste and season with salt, pepper, and soy sauce if using.
Serve the meatballs with the cream sauce, cucumbers, and lingonberry jam.
adapted from Swedish Food and Say It in Swedish
If you don’t mind slightly flattened meatballs, just let the meatballs sear, no shaking needed.
Makes about 40 meatballs, roughly 10 per person.
Estimated nutrition is for meatballs and sauce only.

I Am... Coziest Homemade Hot Chocolate Bombs
It's hot chocolate bombs season! It’s super cute and fun and you can make SO many flavor variations! They sell hot chocolate bombs/hot chocolate balls at the store, but around here I haven’t seen any so I decided to make my own. You can too, but you need to get the right molds before it's too late.
What is a hot chocolate bomb?
Hot chocolate bombs or hot cocoa bombs are cute lil balls of chocolate that you put into a mug. When you pour hot milk into the mug, the chocolate melts and magically releases the marshmallows and cocoa hiding inside.What you need to make homemade hot chocolate bombs
- chocolate
- half circle baking mold
- hot cocoa mix
- marshmallows
How to make homemade hot chocolate bombs
- Melt your chocolate. Use the microwave to melt the chocolate melts or chocolate stirring in between until everything is smooth and pourable.
- Fill the molds. Scoop some chocolate into the mold and use the back of a spoon or pastry brush to push the melted chocolate around the molds, making it thick enough along the sides and edges. Pop the molds into the freezer for 5-10 minutes to set.
- Remove the chocolate from the molds. Gently push the half spheres out of the silicone mold.
- Melt the edges. Microwave a microwave safe plate for a minute, you want the plate to be just hot enough to melt the chocolate. Pick up the empty half of the chocolate bomb and place it on the warm plate for a couple of seconds, just until it melts.
- Fill. Add 1 tablespoon hot cocoa powder and mini marshmallows (and any other add-ins you want) to half of the spheres. Pick up another half and melt the edge on the warm plate then push the two sides together to seal.
- Decorate. Drizzle on some extra chocolate, decorate with crushed cookies, candy, or sprinkles!
For snowman hot chocolate bombs:
- Melt some white chocolate.
- Make the spheres as outlined above.
- Fill with hot chocolate mix and marshmallows.
- Seal the hot chocolate bombs.
- Pipe on eyes and a mouth with melted chocolate.
- Pipe on an orange nose with orange candy melts and enjoy!
For peppermint hot chocolate bombs:
- Melt some white chocolate
- Make the spheres as outlined above.
- Fill with peppermint hot chocolate mix and marshmallows.
- Seal the hot chocolate bombs.
- Drizzle with extra white chocolate.
- Sprinkle on crushed candy canes and enjoy!
What if I don’t have a silicone mold?
Don’t worry, you can still make chocolate bombs without a mold! You can wrap eggs in plastic wrap dip them and let them set. They don’t end up completely round, but it still works.Which mold should I get for hot chocolate bombs?
The best mold for is a half sphere silicone mold. You can easily push the mold to pop the chocolate out. Silicone molds are cheap (compared to professional acrylic molds) and easy to use. The molds I use are 2 inches, but you can use up to 2.5 inches.What chocolate can I use for hot chocolate bombs?
I went the easy route and melted down chocolate chips, but you can also use candy melts which are easy to work with but don’t taste as good. There is also chocolate called couverture chocolate which is formulated to be easy to melt and set.How can I tell if my chocolate is high quality?
Take a look at the ingredients. You’ll want a chocolate with 65% or more cocoa. The cocoa percentage that you see on chocolate packaging tells you how much of the chocolate is made from actual cocoa beans. Your chocolate should also have cocoa butter in it, which creates the melting quality of chocolate. Couverture chocolate (as I mentioned above) has a high percentage of cocoa butter, which is why it melts smoothly making it an excellent chocolate for making hot chocolate bombs.Help! My hot chocolate spheres keep breaking!
If your spheres keep breaking, you want to double check three things:- How you melted your chocolate/chocolate tempering.
- The edges.
- How long you let it set.
How to temper chocolate
Tempering chocolate is a fancy way of saying melting chocolate, but it’s a bit more than just melting, it’s making sure that it doesn’t get too hot. If you don’t temper chocolate properly, it will melt at room temperature, it doesn’t really hold it’s shape, and it’s as shiny. Here’s how to temper chocolate.- Chop your chocolate. Chopping up your chocolate with a knife makes sure all the pieces are small - smaller pieces means it melts more evenly. If you get couverture chocolate, it will come in wafers, you don’t need to chop this.
- Put the chocolate in a heat safe bowl and microwave for 30 seconds. It won’t look melted but don’t put it in for any longer! Use a rubber spatula to move the pieces of chocolate around. Some of the chocolate will be more melty and you’re going to use that heat to help melt the rest of the chocolate. Once you’ve stirred, it’s time to put it back in the microwave.
- Microwave the bowl again for 15 seconds, then remove and stir from the outside in. The outside pieces of chocolate will be more melted than the inside. Use the heat from the outside chocolate to help melt the pieces in the middle. If you have an instant read thermometer, check to see if your chocolate is between 88-90°F. That is the ideal range for tempering chocolate.
- If your chocolate isn’t smooth yet, microwave it again for 15 seconds and stir. Keep stirring until all the chocolate is melted and smooth. It’s best to underheat the chocolate because the residual heat from the bowl and the rest of the chocolate will help you will the melting.
- Spoon a bit of your smooth tempered chocolate onto a piece of parchment and put it in the fridge for 5 minutes. If it looks shiny and snaps when you break it in half, your chocolate has been tempered properly!
What if I heated up my chocolate too much?
If your chocolate is bendy and doesn’t snap when you do the test in the fridge, it’s okay! Just add some more chopped chocolate to the bowl with your melted chocolate and stir it until it melts. Aim for 90°F and then do the fridge and snap test again.How to temper chocolate on the stove/How to temper chocolate without a microwave
To temper chocolate on the stove:- Chop your chocolate into small pieces
- Make a double boiler by placing a heat proof bowl on top of a small pot. Fill the pot with just an inch or two of water, making sure the bowl does not touch the water. Turn the heat on to low.
- Add 2/3 of chopped chocolate to the bowl and stir, while the steam from the simmering water melts the chocolate.
- When the chocolate is smooth and melted, carefully remove it from the double boiler and stir in the remaining chocolate. This will help the melted chocolate cool down to the right temperature, 88-90°F.
How to fill the molds for hot chocolate bombs
If you’re having problems with your spheres breaking or not releasing, I have tips!- Clean your mold. Use a lint free-paper towel and make sure the inside of your silicone mold is nice and shiny. If there’s lint it in it or any residue it will come out on your chocolate.
- Use a (clean) paint brush. I used the back of a spoon to push the chocolate around but if you use a paint brush you’ll have a lot more control. Paint the inside of the mold generously, let set for 5 minutes in the fridge, then apply a second coat being sure to paint extra along the edges so they edges are reinforced.
- Make sure you let the chocolate set enough in the fridge. When the chocolate is set, it will be shiny and snappy and release easily from the molds.
Can I make hot chocolate bombs in advance?
Yes, you can absolutely make hot chocolate bombs in advance. If you temper the chocolate properly (read the chocolate tempering tricks), you can make hot chocolate bombs well in advance.How long do hot chocolate bombs last for?
All the ingredients in hot chocolate bombs are shelf stable and they will keep, if tempered properly, on the countertop almost indefinitely, if they last that long. Think of them like a chocolate bar – chocolate bars last a really long time!How to store hot chocolate bombs
The best way to store hot chocolate bombs, after they have been made is at room temp in an air tight container.Hot chocolate bomb flavors
I love hot chocolate bombs because you can go wild with the flavors. Try these ones!- Oreo - place some crushed up oreos inside and on the outside for decoration.
- S’mores - crush some graham crackers for inside the bomb and on top for decoration.
- Peppermint - crush up some peppermint candies for inside the bomb and on top for decoration.
- Pumpkin - put a teaspoon of pumpkin spice in with the hot chocolate mix and sprinkle some on top.
- Coffee - add a teaspoon of instant coffee to the inside of the bomb.
- Dark chocolate sea salt - sprinkle on some flaky sea salt.
Tips
- Don’t overheat the chocolate! Take your time and microwave in 15 second intervals.
- Make sure you have enough chocolate on the edges of your mold so the molds don’t break when you take them out.
- If you need to, add more chocolate to the edges then let set again.
- Use food safe gloves while you’re assembling so you don’t accidentally melt the outsides or leave fingerprints on your hot chocolate bombs.
- Keep your place cold or run your hands under cold water for a while, the heat of your hands will make the chocolate melt.
- Be gentle when sealing the bombs together, don’t push too hard.
- Use your (gloved) finger to gently rub along the seam where the two halves come together to smooth it out.
- To store the hot chocolate bombs, keep them in an air tight container in a cool spot in your kitchen or in the fridge
Even more tips!
If you’re having problems with your spheres breaking or not releasing, I have even more tips!- Clean your mold. Use a paper towel and make sure the inside of your silicone mold is nice and shiny. If there’s lint it in it or any residue it will come out on your chocolate.
- Use a (clean) paint brush. I used the back of a spoon to push the chocolate around but if you use a paint brush you’ll have a lot more control. Paint the inside of the mold generously, let set for 5 minutes in the fridge, then apply a second coat being sure to paint extra along the edges so they edges are reinforced.
- Make sure you let the chocolate set long enough in the fridge. When the chocolate is set, it will be shiny and snappy and release easily from the molds.
Will it be chocolate-y enough?
Some of you are worried that there won’t be enough hot chocolate mix inside the the hot chooclate bomb. The outside of the bomb melts down and adds a HUGE chocolate hit. You can also add hot chocolate instead of milk to melt your hot chocolate bomb if you want a double hot chocolate!How to temper chocolate
Quick and easy tempered chocolate via the seeding method Tempered chocolate is what you want for hot chocolate bombs - it’s what will make them shelf stable with a shiny finish and a consistent snap. I’ve mentioned several other ways to temper chocolate in this post, but if you’re still having trouble, this is a foolproof way called “seeding” that doesn’t need a thermometer. First, melt two thirds of your chocolate, either in a heatproof bowl set over a pot of simmering water, or in the microwave for 30 seconds. Melt the chocolate completely but don’t burn it - the chocolate shouldn’t be hot on your fingertip. Stir the melted chocolate and add the remaining chocolate into the warm chocolate in three batches, stirring completely after each addition. Continue stirring until the chocolate is smooth and shiny. Test by swooshing a bit of chocolate on a piece of parchment paper - it should start to set immediately. If it doesn’t, add a bit more solid chocolate to your melted chocolate bowl until it sets when you test it.My recommended chocolate for hot chocolate bombs
I like using Ghirardelli melting chocolate wafers. I find that they temper easily and set really well. xoxo -stephHot Chocolate Bombs
When you pour hot milk over these hot chocolate bombs, they melt and magically release the marshmallows and cocoa hiding inside.
- half circle silicone mold
- 1 cup chocolate chips (or melting chocolate wafers)
- 4 tbsp hot cocoa mix
- 4 tbsp mini marshmallows
Melt the chocolate in a glass bowl in the microwave. Use 15 second bursts, stirring in between until everything is smooth and pourable. It will take about 1-2 minutes.
Scoop some chocolate into the mold and use the back of a spoon or pastry brush to push the melted chocolate around the molds, making it thick enough along the sides and edges.
Place the molds into the freezer for 5-10 minutes or in the fridge for 30 minutes to set. A couple of minutes into them setting, take them out and brush/spoon extra chocolate on the top edges to make it thicker. Let set completely, then carefully pop the chocolate dome out of the mold and set aside on a cold plate.
Microwave an empty plate for 30 seconds to 1 minute, until warm, but not hot. Take one chocolate dome and place it on the plate for a couple of seconds to melt the edges. Working quickly, flip it around and add 1 tablespoon hot cocoa powder and mini marshmallows and any other add-ins you want.
Take another dome and melt its edge on the warm plate. Join the two domes together into a sphere and hold until sealed. Let set in the fridge or freezer while you make the rest of your spheres.
To serve: Put into a mug, pour on warm milk (or hot chocolate!) and watch the magic! Stir everything up and enjoy.

I Am... Coconut Chicken Curry
Coconut chicken curry is one of my all time favorite comfort foods, especially this version: Malaysian-ish coconut curry chicken. The saucy, coconutty curry sauce spooned onto rice is so, so good. This is my ultimate chicken curry: flavorful and savory, with a hint of spice and a coconutty base; tender, large, juicy pieces of chicken; soft and tender potatoes that still hold their shape; and a sauce thick enough to coat a spoon but not so thick that it doesn’t flow over rice easily.
This chicken curry recipe is the best of all worlds
This curry is a mix of Malaysian, Singaporean, and Indonesian styles. It’s thickened with coconut milk, seasoned with fish sauce, and scented with lemongrass, star anise, and cinnamon. A flavor bomb of savory with just a hint of sweet and spice. It’s 100% a labor of love: hand pounded aromatics, a custom mix of spices, and a slow gentle simmer, long enough for the oils to separate out and float on top for those glorious pools of seasoned oil on top of the saucy yet thick coconut curry sauce.How to make coconut chicken curry
- Make the curry paste. Crush all lemongrass, garlic, shallots, ginger, and Thai chilis together with a mortar and pestle. You can use a food processor too. Stir in the curry powder, turmeric, chili flakes, and a bit of oil.
- Marinate. Let the chicken absorb ALL the flavors. Longer is better, but at least 30 minutes.
- Sear. Give the chicken skin a nice golden sear. This also fries the curry paste a bit to bring out the flavors.
- Simmer. Simmer everything together until the chicken is juicy and cooked through and the potatoes are nice and tender, about 1 hour.
Chicken curry ingredients
It looks like you need a lot for this chicken curry, and I’m not going to lie, the ingredient list is on the longer side, but it’s well worth the shopping and time investment. Along with the standard chicken, potatoes, garlic, ginger, coconut milk, and chicken stock, you’re going to need the following:- Lemongrass – These days you can find lemongrass paste at the grocery store, but the flavor difference between chopping your own and store bought is intensely different. It’s better to stick with fresh lemongrass: just pull out your favorite knife and go to town.
- Shallots – Shallots are going to add a bit of extra sweetness and onion flavor without onions. They’re sweet and mild and used extensively in Southeast Asian food.
- Curry Powder – Try to buy a Malaysian curry powder mix from an Asian grocery store but if you can’t, regular curry powder will do.
- Turmeric – A bit of turmeric goes a long way. It’s healthy, earthy, and adds a sunny orange hue to the curry. Turmeric is an absolute must for curry.
- Cinnamon stick – A whole cinnamon stick adds a bit of warmth and a bit of sweetness.
- Star anise – Use whole star anise when you’re simmering the curry, the slight licorice bitterness really compliments all the other flavors.
- Fish sauce – Instead of salt, we’re going to be using fish sauce to season. It’s rich and full of umami and really enhances the chicken flavors.
Optional
- Thai chilis – These little red peppers pack a punch. I love adding fresh chilis to curry because it brings the heat, but if you’re head adverse, you can leave these out or seed them.
- Crushed Chinese chili flakes – Really you can use any crushed chili flakes, but Chinese crushed chili flakes have less seeds and are toasted in such a way that the smokiness and pepper flavor really shines through.
- Lime leaves – These are optional because I know how difficult it can be to find fresh lime leaves. If you do find them, they will add a light citrus freshness.
The sign of a good curry
Those pools of oil on top are a sign of a really good curry, by the way, if you’re asking Malaysians or Singaporeans or Thai or Indians or anyone who knows curries. You want your coconut milk and spices to split into two: a flavorful infused oil and a rich, dense, coconut base. When your curry splits, it means that all of the excess water that was in the coconut milk has evaporated and your curry is now concentrated, leaving only the flavorful good stuff.Is this chicken curry spicy?
A good chicken curry is adaptable – you should be able to make it spicier if you’re a spice fiend, and slightly milder and sweeter if you’re looking for a comforting easy curry. If you don’t want it spicy, leaving out the fresh and dried chilies will make this a family friendly affair.Instant pot chicken curry
To make chicken curry in the instant pot instead: After the chicken has been marinated, heat up 2 tablespoons of oil in the Instant Pot insert over saute high. When the oil is hot, sear the chicken, skin side down, until golden. Flip the chicken skin side up and add the coconut milk, chicken stock, cinnamon stick, star anise, and lime leaves. Cook on high pressure for 10 minutes. Quick release when the cooking time is done and reduce the liquid on sauté high if desired.Crockpot chicken curry
To make chicken curry in a crockpot instead: After the chicken has been marinated, heat up 2 tablespoons of oil in a frying pan. When the oil is hot, sear the chicken, skin side down, until golden. Remove the chicken from the pan and add to the slow cooker. Stir in the coconut milk, chicken stock, cinnamon stick, star anise, and lime leaves. Cook on low for for 4 to 5 hours.Curry powder
If you’re feeling ambitious, you can make your own curry powder at home. You’ll need:- 2 tablespoons coriander seeds
- 1 tablespoon cumin seeds
- 2 whole cloves
- 1 tablespoon fennel seeds
- 1 tablespoon whole black pepper
- 2 inch cinnamon stick, broken into pieces
- 1 tablespoon crushed Chinese chili flakes
- 1-2 whole cardamom pods
- 5-6 dried Chinese chilis
- 3 tablespoons ground turmeric
What to serve with chicken curry
Sometimes I like to have some lime on the side to squeeze some freshness on and serving up cucumbers with this is a pro move, the fresh juicy crunchiness of a good cucumber plays nice with the spice. I hope you give this curry chicken a try. It’s near and dear to my heart. kari ayam and roti prata forever! xoxo stephCoconut Chicken Curry
Slightly spicy, coconutty and comforting Malaysian curry chicken.
Curry Paste
- 2 stalks lemongrass (sliced)
- 4 cloves garlic (minced)
- 2 shallots (peeled and chopped)
- 1 tbsp ginger (minced)
- 2 tbsp curry powder (Malaysian/SE Asian preferred)
- 1/2 tsp ground turmeric
- 1/2 tsp red pepper flakes (Chinese preferred)
- 1 Thai bird’s eye chili (sliced, optional (or more, you monster))
- 2 tbsp oil
For the Curry
- 2 tbsp oil
- 8 chicken thighs (bone-in, skin-on)
- 3-4 potatoes (small, peeled and quartered)
- 1 cinnamon stick
- 2 star anise pods
- 5 lime leaves (optional)
- 1.5 cups coconut milk
- 1/2 cup chicken stock
- 1 tbsp fish sauce
- 2 tsp brown sugar
Crush lemongrass, garlic, shallots, ginger, and Thai chilis in a mortar and pestle (or a food processor but it'll be less tasty) until it resembles a paste. Stir in curry powder, turmeric, crushed chili flakes, and 2 tablespoons oil. Coat chicken throughly with the curry paste and let marinate for 30 minutes.
In a large dutch oven, heat up another 2 tablespoons of oil and fry the chicken, skin side down, until golden. Flip the chicken skin side up and add the potatoes. Stir in coconut milk, chicken stock, cinnamon stick, star anise, and lime leaves.
Bring to a gentle simmer and cook for 1 hour, or until chicken is soft and tender. Season with fish sauce and brown sugar and enjoy!

I Am... Burr Baskets
Burr baskets are a cute little winter gift basket with cozy cute things for your loved ones! It’s coming up on December - where did the year go!? - and it’s time for Burr Baskets. I know, I know, the world is a horrible consumerist place and we’re all slaves to corporate. But, it’s the holiday season and a little cheer this year isn’t remiss, so why not make someone you love happy with a Burr Basket?
What is a burr basket?
A burr basket is a cute little winter themed gift basket, kind of like an Easter basket or a boo basket. It’s called a burr basket because, brr, it’s cold out there! To be honest, I don’t know why it’s “burr” and not “brr,” but I’m here for it. If you are on TikTok, you’ve seen them, I’m sure. And if you’re clueless on just what the heck a burr basket is, I’ve got you!What do you put in a burr basket?
Anything and everything with a cozy winter theme! Really, anything goes, but here’s a loose “recipe” just to make life easy:Basket
You’ll need a container/basket for your burr basket. You don’t need the basket to be giant, just keep in mind that everything you get should be able to fit inside. Also, you don’t need to be restricted to a basket either, you can choose a reusable tote bag too. There are a lot of cute winter themed baskets and bags out there but if you get something neutral, the basket can hang out all year round.Cozy item
Moving on to the things in the burr basket, I’d say the number one thing is something warm and cozy that is something that is both functional and cute. Something that will make the recipient of your burr basket think of you every time they use it. A quirky hoodie, a fuzzy blanket, a scarf, mittens, maybe slippers? Just make sure it’s warm and cozy.Mug
A cute holiday mug is perfect for burr baskets. Heck, you can even make a mini burr basket where the mug is the basket! There are so many winter and Christmas-y themed mugs out there. Or you can go classy and get a hand thrown ceramic mug. If your special someone isn’t a hot drinks kind of person, you can get a really like cocktail glass or even a Stanley so they can stay hydrated.Drinks
Seasonal winter tea mixes, hot chocolate mixes, coffee, or matcha all make great items to tuck into your burr basket. Maybe they’ll even share with you!Snackies/Treats
Um, wintertime is the time for ALL the holiday snackies and treats! Peppermint bark, festive holiday oreos, Christmas cereal, popcorn, all the Christmas flavored things! Just hop into the grocery store, there usually have a giant seasonal section where all the fun winter treats will be.Plushie
A cute little snuggle buddy is just the thing to tuck into your burr basket. There are so many super cute Christmas Jellycats out there, you’re sure to find one that is perfect for your loved one.Candle
Winter is the time for candlelight and scented candles. There are a bunch of quirky seasonal candles out there but just be careful because candles are a love it or hate it kind of thing. If you’re going for a candle and want to go all out, there are some candle companies out there that are considered delicious: Diptyque, Le Labo, P.F. Candle Co., Voluspa, and Mala the Brand. Scented candles are on the pricier side, but they really set the vibes.Card
Don’t forget a handwritten note in a card because that’s the true gift. Let your loved one know what you love about them, what your favorite things to do with them are, and what kind of fun things you see the two of you doing during the winter season.Homemade treat
Nothing beats a homemade treat and nothing says love like spending time in the kitchen baking up something sweet. Add in some homemade brown butter chocolate chip cookies, soft and chewy gingerbread cookies, or cinnamon sugary snickerdoodles.How to make your burr basket extra cute
- Get a big enough basket (or bag) so that everything fits inside neatly without too much extra space. Place the biggest item in the bottom of the basket - ie line the basket with the blanket or scarf.
- Remove any extraneous packaging. Take things out of the box if the box isn’t cute, peel off any price tags, take off the plastic wrap if there is any. Don’t cut off any of the tags though, just in case they might want to exchange or return something.
- Arrange. Larger items go in the back slash near the bottom and smaller items go on top and in front. Try to make it so that everything in the basket is visible from first glance.
- Bonus: grab a string of battery operated fairy lights, put the batteries in, turn them on, and arrange them around all items to make the basket look extra magical.
- Tuck the card/note in the top or at the front so it’s the first thing they open!
Amazon burr basket items to buy:
Burr baskets
- These cotton woven baskets are practical and handy, even after burr basket season is over.
- A super cute Christmas deer basket
- A lil woven guy that’s perfect for a mini burr basket
- A multipack of baskets in case you need to make more than one ;)
Cozy winter burr basket items
- Soft and plush blanket perfect for snuggling
- An extra luxurious soft blanket for those girlies who like being pampered
- The cutest santa hat wearing smilie face slippers
- Cat paw slippers for the cat lover in your life
- Fuzzy shearling slippers for those peeps who always have cold feet
- A colorful, thick, warm scarf
Burr basket mugs and cups
- Super #aesthetic ribbed mug in a smoked glass, perfect for homemade lattes in bed
- A classic Stanley camp mug for winter morning walks
- A water tumbler with a top handle in winter white
- A Japanese pottery warm your hands around it mug
- The cutest retro Christmas mug with a big red handle
- Fluffy font forward “Oh what fun” and “Ho Ho Ho” mugs
Burr basket drinks and snacks
- Holiday blend roast coffee in the cutest holiday package
- Cake batter medium roast coffee
- White chocolate peppermint bark beans or Sugar cookie coffee beans
- Spiced holiday black tea in a festive tin
- Creamy white tea with a vanilla and almond white Christmas tea
- Cinnamon spiced creamy horchata hot chocolate mix
Burr basket plushies
There are so many cute Christmas plushies out there from mini to big!- The sweetest lil candy cane
- A stuffed mug of cocoa you can hug forever
- A squishable red and white Christmas ornament!
- Don’t worry, you can cuddle this snowman all you want, it won’t melt
Burr basket cards
A burr basket is nothing without a handwritten note. Pick up a super sweet card and don’t forget to write a personalized message inside :)- The cutest card for your favorite person
- A classy Christmas card that let’s someone know all you want for Christmas is some quality time
- Classic Christmas vibes with a pop-up Charlie Brown Christmas card that has lights and music!
I Am... The Best Part of Thanksgiving is Leftovers
There are two types of people in the world: those whole live for Thanksgiving dinner and those who live for the leftovers. I always waffle between the two but I think I’m a leftovers person. I just love having food in the fridge that can easily heated up for when I’m in those hangry moods. And when I’m in the mood to make leftovers into something even better like bestovers...oh man, that’s where I like to shine. Give me all your roast turkey carcass because here I come turkey congee and turkey noodle soups! I think we all know that the best part of Thanksgiving is leftovers, right?
Read More →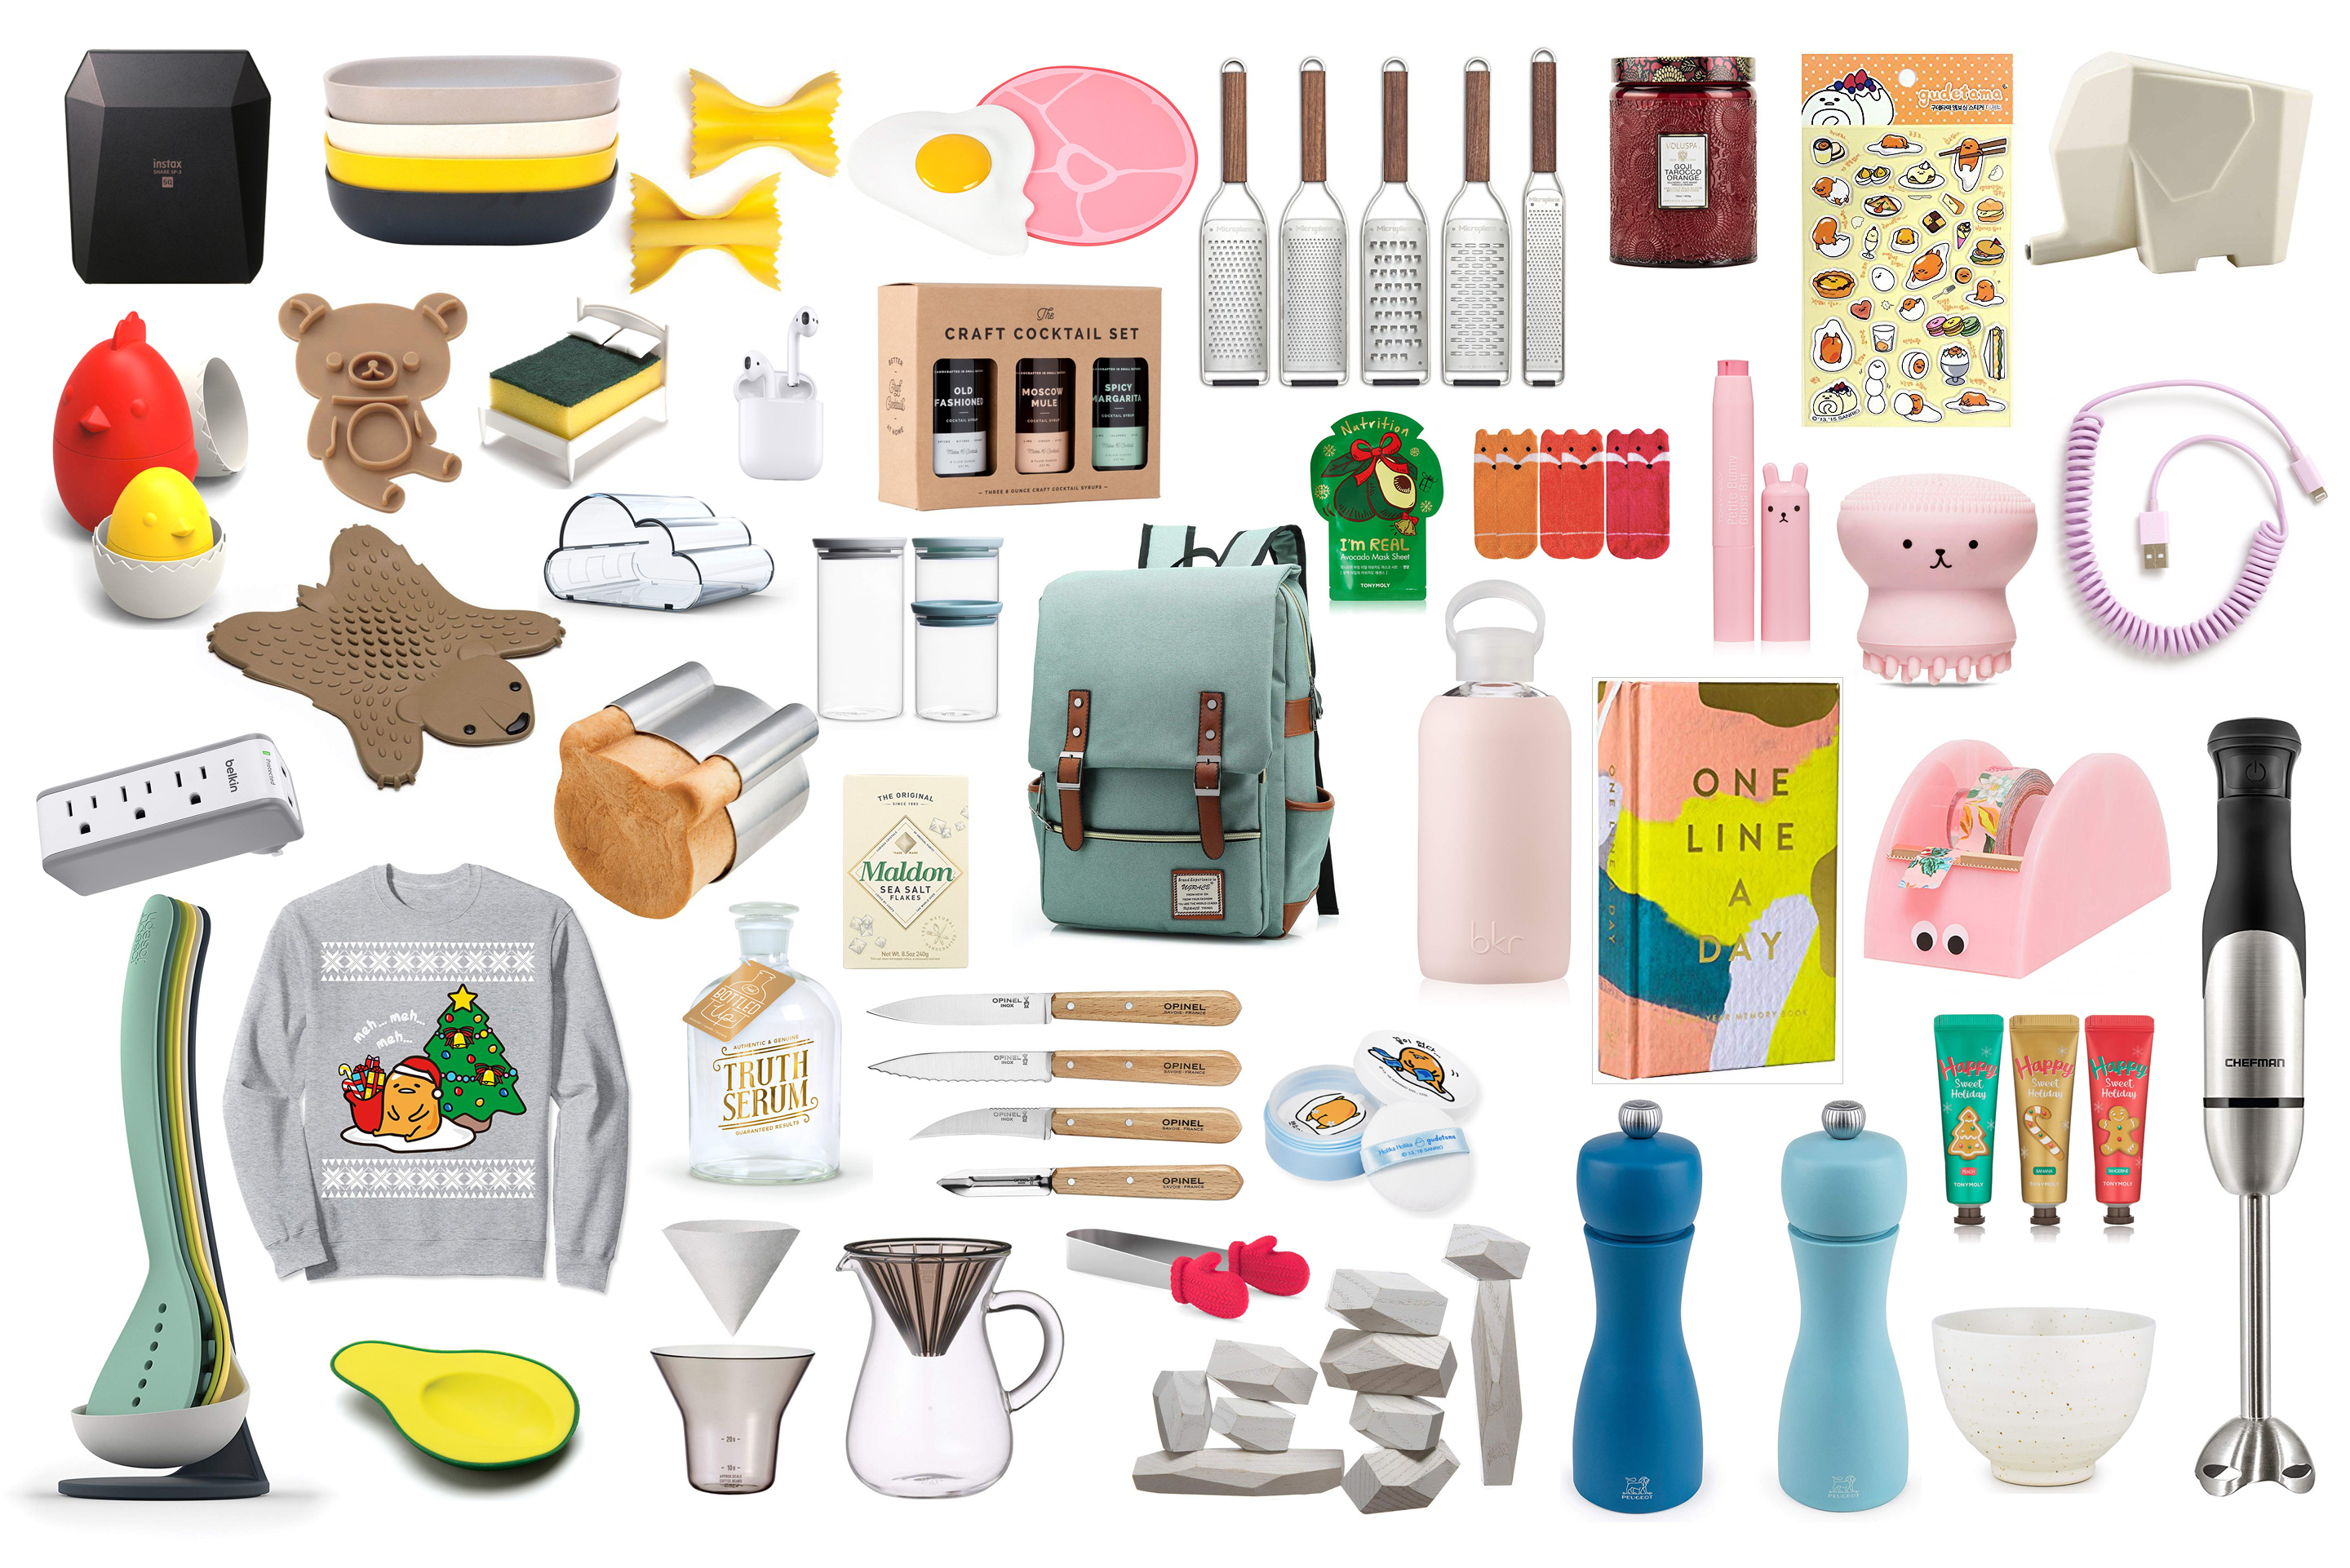
I Am... Best Black Friday Kitchen Deals
It’s time to unbutton your jeans and finally buy all the things you’ve been saving in your cart with these Black Friday kitchen deals. Black friday is the best time to stock up on basic kitchen deals and treat yourself to kitchen steals. Why not do a little early holiday shopping and treat yourself! Here are some of the best things to get for your kitchen on Black Friday/Cyber Monday:
Best Black Friday deals for home and kitchen stuff
KitchenAid Stand Mixer
The classic, classy 4.5 quart KitchenAid stand mixer is on a massive sale right now. It’s the #1 best selling in stand mixers on Amazon for a reason: it’s incredibly strong, versatile, and long lasting. If you’ve had your eye on a stand mixer, definitely take advantage!Vitamix Blenders
The gold standard in blenders is Vitamix. We love and use ours every 2 days or so and we’re not even smoothie drinkers. There are so many things blenders can do in the kitchen to make your life easier, from blending sauces to making soups. If I were to choose a new Vitamix, the 64 oz low-profile A2500 would be on my wishlist. It’s deeply discounted right now and like all Vitamix blenders, is highly rated and built to last. Check here for other Vitamix black friday deals.Instant Read Thermometer
Every home cook and kitchen NEEDS and instant read thermometer and this ThermaPro is 40% off (plus a little extra). We’ve used this exact model recently while at a friend’s house and were impressed buy the speed and accuracy. We did a side by side with a Thermapen because we’re nerdy like that. At under $15 we’re definitely grabbing one to add to our camp/travel kitchen.Staub Cast Iron Braiser
I LOVE braisers. If you’re going to have only one cast-iron pan/pot/casserole in your kitchen, it should be this one. The high sides are perfect for searing, it’s deep enough to deep-fry in, you can use it on the stove top and in the oven, and it’s beautiful enough to bring right to the table. The glass lid is just the chef’s kiss on top, allowing you to peek at what you’re cooking without opening the lid. We have this exact braiser and I reach for it all the time. I prefer the insides of Staubs compared to Le Creuset because the insides are a smooth black enamel that doesn’t stain and is easy to clean. It’s 33% off right now, run, don’t walk.COSORI Air Fryer
We love our air fryer so much that sometimes we joke about getting a fleet of air fryers that we’d keep out the countertop so we could air fry all the things at the same time. We updated to a COSORI air fryer recently and are seriously impressed with how air fryer technology has improved. Our current guy is this one which we are in love with. If you’re looking for something a little smaller, this one looks like the perfect size for a couple.Nespresso
Addicted to iced coffee? Hot coffee? Any coffee!? Yup, me too. The Nespresso Vertuo POP is 25% off right now and it makes iced coffees and espressos so you can unleash your inner barista. The POP is cute and compact and will add a splash of color to your kitchen and caffeine to your life.CAROTE Non-Stick Pots and Pans Set
Full disclosure, I haven’t tried these pans, but I’m always looking at the covetously because I love how sleek and aesthetic they are. This set is 54% off so maybe now is the time I convince Mike to get a set? They’re highly rated, non-stick, stackable, and have removable handles for ease of storage. They look like a great starter set for the kitchen or amazing for anyone who’s looking to update their non-stick cookware.KitchenAid Oven Mitts
I find one of the many things people overlook in their kitchen are oven mitts. We’re guilty of it too - our oven mitts are old. These soft silicone mitts are 47% off, wipe clean, and are rated up to 500 degrees F. Plus they come with both mittens. Did you know that sometimes you only get one?! Treat yourself to some new oven mitts. You and your hands deserve it.Peelers
Have you ever used a vegetable peeler that just isn’t sharp anymore? Is it the vegetable peeler that’s in your kitchen drawer right now? Vegetable peelers are the forgotten stepchild of kitchen tools. The joy of peeling through vegetable skins with ease is 37% off. They come with carbon steel blades and are the superior Y-shape of peelers.Kitchen Towels
If there’s one thing I absolutely loathe, it’s a lack of fresh, clean kitchen towels. They’re the workhorse of the kitchen and having a huge, clean stack is a life saver. Really, any 100% cotton dish towels will do, but this set of 6 is deeply discounted and is highly rated, so they will do nicely. Truly the best savings are on items that you would regularly purchase anyway, but now as a bonus, they’re on sale! We have a giant stack of towels (I'm talking over 30) in the kitchen and it's so nice to just be able to grab a new one when you need it without interrupting your kitchen flow. xoxo steph we may earn a smol commission from these links Read More →
I Am... Tiktok Salmon Rice Bowl
Flaky salmon, fluffy rice, soy sauce, kewpie mayo, sriracha, avocado, kimchi, and seaweed come together in the perfect Tiktok salmon rice bowl. Sometime in 2021 a Tiktok from Emily Mariko making a salmon rice bowl got viral and everyone was making salmon rice bowls. The tiktok is long forgotten now but the salmon rice bowl is still a quick and tasty snack to make. It's my fave go-to meal when we have salmon for dinner. Mike will have some fancy crispy salmon dinner and I'll have this. Emily’s Tiktok shows her flaking up leftover cooked salmon, topping it with rice from the fridge, adding an ice cube, covering it with parchment paper and warming it up in the microwave. The ice cube melts a bit and steams, making the salmon and rice moist and hot. Then, it’s just a question of adding soy sauce, kewpie mayo, and sriracha. The rice bowl finishes with slices of avocado and a side of kimchi. Open up a package of Korean seaweed/laver and use a pair of chopsticks to scoop up a bit of seaweed and rice and enjoy!
How to make a salmon rice bowl
- Flake up your cooked salmon. Use a fork and mash the salmon into flakes.
- Add the rice on top. Top off the salmon with some leftover or fresh rice.
- Nestle in an ice cube into the rice and cover everything with parchment paper and warm in the microwave until warm. The ice cube melts in the microwave and adds moisture to the salmon and rice.
- Remove the ice cube, add a drizzle of soy sauce and mix everything up. Top with mayo, sriracha, and avocado slices.
- Enjoy with roasted seaweed and kimchi!
Do you need to do all this?
This recipe is meant for leftovers, but if you're making it from scratch, you don't need to follow most of it. Honestly I just make fresh rice and air fry some salmon and go to town. Just be inspired by the essential flavors of salmon, rice, avocado, kimchi, sriracha, and mayo. And seaweed, that's the best part!What is the Tiktok salmon rice bowl?
Popularized by Emily Mariko, a Japanese American Tiktoker, the Tiktok salmon rice bowl is a rice bowl made from flaked salmon mixed with rice and soy sauce, topped with kewpie mayo, sriracha, and avocado. To enjoy it, you scoop up a bite of mixed rice with roasted seaweed and enjoy it with kimchi.Tiktok salmon rice bowl ingredients
- cooked salmon - any leftover salmon is perfect for this. You can even used canned if you don’t have a leftover salmon filet
- rice - cold rice straight from the fridge, don’t worry, it’ll get nice and fluffy when you steam it up in the microwave.
- ice cube - a single ice cube helps steam the rice and salmon. It won’t melt completely, it’ll just add a bit of moisture.
- soy sauce - add soy sauce to taste, remember to get the good stuff.
- kewpie mayo - I’m in love with kewpie mayo, it’s the best mayo out there, fight me.
- sriracha - optional but if you love spicy sushi, a squirt or two is *chef’s kiss*
- avocado - perfectly ripe slices of avocado adds a nice creaminess.
- roasted seaweed - roasted seaweed snacks are key, more on this later!
- kimchi - a bit of kimchi on the side adds acidity, crunch, flavor, and spice.
Why does this rice bowl work?
It’s the combination of flaky salmon, fluffy rice, umami filled soy sauce, and creamy kewpie mayo that works so well. If you love Japanese rice balls or onigiri, this is like eating a deconstructed onigiri. The seaweed stays nice and crispy and you can change the flavor with each bite, adding kimchi or avocado. Plus, the idea of using an ice cube to steam your leftover cold rice and salmon is genius.Is the Tiktok salmon rice bowl worth the hype?
YES! I mean, I love scooping up rice with seaweed and all the flavors work together perfectly, kind of like a deconstructed salmon kimchi sushi roll. Microwaving your salmon and rice with an ice cube and parchment paper is a game changer. I think people are in love with this recipe because it’s easy, fast, and it tastes good. It’s taking leftovers and making them into bestovers and what’s not to love about that?Which seaweed for Tiktok salmon rice bowl?
The seaweed is one of the most important parts! I like roasted Korean seaweed packs, the kind that you can grab at Whole Foods or even Costco. It’s not the same as nori or seaweed for sushi, it’s lighter, crispier, and are pleasantly salty. Conveniently, seaweed snacks are the perfect size for scooping up bites of rice and that’s how a lot of Koreans enjoy them. As with all and any Tiktok recipes there’s always a lot of controversy. It’s no different with this one. People are all over Tiktok split between saying that this is the most amazing thing that they’ve ever made and that Emily didn’t invent anything new. In the end, she’s the one who brought the world’s eyes on it so I don’t really understand why people are so salty about how they’ve eaten this at home forever. In the end, it’s a quick and easy way to make your leftovers taste amazing so thanks Emily for sharing your love for salmon rice bowls with the world!Tiktok Salmon Rice Bowl
Leftover salmon and old rice combined with soy sauce, kimchi, and mayo make the yummiest trend from Tiktok so far.
- 1/2 filet salmon (cooked, about 2 ounces)
- 1 cup cooked rice
- 1 ice cube
- 1 tbsp soy sauce (or to taste)
- 1 tbsp kewpie mayo (or to taste, sub regular mayo if needed)
- 1 tsp sriracha (or to taste, optional)
- 1/2 avocado (sliced or diced, optional)
- 1/4 cup kimchi (optional)
- 1 package roasted seaweed snack
Use a fork to flake up your salmon filet.
Top your salmon with cold rice from the fridge and nestle in one ice cube.
Cover with parchment paper and microwave for 1 to 1.5 minutes. Remove the parchment paper and any ice cube remaining.
Add soy sauce to taste and mix everything up.
Top with kewpie mayo, sriracha, and avocado slices.
Enjoy with a side of kimchi and roasted seaweed, using the seaweed to tuck it around a bite of rice. Enjoy!

I Am... A Guide to Skiing in Banff
If you’ve ever wanted to ski in a Canadian National Park, skiing in Banff is for you. Located within Banff National Park there are three distinct ski resorts: Mt Norquay, Banff Sunshine Village, and Lake Louise Ski Resort. The area is considered a must visit destination for skiers and snowboarders.
How long does the skiing season last in Banff
The season starts early and ends late. It’s one of the reasons why the area is so renowned. Running from late November to early and sometimes even late May, the snow in Banff is reliable and abundant. Once you add in the amazing scenery, you’ll understand why so many speak breathlessly about Banff.What are the three ski resorts in Banff National Park?
The three Banff ski resorts are:Banff Sunshine Village
Skiable acres - 3,358 Vertical - 3,510 ft Lifts - 12 Runs - 137 marked Ability breakdown - 20% beginner, 55% intermediate, 25% expertLake Louise Ski Resort
Skiable acres - 4,275 Vertical - 3,250 ft Lifts - 11 Runs - 164 marked Ability breakdown - 25% beginner, 45% intermediate, 30% expertMt. Norquay
Skiable acres - 190 Vertical - 1,650 ft Lifts - 6 Runs - 60 All three resorts are accessible from the town of Banff, Lake Louise Village, and the nearby town of Canmore. Best of all, Banff and Lake Louise are only a couple hours detour off the Powder Highway.Beginner, Intermediate, and Expert Skiing in Banff
If you’re skiing or boarding with a group of mixed levels, you’ll be happy to hear that all three resorts have something for everyone, from total beginner to deep and steep avalanche-gear-needed terrain.How to get to Banff for Skiing
Banff National Park is in Western Canada, boarding two provinces, BC and Alberta. It’s a mere 100 km west of Calgary and if you’re flying internationally, the Calgary airport, YYC, is the airport you’ll want to hit up. From YYC, it will take about 1.5 hours on the Trans Canada Highway (aptly named Highway 1) to reach the town of Banff. We recommend renting a car (with snow tires!), but you can also use a bus service.Do I need a parks pass for Banff when skiing?
Yes, any vehicle stopping in Banff needs a valid parks pass. You can buy it online ahead of time on the Parks website or right at the gates to the park. You can get either a Day Pass, which is best if you’re not going to be skiing for too long, or you can get a Discovery Pass which lasts for 1 year. The Day Pass cost $11 per person per day and the Discovery Pass costs $151.25 per year for a couple or family.Where to stay in Banff for Skiing
There are three main areas people stay when visiting Banff for skiing: Banff Township, Lake Louise Village, or the nearby town of Canmore. Budget-wise, it is going to be most expensive to stay in either the town of Banff or Lake Louise Village. There are a variety of choices from luxury hotels to simple motels. Banff has a lot of dining and après choices while Lake Louise Village is a bit more sleepy. Personally, we love staying in Canmore. It’s a short drive from Canmore to the park and once you’re in the park, it’s not too far to all three mountains. There are a lot more accommodations in Canmore and if you’re the kind of person who likes to have a kitchen and laundry, then there are ton of vacation rentals. We especially like the Spring Creek area. Canmore is a quaint little mountain town and decidedly less busy and touristy compared to Banff.How do you get to the Banff ski areas?
If you’re staying in Banff and you don’t have a car rental, you can take public transport or resort complimentary shuttles.How to get to Banff Sunshine Village
Banff Sunshine Village has a free daily bus from the town of Banff to the base of the resort. If you’re driving, it’s an easy drive to the base and there’s plenty of free parking. Look here for more info on how to get to Sunshine Village.How to get to Lake Louise Ski Resort
Lake Louise also offers a daily free shuttle, both from Lake Louise Village and the town of Banff. Like Sunshine Village, they have plenty of free parking if you’re driving there. For more info on Lake Louise, check here.How to get to Mt. Norquay
Just like the other two, Norquay also has a free shuttle. You can take it from the town of Banff to the Norquay base. If you have your own vehicle, there’s lots of free parking. For more about Mt. Norquay, check here.SkiBig3
What is SkiBig3?
SkiBig3 is a skiing challenge put on by Banff Tourism to encourage all ski and board visitors to go to all three mountains. You can ski all three resorts within one day, all on the Big 3 ski pass. They also have multi-day tickets for all three mountains, so you don’t actually have to go to all three mountains in one day.SkiBig3 Trifecta Callenge
Once you visit all three mountains of Banff, you can visit the Adventure Hub in Banff or Canmore and get a SkiBig3 trifecta trail sign, patch, or sticker. You also get a coupon for a free pint of beer with purchase.Are the Banff ski resorts on the IKON pass?
Yes. All three resorts are on the IKON pass and the number of days and blackout dates depend on which pass you get.Which Banff Ski Resort is Best?
Personally, out of the three, we liked Banff Sunshine Village the best. Mt Norquay is a pretty small mountain and the terrain is not really varied. We went to it just so we said we did it. The next best, after Sunshine Village, is Lake Louise. When we visited, they were in a bit of a snow drought, so the snow quality at all three mountains was questionable. That being said, we definitely saw the potential of both Sunshine Village and Lake Louise. I would say that if you like a variety of terrain, including steep, difficult off piste runs, then Sunshine Village is the place to go. It has trees, bowls, chutes, and extremely wide - literally the whole mountain wide - low to medium pitch runs. Plus, Sunshine Village has a Beaver Tails stand! There’s nothing better than a ski break with hot and fresh deep-fried dough dusted in cinnamon sugar. Oh, and you can ski between provinces on the run called The Great Divide, located on top of the Continental Divide, which boasts amazing views of Banff’s backcountry areas. Lake Louise is more known for its long, wide open groomers and cruisers. For a wide-open scenic run with views of Mount Temple, Lake Louise, and the Victoria Glacier icefields, try Charlie’s choice. It’s a gentle blue run with to-die-for views. That’s it! I hope you get a chance to ski in Banff. Banff is truly a national treasure. From the turquoise blue lakes to the snow covered peaks and quaint mountain villages, it’s a ski vacation you’ll never forget. Read More →
I Am... Cheesy Miso Stuffed Mushrooms
Stuffed mushrooms are the cutest appetizer out there, and definitely one of the most underrated holiday sides. So round, so poppable, and so delicious. I absolutely love stuffed mushrooms. They’re easy to make (and make ahead if you need to) and they’re always a hit. I love stuffed mushrooms and how infinitely customizable they are. They’re kind of like the vegetarian version of a deviled egg! I’m all about tiny bite-sized stuffed things and stuffed mushrooms fit the bill perfectly. These cheesy miso stuffed mushrooms are particularly good because they’re triple umami: mushrooms, miso, and parmesan cheese! They’re so full of flavor and satisfying.
How to make stuffed mushrooms
- Start off by washing your mushrooms. Yes, we’re going to wash them, more on that below.
- After you wash them, trim the very tip of the stem and discard, then gently break the stems from the caps.
- Place the caps on a parchment paper lined baking sheet.
- Mince the stems then sauté them in butter until golden then let cool.
- While the stems are cooling, mix together cream cheese, mayo, and a bit of white miso.
- Stir in the sautéed stems then stuff the mushrooms, topping them with parmesan.
- Bake until golden and piping hot then enjoy!
Stuffed mushroom ingredients
- mushrooms - I like using brown mushrooms because I think they’re prettier but white mushrooms are exactly the same so go with whichever you prefer. Try to choose mushrooms that are on the bigger side, but not too big, 1 - 1.5 inches.
- butter - mushrooms sautéed in butter are a dream come true. You can use oil if you don’t have butter on hand.
- cream cheese - this is what is the bulk of the creaminess in these stuffed mushrooms. It’s easier to mix if your cream cheese at room temp.
- kewpie mayo - my secret ingredient! Kewpie mayo adds extra creaminess and when you bake it, it is SO delicious. If you don't already know about it, read more about kewpie mayo here.
- white miso - white miso adds extra umami and flavor. If you don’t have any on hand and don’t want to go to the store, you can skip it, but it really boosts all the savoriness of this dish.
- parmesan - finishing with finely grated parmesan is always a pro move!
How to pick good mushrooms
I like buying mushrooms loose so I can go through and choose ones that are about the same size so they all cook at the same rate. Look for whole, intact caps without discoloration. They should feel spring-y and light, not spongy.To wash or not wash mushrooms
If you do a quick internet search on this, people are divided. Some people wash, some people don’t wash, some people peel. The reason why people don’t wash mushrooms is that they’re worried they’ll get soggy. But the truth is, like all plants, they can take a bit of a shower and be okay, especially if you’re washing them while they’re whole.How to clean mushrooms
Wash mushrooms right before you use them. Place whole mushrooms in a sieve (I use the sieve in the salad spinner basket) and use the spray function and cold water to spray off any dirt. Spin or pat dry with paper towels. Use immediately.What to serve with stuffed mushrooms
- The best green bean casserole
- Super smooth and fluffy mashed potatoes
- Garlicky parker house rolls
- Velveeta mac and cheese
- The ultimate fall kale salad
- Fool-proof super juicy turkey
Cheesy Miso Stuffed Mushrooms
Stuffed mushrooms are the cutest appetizer out there.
- 16 large mushrooms (white or brown)
- 2 tbsp butter
- 4 oz cream cheese
- 1/4 cup mayo (kewpie mayo preferred)
- 1 tbsp white miso
- 1/4 cup Parmigiano Reggiano cheese (finely grated)
- parsley (finely chopped, to finish)
Heat the oven to 400°F. Line a baking sheet with parchment paper. Trim the bottom of the stems of the mushrooms, then gently break them off. Place the mushroom caps on the prepared baking sheet.
Finely mince the mushroom stems. In a medium skillet over medium heat, melt the butter and sauté the mushroom stems until soft and golden. Remove from the heat and let cool slightly.
In a bowl, mix together the cream cheese, mayo, and white miso until smooth. Stir in the sautéed mushroom stems, taste and season with freshly ground pepper.
Scoop the filling into the mushroom caps and top with grated parmesan.
Bake for 20 minutes or until the cheese melts and the mushrooms are piping hot. Finish with parsley, remove, let cool slightly and enjoy!

I Am... Instant Pot Mashed Potatoes
These instant pot mashed potatoes are so good and so easy they're dangerous. Mashed potatoes are the ultimate comfort food and now that I have a hands off way of making them, I'm pretty sure I'm going to be eating so many potatoes that I'm going to turn into one. I love how you just set everything in one pot and you're done. Just pop your potatoes in, cook on high pressure for 7 minutes, mash, season, and eat. So simple and so good. My tip here is using a sieve (or a ricer) to push your potatoes through instead of mashing. You end up with super smooth and creamy mashed potatoes.
How to make the best instant pot mashed potatoes
- Prep the potatoes: Scrub and peel (or leave the skins on if you’re into that) the potatoes and cut into quarters.
- Place in the Instant Pot with garlic and a bit of chicken stock. Pressure cook on high for 7 minutes, then quick release.
- Mash by pushing the potatoes and garlic through a fine mesh sieve or ricer. If you like a lumpier mash, use a masher.
- Stir in room temp butter, then the milk. Taste and season with salt (and pepper if desired) and serve warm!
Instant pot mashed potato ingredients
- Potatoes: Like I mentioned above, I always use either Yukon golds or Russet potatoes. Either are a solid choice and if you like you can even mix them for the best of both worlds.
- Garlic: Who doesn’t love garlic mashed potatoes? Give it gives these potatoes a warm garlicky flavor. Feel free to increase or decrease the amount of cloves used.
- Butter: Butter is essential so use a good one - we love grass-fed butter.
- Milk or cream: I almost always use whole milk for my mash, but if you want an extra indulgent potato, use half and half or heavy cream.
- Salt: Don’t forget to season!
- Toppings: I keep it pure with just a butter pool, but chopped chives or sliced scallions look pretty and add some color and herbaceous. Cracked black pepper is always good. You can always customize as you wish and stir in cheese, top with bacon bits, and jalapeños, or everything bagel seasoning.
4 secrets to the best mashed potatoes:
1. Water is the enemy
Waterlogged potatoes mean gluey mashed potatoes. To avoid this, we’re going to steam the potatoes in the Instant Pot with just the minimal amount of liquid, which will make them fluffy, cooked through, and full of potato-y flavor.2. Season!
Season at every step. I like to steam/cook the potatoes in chicken stock so it adds an extra layer of flavor. If you don’t want to use chicken stock, you can use vegetable stock or just make sure to salt the water you cook the potatoes in. You want to season when you’re cooking the potatoes and afterwards when you add in the butter and milk so you have layers of seasoning.3. How you mash matters.
I love the way mashed potatoes taste when you push the potatoes through a fine mesh sieve. It gives you the smoothest, most luscious mashed potatoes you’ve ever eaten. But, if you like a slightly chunkier mash, use a potato masher. There are even different kinds of mashers: smooth mashers or chunky mashers depending on how you like your potatoes.4. Don’t over mix.
Once your potatoes are mashed, you want to just stir in the liquids (butter and milk or cream) without over mixing, which can lead to gummy potatoes.How much water for Instant Pot mashed potatoes?
The minimum amount of liquid Instant Pot needs for pressure cooking is 1 cup. You can use either 1 cup of chicken stock or salted water. This is a lot less liquid compared to almost all the other Instant Pot mashed potato recipes hanging out on the internet. It’s superior for two reasons.- Cooking potatoes in a large amount of water makes them water-logged and soggy, which results in less potato flavor.
- Less water means less time for the pot to come up to pressure.
How many potatoes do you need per person?
For a side serving of mashed potatoes, the general rule is: 1 medium to medium-large potato per person. Potatoes come in various sizes, but a good rule of thumb is that you’ll need a medium to medium-large potato that fits in the palm of your hand for each person. Aim for a 1/2 lb individual servings of mashed potato.Vegan Instant Pot mashed potatoes
If you’re vegan, or have guests who are, it’s super easy to make flavorful, smooth, rich mashed potatoes. Follow the recipe as below, but make these ingredient substitutions. Instead of chicken stock, cook the potatoes in 1 cups mushroom dashi stock or your favorite vegetable stock. Instead of butter, use vegan butter or white miso. Instead of milk, use your favorite milk alternative, mushroom dashi, or white miso paste mixed with water.What are the best kind of potatoes for instant pot mashed potatoes?
There are only two kinds of potatoes that are perfect for mashed potatoes: Yukon golds (my absolute favorite) and Russets.- Yukon golds are perfect for mashing because they’re starchy, beautifully yellow, and have a rich buttery potato taste. They’re also a more dense potato with a thin skin, and when you use them, you get a more luxurious mash.
- Russets (or Idaho) potatoes are those big potatoes with the dusty skin that most people use for baked potatoes. These are also excellent for mashed: fluffy, dry, and starchy, when cooked right. Russets are the more mild potato of the two potatoes I recommend and if you’re a fan of lighter potatoes, they make a mash with a more delicate texture.
Skin on or skin off?
Because I’m in the smooth mash camp, I don’t think potato skin belongs in mashed potatoes. But some people love that texture contrast. And for those people, I say, feel free to leave the skins on!What if I don’t have an Instant Pot?
You can still make these mashed potatoes, all you need to do is steam: place the cut up potatoes on a plate or in a steamer basket. Boil 1-3 inches of water in a large pot and place the potatoes in the pot. Cover and steam on medium until very tender, 30 to 35 minutes. Check this post out for more. Best mains to serve with mashed potatoes- The Best Cajun Butter Steak
- The Juiciest Baked Chicken Thighs
- One Pan Creamy Dijon Mustard Mushroom Chicken
Instant Pot Mashed Potatoes
Smooth and fluffy mashed potatoes in under 20 minutes!
- instant pot
- 2 lbs potatoes (peeled and quartered)
- 1 cup chicken stock (no sodium preferred)
- 2-4 cloves garlic (optional)
- 2 tbsp butter (or to taste)
- 1/4-1/2 cup milk (or to taste)
- salt and freshly ground pepper
Place the potatoes, chicken stock, and garlic (if using) in your Instant Pot/pressure cooker. Put the lid on, set the pressure to high and cook time to 7 minutes. Quick release the pressure when cooking time is completed.
Remove the potatoes from the liquid and mash or push through a ricer or a sieve. Optionally add a bit of the leftover chicken stock that the potatoes were cooked in for a bit more flavor.
Stir in the butter, milk, and salt and pepper to taste. Enjoy!
