
I Am... Crunchwrap
A do-it-yourself homemade crunchwrap supreme is the ultimate cheat day eat. Imagine an extra large flour tortilla topped with seasoned ground beef, melty nacho cheese, a crispy tostada shell, freshly shredded lettuce, ripe tomatoes, and cool sour cream, folded up and grilled. It’s a Taco Bell classic and it’s one of my favorite things to make and eat. I love Taco Bell. But if I’m being honest, I also love making things at home because, I dunno, it gives my life some sort of semblance of being grown up? Somehow, making dinner from scratch just feels good. It's certainly got to be healthier!
What is a crunchwrap supreme
It’s the best combination ever of crunchy and soft, savory and fresh. It’s basically a flattened burrito with a crispy crunchy tostada core. There’s seasoned beef, nacho cheese, a giant crunchy corn chip, lettuce, tomatoes, and sour cream all tucked into a flour tortilla that’s grilled. It’s SO GOOD. It’s definitely one of my guilty pleasures. Making it at home makes it not-so-guilty because, everything’s healthier when you make it at home, right? Even if you eat three of them?!A crunchy secret
The secret ingredient in a crunchwrap is the crunch. Crunchy things make you want to keep taking bite after bite and the crunch inside a crunchwrap is no exception. The crunch in a crunchwrap is a tostada, similar to a giant round tortilla chip.How to make a crunchwrap supreme
- Prep. Get all your ingredients ready. You’ll need to cook up some taco seasoned beef, make or buy nacho cheese (I bought mine), shred some lettuce, and chop some tomatoes.
- Layer. Lay a giant flour tortilla on a flat surface. Place a scoop of seasoned beef into the middle and spoon on some warm nacho cheese. Place a tostada on top and layer on sour cream, then shredded lettuce, tomatoes, and shredded cheese.
- Fold. Fold the sides of the flour tortilla up and over the filling, making a hexagon.
- Grill. Place the crunchwrap on a non-stick pan and grill until toasted, flipping once.
- Enjoy. That’s it! Enjoy your homemade crunchwrap!
How to fold a crunchwrap supreme
The end shape of a crunchwrap is a hexagon, with six sides. Take an edge of the tortilla and fold it down on to the fillings. Use one hand to hold it down in place and use your other hand to lift and fold another edge of the tortilla over the filling. Continue folding and holding until you make 6 folds, then flip the crunchwrap, seam side down onto a non-stick frying pan and lightly grill over medium heat.Ingredients
- Extra large flour tortilla. The larger your tortilla, the easier it will be to fold your crunchwrap. Go for the XL burrito size tortillas, at least 12 inches.
- Seasoned ground beef. You can use a handy seasoning packet – they even sell Taco Bell branded ones, but I’ve included a recipe that you can easily make at home with pantry spices.
- Nacho cheese. The gooey nacho cheese is a signature in a crunchwrap. If you don’t have have nacho cheese and don’t want to make it, you can used shredded. They sell nacho cheese at the store but if you want to go all out and make queso, here’s a recipe. Pro tip: keep some extra around for dipping.
- Tostada. They sell tostadas right next to the tortillas. They look like crispy fried corn tortillas because that’s what they are. You can also fry up small corn tortillas if you don’t want to buy tostadas.
- Sour cream. Sour cream is pretty self explanatory. You can also sub greek yogurt if you’re looking to be a bit healthier.
- Lettuce. I like green leaf lettuce but any shredded lettuce will do.
- Tomatoes. diced tomatoes add sweetness and juiciness.
- Shredded cheese. the shredded cheese is a bit over the top considering there’s nacho cheese, which is why Taco Bell doesn’t actually have a shredded cheese layer. But more cheese = more better!
What is a tostada?
A tostada is a small corn tortilla that’s been fried, baked, or grilled so it has a crispy crunchy texture like a tortilla chip.How to make tostadas at home
Add a bit of oil to a frying pan and heat it up over medium heat. Add a corn tortilla and fry it, until it sizzles and turns golden brown, flipping as needed. Let it cool and drain. It will become crisp and crunchy after it cools down.FAQ
What size tortillas do I need for crunchwrap supremes?
The bigger the better! An extra large tortilla, at least 12 inches in size will make it easier for you to fold up and over the fillings.What if I can’t find extra large tortillas?
If you can’t find giant flour tortillas, grab the biggest ones you can find. Get a second pack of the smallest flour tortillas. Assemble your crunch wrap and in the middle, on top of the fillings, place a small flour tortilla on top and fold the original tortilla over the fillings covered with the tortilla.What can I put inside a crunchwrap?
Absolutely anything. If you’re a fan of chicken, pork, or turkey, you can use those instead of ground beef. You can even make crunchwraps with carnitas, barbacoa, chicken tinga, al pastor, the list goes on. If you’re vegetarian you can use beans, refried beans, or tofu.Other crunchy things to add to a crunchwrap
- doritos
- flaming hot cheetos
- takis
The crunchwrap hack
Try the tiktok wrap hack if you want a slightly different (and easier) way to fold your crunchwrap. Both are good! Happy Crunching!Crunchwrap Supreme
The ultimate cheat day eat
Taco Seasoning
- 2 tsp chili powder
- 2 tsp ground cumin
- 2 tsp onion powder
- 2 tsp garlic powder
- 1 tsp paprika
- 1/4 tsp cayenne (optional)
Crunchwrap
- 1 lb ground beef (lean preferred)
- 1/2 cup tomato sauce
- 1/2 cup nacho cheese (warmed)
- 6 flour tortillas (extra large/12"/burrito sized preferred, see notes)
- 6 tostadas (or street sized corn tortillas fried until crispy)
- 1/2 cup sour cream
- 2 cup lettuce (shredded)
- 1 cup tomato (diced, about 1 large hot house )
- 1 cup cheese (shredded, Tex Mex blend preferred)
Brown the beef in a frying pan over medium high heat, breaking up, until browned and cooked through. Add the spices, tomato sauce, and 1/4 cup water. Simmer until slightly reduced but still saucy. Taste and season with salt and pepper. Set aside.
Lay out a large flour tortilla and place a scoop of the taco beef into the middle, about the size of the tostada. Scoop a generous amount of warmed nacho cheese over the beef.
Place the tostada shell on top of the beef. Spread some sour cream on top of the tostada.
Top with shredded lettuce, diced tomatoes, and shredded cheese.
Tightly fold the edges of the tortilla up and over the filling. Repeat 5 times so you have six folds and the crunchwrap is a hexagon.
Heat up 1 tsp of oil in a non-stick pan over medium heat. Add the crunchwrap, seam side down and grill until golden brown. Flip and brown the second side. Remove from the pan, slice in half and enjoy!
If you’re not using extra large tortillas, place a extra tortilla in the middle on top of the filling before folding.
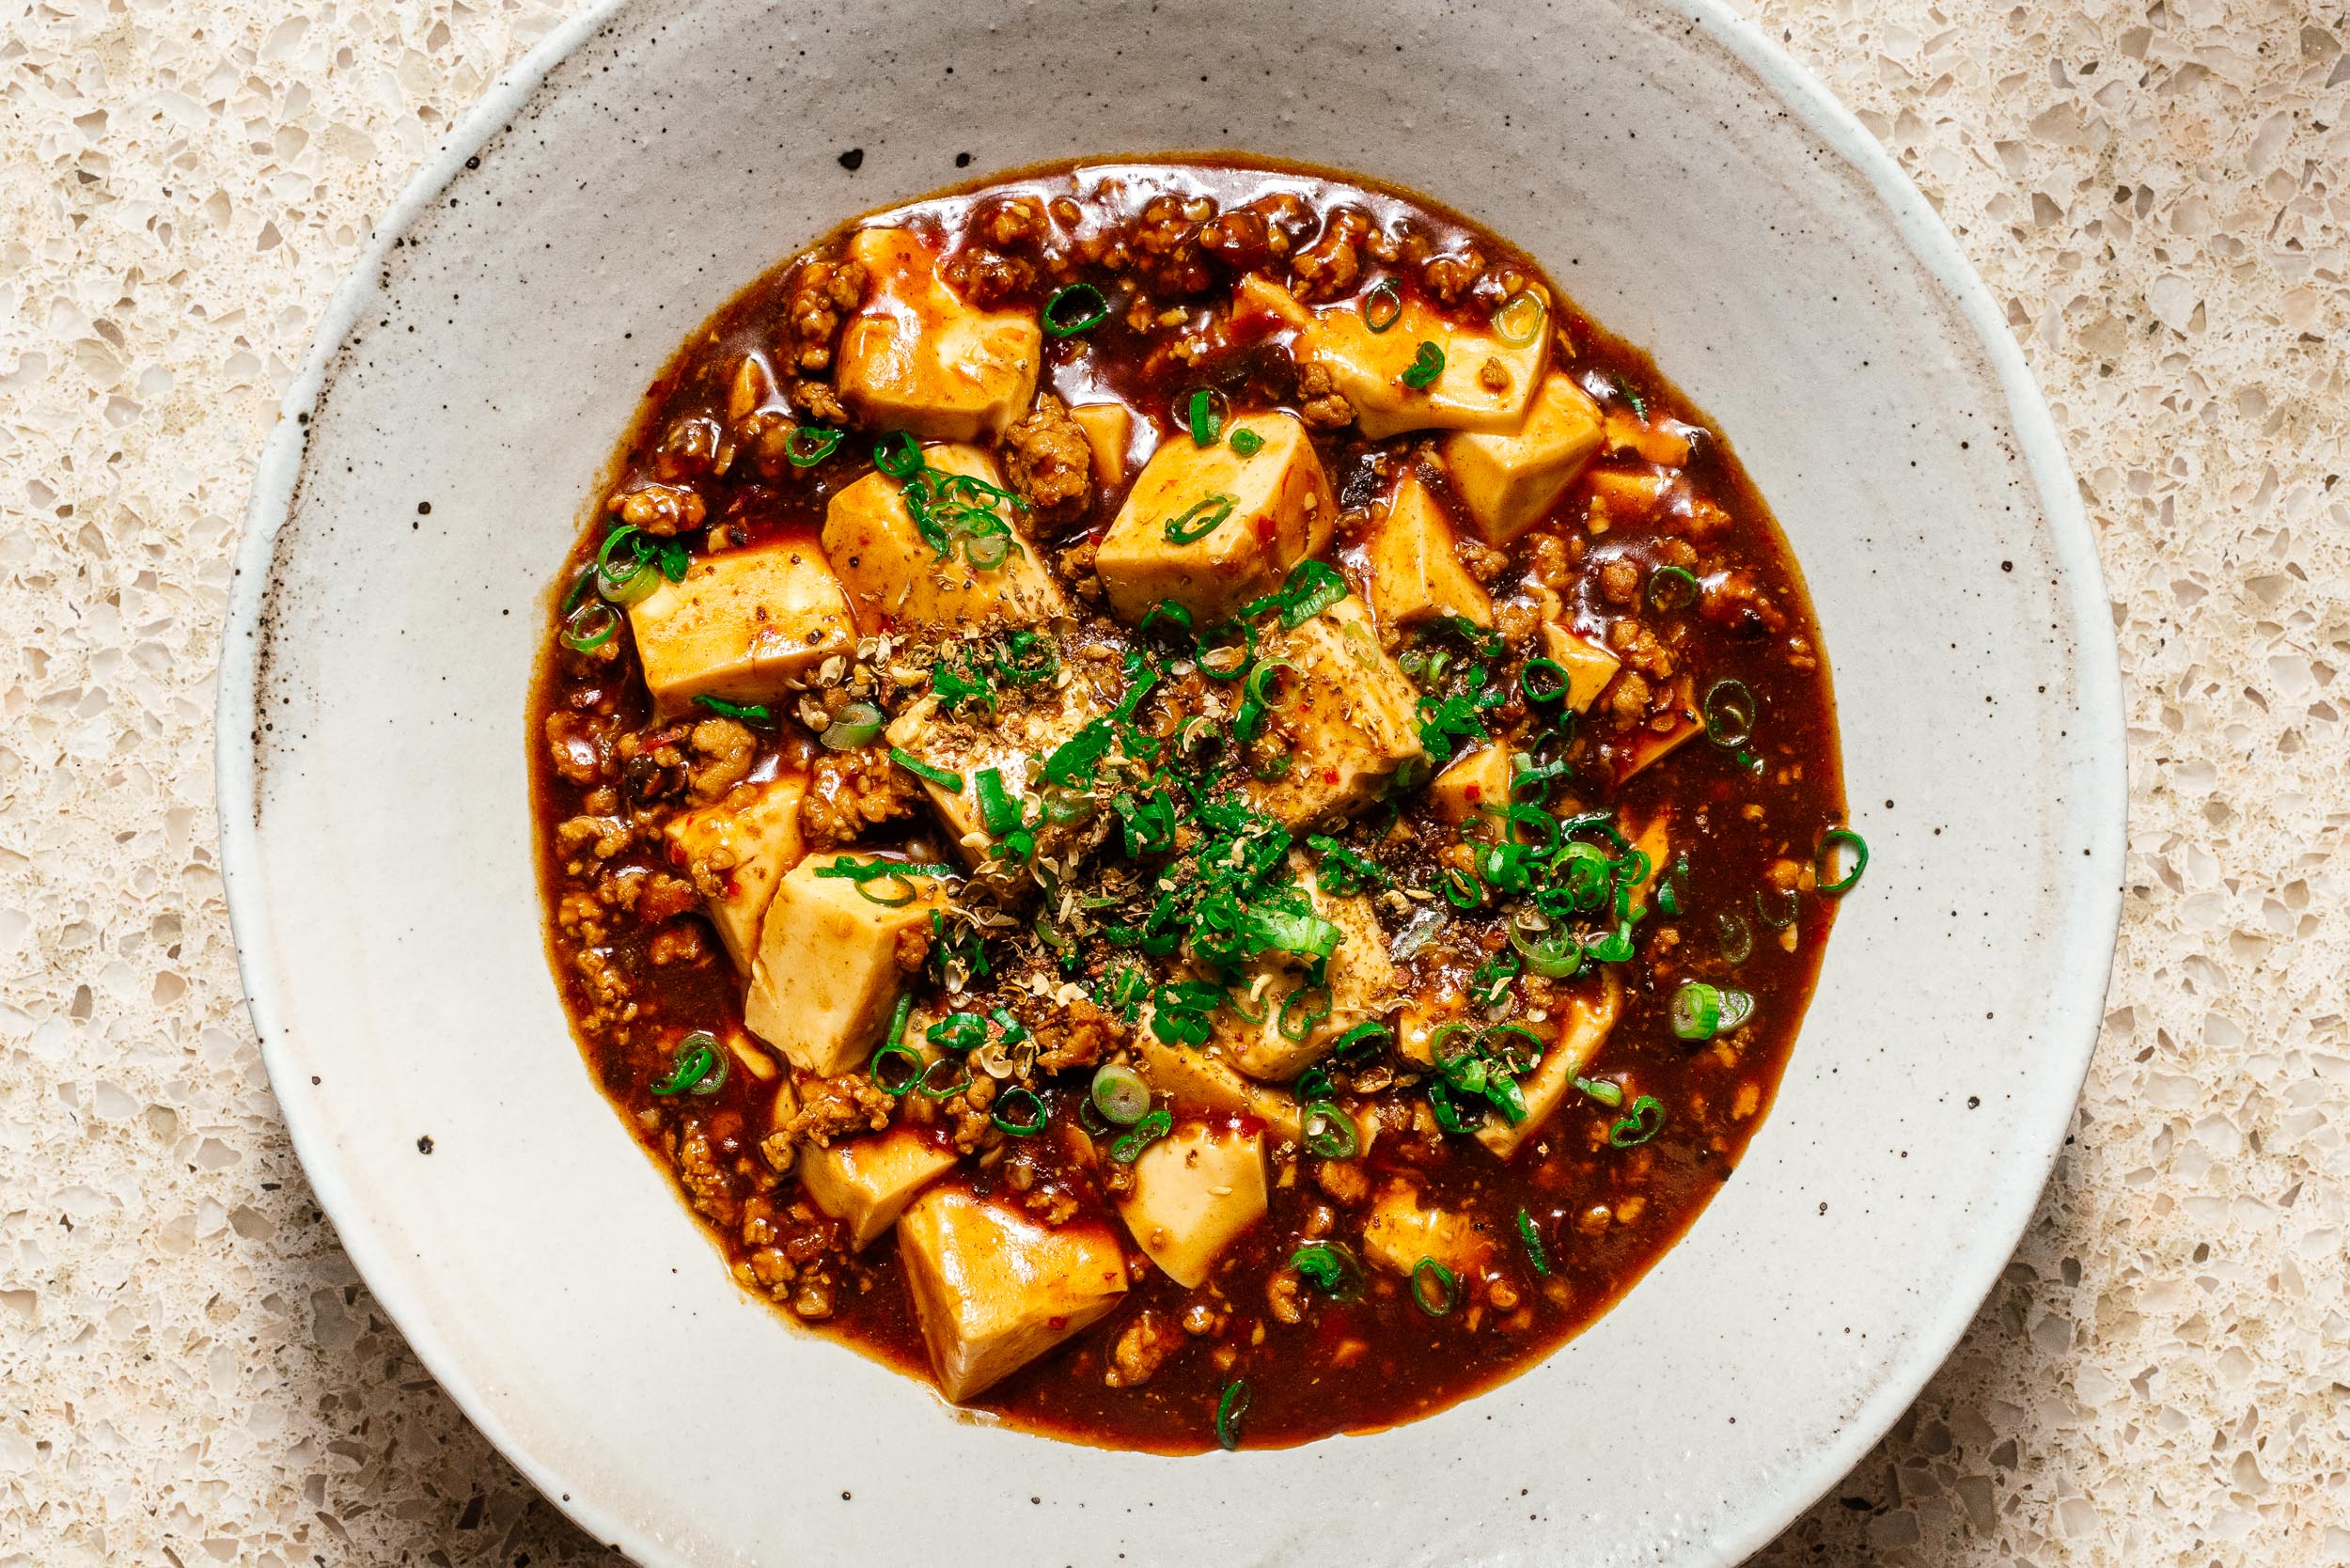
I Am... Mapo Tofu
I'm addicted to the magical combination of silky soft tofu and saucy spicy pork. If you're in the know, you know what I'm talking about: mapo tofu.
What is mapo tofu?
Mapo tofu is a famous Sichuan tofu dish that has plenty of mala, the signature numbing spiciness of good Sichuan food. If you haven’t had Sichuan food before, you might be scared of its fire-y red color, but once you get past that heat, you’ll be coming back for more! If you love tofu and you love spicy, you’re going to love mapo tofu too. And, if you’re not so big on spicy, the good thing about this dish is that you can adjust the spiciness level by altering how big of a pinch of Sichuan pepper you finish it with. If you’re not familiar with it, here’s a quick breakdown: mapo tofu is a super popular Chinese dish from the Sichuan province. It has soft tofu in a spicy bright red sauce with a bit of ground pork. The name of the dish roughly translates to “pockmarked grandma’s tofu,” kind of like old grandma’s tofu. There are lots of mapo tofus out there but this is a traditional, authentic mapo tofu recipe.How to make mapo tofu
Once you have your ingredients in hand, it’s a pretty simple recipe. You start off by blanching your tofu in salty water. Then, it’s just a question of frying the pork and doubanjiang, adding some chicken stock and thickening it up. Frying the doubanjiang and releasing the oils is what makes everything super tasty and fragrant. The sauce gets a bit of thickening up with cornstarch and everything is glossy and golden and clings perfectly to your tofu cubes. It’s a match made in heaven for rice.- Blanch the tofu. Gently simmer the tofu over low heat in salted water, then remove the pot from the heat and let it hang out in its salty bath.
- Fry. Brown the pork so it crisps up a bit then add the doubanjiang and fry it so that the heat releases its spicy red oils. Stir in the garlic and ginger.
- Sauce. Add the chicken stock and soy sauce and bring everything up to a bubble. Add the drained tofu cubes and stir in a cornstarch slurry. Simmer until the sauce is thick and gloss then you’re ready!
Key Ingredients
There are two key ingredients to this tofu: chili bean paste (doubanjiang) and Sichuan peppercorns. You can find both of them at your local Asian grocery store. The other ingredients are pretty standard fare.- Doubanjiang. Sometimes, with authentic recipes, there’s that one ingredient that you have to search far and wide for. You’ll be searching the aisles wondering, is this worth it? I’m here to tell you that it is! Doubanjiang is a spicy fermented mix of soy and broad beans. It’s been called the soul of Sichuan cooking and it’s what will give your mapo tofu that glorious red hue. When shopping, you want to look for the Pixian (an area in China) variety if you can. It’s kind of like how, if you can, you want to buy champagne from the Champagne region in France. But, like champagne, if you can only find sparkling wine, don’t sweat it, Lee Kum Kee also sells a serviceable easier to find Cantonese style doubanjiang that they call chili bean sauce/toban djan. You can also always find it online. Read more about doubanjiang here.
- Sichuan peppercorns. In regards to Sichuan peppercorns, you can buy pre-ground Sichuan peppercorn powder, but if they’re available, go for whole Sichuan peppercorns and toast and grind them yourself. The spice will be much more fresh and apparent if you do.
- Soft tofu. Soft tofu is key to authentic mapo tofu. The tofu should be smooth, creamy, and soft.
- Ground pork. There’s just a bit of ground pork in this dish, just enough to compliment the tofu.
- Ginger and garlic. Ginger and garlic add a punch of aromatics.
- Chicken stock. Chicken stock is what makes up the bulk of the sauce.
- Cornstarch. We’ll use cornstarch as a thickener to make the sauce silky and smooth.
- Soy sauce. Just a touch of soy for some extra umami.
What does mapo tofu taste like?
Mapo tofu tastes spicy: both conventionally spicy with heat on your tongue, and málà, a numbing kind of spicy that is characteristic of Sichuan food. The sauce is pleasingly oily, which ampliflies the spiciness and flavor. It also has a deeply savoriness to it thanks to the umami from the doubanjiang. Also key is the texture play mapo tofu has going on: the silky creaminess from the soft tofu coats your tongue and the crispy-ish bits of pork add a pleasing contrast to the overall softness and sauciness of the dish. Mapo tofu is soul food and maybe the best comfort food out there, especially when paired with perfectly fluffy rice.How spicy is mapo tofu
The pleasant numbing spice of mapo tofu comes from Sichuan peppercorns, which have a pleasant numbing effect which makes it so you can eat more and more spice until you realize that you’re entirely spiced out. It’s called “málà” in Chinese and is prized in Sichuan cooking. Málà literally means numbing (ma 麻) hot/spicy (la 辣). Spicy hot fiends love Sichuan peppercorns because they’re fragrant and have a specific flavor. Warning: Sichuan peppercorns are very spicy. If you have high quality or fresh peppercorns, they're more numbing and powerful. In this recipe, we’re not going to cook the peppercorns because they have a tendency to get over toasted if you’re not careful and can lead to bitterness. Instead, you’ll finish your dish off with a generous sprinkling, which is perfect for adjusting spice levels right at the table.On tofu
I have to say, the most frequently asked questions about mapo tofu are of the following variety: What kind of tofu for mapo tofu? Can you use firm tofu in mapo tofu? It seems like everyone needs to know: which tofu is it? Lots of recipes out there say you can use firm or medium tofu and of course, you can, but if you’re going for an authentic mapo tofu, go for soft tofu. The tofu should be smooth and jiggly and almost break apart the moment your chopsticks touch them. I think a lot of recipes recommend firm or medium firm tofu because soft tofu is notoriously difficult to work with. But I believe in you. Do the soft tofu. It’s worth it! Pro tip: to help your tofu stay together when you toss it into the sauce, blanch it. To blanch tofu: simply place in just simmered salted water for a couple of minutes and let it sit. Blanching tofu in salted water will season it and help firm it up. The tofu will become even more creamy and supple while retaining its shape when you mix it into the mapo sauce. It also has the bonus of making the tofu warm so that you don’t have to heat it up as much in the sauce.Can mapo tofu be vegetarian/vegan?
Yes! You can skip out on the ground pork and it will be vegan. If you have some dried shiitake mushrooms on hand, soak them, drain them, chop them up and give them a fry in place of the pork. Switch the chicken stock out for vegetable stock.What do you eat mapo tofu with?
Traditionally mapo tofu is served with rice. You can also have mapo tofu with noodles (or zoodles), bread, you name it. Essentially it goes with any carb. We’ve even made mapo tofu pizza and mapo tofu poutine. And of course, it goes great with wonton. [caption id="attachment_26331" align="alignnone" width="1450"] Tastes good on zoodles too![/caption]Frequently asked questions
- Can I make this vegan/vegetarian? Easily! Just substitute in finely diced mushrooms for the ground pork. The ground pork isn’t really the star of the show, so using rehydrated shiitakes or even button mushrooms works at adding umami.
- Substitutes for doubanjiang To be honest, if you’re looking to make an authentic mapo tofu you can’t skip out on the doubanjiang. If you don’t want to order doubanjiang online (buy this brand: Pixian broad bean paste)
- Substitutes for Sichuan peppercorns There are no substitutes for the málà of Sichuan peppercorns. If you’re spice adverse, you can definitely leave them out. Between doubanjiang and Sichuan peppercorns, doubanjiang is infinitely more necessary.
- Substitutes for ground pork If you want to use another ground meat, that’s perfectly alright. Ground chicken or turkey or even ground beef (make sure to use a slightly fattier percentage) will all work.
- How do I make mapo tofu not spicy? Reduce the amount of doubanjiang to 1/2 tbsp and leave out the Sichuan peppercorns.
Mapo Tofu
You might be scared of it’s fire-y red color, but once you get past that fear of heat, you’ll be coming back for more, more, more.
- 14 oz soft tofu (1 block)
- 1 tbsp oil
- 1/4 lb ground pork
- 1.5 tbsp doubanjiang (chopped)
- 2 cloves garlic (minced)
- 2 tsp ginger (grated or finely chopped)
- 1 cup chicken stock (sodium free/unsalted preferred)
- 1 tbsp soy sauce
- 1 tbsp cornstarch (whisked into 2 tbsp water)
- 1/2 tsp ground sichuan pepper (or to taste)
- green onions (thinly sliced, to finish)
Cut the tofu into small cubes and set aside. Bring a pot of water to a boil and add a pinch of salt. Turn the heat down to a simmer then add the tofu and cook for 2 minutes. Remove from the heat and let soak in the salted water while you prepare the rest of the dish.
In a wok, heat up the oil over medium heat. Add the pork and cook, breaking up, until the fat renders out and the pork is cooked through. Turn down the heat and add the doubanjiang and cook, stirring, until the oils release from the doubanjiang and everything looks bright red.
Stir in the garlic and ginger and cook for 1 minute. Add the stock and soy sauce and bring the heat up so everything comes up to a simmer.
Drain the tofu and add it to the wok, pushing it around gently so you don’t break it. Stir in the cornstarch slurry and bring up to a gentle simmer, until the sauce is thick and glossy, about 1 minute.
Turn off the heat and scoop the tofu with sauce into a serving dish. Finish with a sprinkle of ground Sichuan peppercorn and sliced green onions.

I Am... Buldak Carbonara
Creamy, spicy, addictive ramen, in less than five minutes - buldak carbonara is the perfect mix of carbs, spicy, and sauce goodness. If you’re a fan of ramen, you’ve probably heard of Samyang Instant Ramen. They’re the Korean company that makes instant ramen classics like Buldak Hot Chicken, Buldak Hot Chicken with Cheese, and, of course, Buldak Hot Chicken Carbonara. I love instant ramen. I love it a lot. But I definitely don’t love it as much as that little girl who cried tears of joy when she received a 5 pack of spicy buldak carbonara for her birthday. She was so incredibly happy and grateful and it just warmed my heart. It also made me wonder, how the heck is her spice tolerance so high? Because even though buldak carbonara isn’t as spicy as the regular hot chicken buldak, it is still pretty darn spicy! If you’re not instant ramen obsessed, you might be wondering what the heck is buldak carbonara. It’s gone pretty viral on TikTok because it’s creamy, glossy, and delicious-looking. It also happens to be pretty darn spicy and people like watching people when they eat spicy things - just look at how amazingly popular Hot Ones is! Side note, that Hot Ones episode with Sydney Sweeney 🥵.
What is buldak carbonara?
Buldak carbonara is a flavor of instant ramen from Samyang. It’s part of a ramen line that features super hot-n-spicy ramens. The buldak carbonara flavor comes in a pink pouch with a cute drawing of a hot chicken on it. I think the pink denotes the fact that it’s less spicy than the fire red 2x spicy buldak. Essentially, it’s a hot and spicy chicken ramen but with a carbonara-inspired sauce that is creamy thanks to the extra little packet of cheese.How to make homemade buldak carbonara
If you don’t have access to Samyang buldak carbonara and are craving it hard, you can make your own at home! I’ve heard that the carbonara flavor is sold out a lot, but thankfully there’s a homemade hack!- Gather. Start by gathering your ingredients. It’s not as simple as opening a pack of buldak carbonara, but you gotta do what you’ve got to do. You’ll need some ramen noodles, gochujang, soy sauce, sugar, chicken boullion powder, garlic powder, black pepper, 1 egg yolk, milk powder, and freshly grated parmesan.
- Mix. Add gochujang, soy sauce, sugar, chicken boullion powder, garlic powder, pepper, milk powder, parmesan, and one egg yolk to a bowl. Whisk until everything comes together, then set aside.
- Cook. Bring a pot of water up to a boil and cook your noodles of choice according to the package ingredients. Save 1/2 cup of the hot noodle water then drain your noodles.
- Stir. Add 1/4 cup of the hot noodle water to the bowl with your sauce mix. Whisk it all up until it’s smooth.
- Toss. Add the sauce into the pot that has the noodles and mix and toss until the sauce is glossy and coats and clings to the noodles, adding hot noodle water, bit by bit if needed to loosen the sauce. When the noodles are nice and saucy, remove from the heat.
- Enjoy. Scoop your noodles out into a bowl or eat them straight from the pot, no side eye here! Time to get your spicy on!
Buldak carbonara ingredients
For homemade buldak carbonara, you need all the regular ingredients in buldak sauce, plus:- milk powder - milk powder is amazing. If you haven’t tried it, it’s one of those not-so-hard to get ingredients that is a solid pantry staple. You can find it in the baking aisle sold in bags. Milk powder is milk that has been dehydrated and powdered for shelf life and ease. Add water to it and it becomes milk! It’s what’s going to give our buldak carbonara that creamy feel and is what is in Samyang’s powder packet.
- cheese - we’re going to go with freshly grated parmesan cheese because as much as I love cheese powder, I have no idea where to find it. Just make sure you grate your parmesan super finely.
- egg yolk - instant buldak carbonara doesn’t have eggs in it but since we’re doing this homemade style, egg yolk is going to make your carbonara so much better by adding thickness, richness, and flavor.
How to make instant buldak carbonara
When you open up the package of noodles, you’ll see it comes with a noodle cake and two sauce packets, one that’s liquid, and one that’s the cream powder.- Boil. Start off by adding 2.5 cups of water to a saucepan and bringing it to a boil over high heat.
- Cook. When the water is bubbling rapidly, add the noodles and set a timer for 5 minutes. If you like your noodles al dente and chewy, go for 4 minutes. Use a pair of chopsticks or a fork to gently break up the noodles after 2 minutes.
- Save. Use a measuring cup to carefully scoop out 1/2 cup of the hot noodle water. If you don’t want to measure out 1/2 cup of hot noodle water, you can simply drain the noodles, making sure to leave enough hot water in the pot to stir into a smooth sauce.
- Drain. Drain the noodles then add the 1/2 cup of hot water back into the pot.
- Mix. Add both of the seasoning packets and mix, mix, mix.
- Enjoy immediately!
What does buldak carbonara taste like?
Creamy, cheesy, spicy, and delicious! Buldak carbonara tastes super similar to the original spicy buldak fire noodles. That is, hot and spicy. There’s a cheesy, smooth and creamy element to it, thanks to the cheese packet. That helps tone down the spice compared to regular buldak noodles. It’s a cheesy, creamy, spicy noodle. Unlike carbonara, Samyang buldak carbonara doesn’t include pork or egg.Is buldak carbonara spicy?
Yes! Don’t be fooled. Buldak carbonara doesn’t look as fiery hot as regular buldak, but it still packs a punch and is spicy. On the spice level, Samyang rates buldak carbonara a level 3 spicy. For reference, the original buldak is a 4 and the 2x spicy buldak is 5. Technically, Samyang doesn’t think buldak carbonara is incredibly spicy, but it really depends on your spice tolerance.Can you make buldak carbonara less spicy?
Yes, you can, but it won’t be as flavorful. A lot of the flavor in the instant pack of buldak carbonara is in the spice packet. That being said, try this, which will make it less spicy!- In a shallow bowl, add 1 egg yolk, 1-2 tbsp kewpie mayo, 1/2 the package of liquid buldak sauce, the cheese powder, and 2 tbsp cream. Whisk everything together until smooth.
- Cook the noodles according to the package directions, then scoop your noodles directly from the pot into the bowl with your sauce. Toss, mixing well until the noodles are saucy.
- Top with as much shredded cheese as you like and enjoy!
How do you make buldak carbonara less spicy?
If you’re looking for a less spicy version of buldak carbonara and don’t want to sacrifice flavor, look for Samyang’s cream carbonara buldak. The package looks almost the same but is a slightly lighter pink. The chicken on the package is also floating in the air in a hot air balloon instead of sitting in a pot.Cream Carbonara vs Buldak Carbonara
Compared to buldak carbonara, the cream carbonara is a 2 on the Samyang spicy scale. It’s less spicy but still has a nice kick to it. The buldak sauce it comes with is looser and not as fiery red. It’s a slightly milder, more creamy and cheesy buldak ramen. I prefer it over the regular carbo!What to add to instant ramen
Like all ramen, you can top your buldak carbonara with anything and everything! Some popular add-ins/toppings are:- tteokbokki - add some chewy tteokbokki rice cakes (pictured below) to the water while the noodles are boiling for extra carbs on carbs. After all, this is carbo ramen!
- egg - you can add eggs in so many different ways, whisking an egg yolk into the sauce mix, topping with a fried egg, topping with a boiled egg, or even just adding egg to the noodles after they’re mixed for a poached egg approach.
- cheese - yep, there’s already cheese in buldak carbonara, but does anyone ever say no to more cheese? Sprinkle on shredded cheese and cover your noodles with a lid to make sure the cheese melts down into creamy, stretchy cheese pulls. Or, you can stir in some cream cheese for an extra creamy sauce.
- seaweed - crushed up seaweed snack, strips of seaweed, or even using seaweed snack to scoop up your noodles is a pro move.
- protein - anything goes! You can lean into the carbonara of it all and do some bacon or pork belly. Maybe use a can of tuna or add whatever leftover protein you happen to have in your fridge. Steak slices would be super luxe too.
- sesame seeds - toasted sesame seeds add aroma and a bit of crunch.
- green onions -thinly slice green onions add a bit of freshness and greenery.
- kewpie mayo - kewpie mayo can help ease the spice and add creaminess.
Homemade Buldak Carbonara
Buldak carbonara is the perfect mix of carbs, spicy, and sauce goodness
- 1/4 cup finely grated parmesan
- 2 tsbp milk powder (or milk)
- 1 tsbp gochujang (or to taste)
- 2 tsp soy sauce
- 1 tsp chicken bouillon
- 1 tsbp rice vinegar
- 1 tsp garlic powder
- 1 tsp sugar
- 1/2 tsp toasted sesame oil
- 1-2 egg yolks (use double the egg yolks for extra richness)
- 1 portion noodles (of choice, see notes)
In a bowl, whisk together the parmesan cheese, milk powder, gochujang, soy sauce, chicken bouillon, rice vinegar, garlic powder, sugar, toasted sesame oil, and egg yolk (or 2 for extra richness). Mix until well combined.
Bring a pot of water up to a boil and cook your noodles according to the package instructions. Save 1/2 cup of the noodle cooking water and drain the noodles, leaving them in the pan.
Stir 1/4 cup of the hot noodle water into the sauce then add the sauce to the noodles in the pot, tossing to coat. Add more of the hot reserved noodle water as needed, while mixing, over low heat, until the sauce is smooth and creamy and clings to the noodles. Remove from the heat and enjoy!
Estimated nutrition does not include noodles of choice (we recommend samyang or nongshim shin noodles).

I Am... Chicken Katsu: Easy Air Fryer, Deep Fried, and Oven Versions
Chicken katsu is one of my all time favorite things to make and eat. It’s like shake and bake chicken but with a Japanese twist. Juicy, tender chicken, with crispy panko breadcrumbs on the outside, fluffy rice and crunchy cabbage?! Dream meal! Almost every culture has a breaded chicken cutlet and I love them all but chicken katsu has a special little katsu shape in my heart.
What is katsu?
Katsu is a Japanese transliterated word, meaning cutlet. It comes from tonkatsu (pictured below), which is a pork cutlet, but there are also all other kinds of katsu, which has turned into a term for panko breaded items. You can find tofu katsu, beef katsu, and of course, chicken katsu.How to make chicken katsu
- Prep the chicken cutlets. Lightly pound the chicken so that it’s about 1/2 inch thick. This helps it cook more evenly. Season both sides with salt and pepper.
- Flour. Dip the chicken in flour, shaking off any excess.
- Egg. Dip the chicken in the egg, coating both sides, shaking off the excess.
- Panko. Press the chicken into the panko, making sure the panko coats all of the chicken.
- Cook. Air fry, bake, or deep fry the chicken katsu.
- Enjoy! Slice, serve with rice, cabbage, sauce, and enjoy.
Best chicken to use
You can make chicken katsu with either boneless skinless chicken breast or boneless skinless chicken thighs. Either way, you’ll want to lightly pound the chicken so that it isn’t too thick.Chicken vs Pork
Which is better? Well, pork is the more traditional of the two, but pork can get overcooked pretty easily and you need to source just the right fattiness and thickness in order to get an authentic tasting katsu,whereas chicken pretty much almost always ends up great. In my books, pork from restaurants, chicken at home is the clear choice!What is panko?
Panko are Japanese breadcrumbs. They’re vastly different from regular breadcrumbs - fluffier, larger, and made from crustless white bread. The irregular flakes of panko are what make katsu so crunchy. They’re dryer, flakier, and absorb less oil. Panko is actually super interesting and a big deal in Japan. Dedicated panko factories bake bread to different panko specifications. You can get fresh panko, dried panko, and different sized flakes. They even have different ways of baking the bread, either oven baked or electrically baked using currents. A lot of restaurants get fresh panko delivered to them daily.Where to buy panko
Panko is sold in most grocery stores in the Asian aisle but it’s cheaper to buy it at an Asian grocery store. You can also get it online. I prefer Japanese brands of panko, sometimes you’ll see something labeled panko but it looks like regular breadcrumbs. Take a look at the package and buy panko with large, irregular, shards that are flat.How to set up a katsu breading station
Just like how you bread regular chicken you need flour, egg, and panko.- Set up three shallow dishes that are able to fit your chicken.
- Put flour in one dish, lightly beaten egg in the next dish, and panko in the last dish.
- Season your chicken with salt and pepper, then using one hand, dip it in the flour, coating both sides. Shake off the excess flour and place it in the egg.
- Use your other hand to turn the chicken in the egg, making sure it’s coated all over. Shake off any excess egg and place the chicken in the panko.
- Using the hand you used to flour the chicken, flip and press down on the chicken to coat in panko, being sure to gently adhere the panko all over. Shake off the excess panko and you’re ready to cook!
How to cook chicken katsu
Air fried/baked chicken katsu
If you’re air frying or baking chicken katsu you’ll need to toast your panko before coating your chicken. The deeply golden signature color of chicken katsu is part of why it’s so appetizing and if you bake or air fry, there won’t be a lot of color on the panko because it won’t be deep fried. Dry toasting it before hand fixes that! All you need to do is add the panko to a dry pan and toast over medium heat, stirring. Drizzle on a bit of oil and stir until golden and toasty. Just before it’s brown, remove the panko from the pan and place in a shallow bowl to cool completely. From there you just coat your chicken the same as ever. To air fry: Place the prepared chicken katsu on a rack inside the air fryer and air fry at 400°F for 12-15 minutes or until the internal temperature of the chicken reaches 165°F. To bake: Heat the oven to 400°F. Place the prepared chicken katsu on a rack and bake for 20-25 minutes or until the internal temperature of the chicken reaches 165°F.Deep fried chicken katsu
Deep fried chicken katsu will give you the juiciest, most evenly browned katsu, but it’s also the messiest. To deep fry: Heat up 2-3 inches of neutral oil in a deep pan over medium high heat until it reaches 350°F. Gently place the coated chicken katsu into the oil and fry, flipping once, until golden brown and cooked through, about 2-4 minutes per side. For perfectly cooked katsu, invest in a instant read thermometer. You can use it whenever you cook meat and it ensures that you’re never eating dry, overcooked chicken breast. The best kind of thermometer is a thermocouple style, but you don’t have to spring for the fancy expensive ones: this one is nice and inexpensive and still super fast.Chicken katsu sauce
Chicken katsu is usually served with sosu, which is the Japanese transliteration of sauce. It’s a thick, sweet and tangy brown sauce that’s loosely based on Worcester sauce. Made from vegetables, fruits, and spices, there are several kinds and thickness used for a variety of Japanese dishes. The sosu most commonly served with chicken katsu is tonkatsu sauce. It’s thick and mild, and full of umami. You can buy it online, popular brands are Bulldog or Otafuku. If you can’t find it, you can make an approximation of it easily at home.Chicken katsu sauce recipe
2 tbsp ketchup 1 tablespoon oyster sauce 1-2 tsp Worcestershire sauce 2 tsp sugar Mix all the ingredients together in a small bowl.Katsu in Japan
Japan has dedicated tonkatsu restaurants that focus on pork cutlets, along with seafood like ebi fry (panko deep fried shrimp) or kaki-fry (panko deep fried oyster). There are also katsu-sando which are pork cutlet sandwiches. Chicken katsu is not as popular as its pork counterpart in Japan but it’s insanely popular all over the world, probably because it’s very similar to chicken tenders or chicken schnitzel.How is katsu served?
Katsu can come as part of a set meal (teishoku), as a rice bowl (donburi), with curry (curry katsu), or as a sandwich (katsu-sando). The most common is a teishoku set, where it’s served with rice, cabbage, pickles, and sauce.What to serve with chicken katsu
If you want to create a teishoku or set meal, serve up your katsu with fluffy rice, shredded cabbage with Japanese dressing, miso soup, and Japanese pickles!- Japanese steamed rice
- Soy-vinegar dressing for your cabbage
- Miso soup
- Sunomono cucumber pickles
Chicken Katsu Recipe
Juicy, tender chicken, with crispy panko breadcrumbs on the outside, fluffy rice and crunchy cabbage.
- air fryer
- 2 chicken breast (lightly pounded)
- 2 tbsp all purpose flour
- 1 egg (lightly beaten)
- 1 cup panko
Season both sides of the chicken with salt and freshly ground pepper.
If air frying or baking, toast the panko: Add the panko to a dry pan and toast over medium heat, stirring. Drizzle on 1 tablespoon neutral oil and stir until golden and toasty. Remove from the heat and place the panko in a shallow bowl to cool.
Set up 3 shallow dishes, one with the flour, one with the lightly beaten egg, and one with the panko.
Using one hand, dip the chicken into the flour, coating both sides. Shake off the excess flour and place it in the egg.
Use your other hand to turn the chicken in the egg, making sure it’s coated all over. Shake off any excess egg and place the chicken in the panko.
Using the hand you used to flour the chicken, flip and press down on the chicken to coat in panko, being sure to gently adhere the panko all over. Shake off the excess panko and you’re ready to cook.
To air fry: Place the prepared chicken katsu on a lightly oiled rack inside the air fryer and air fry at 400°F for 12-15 minutes or until the internal temperature of the chicken reaches 165°F.
To bake: Heat the oven to 400°F. Place the prepared chicken katsu on a lightly oiled rack and bake for 20-25 minutes or until the internal temperature of the chicken reaches 165°F.
To deep fry: Heat up 2-3 inches of neutral oil in a deep pan over medium high heat until it reaches 350°F. Gently place the coated chicken katsu into the oil and fry, flipping once, until golden brown and cooked through, about 2-4 minutes per side
After the katsu is cooked, let it cool slightly before cutting it into strips and serving it with rice, shredded cabbage, and katsu sauce. Enjoy!
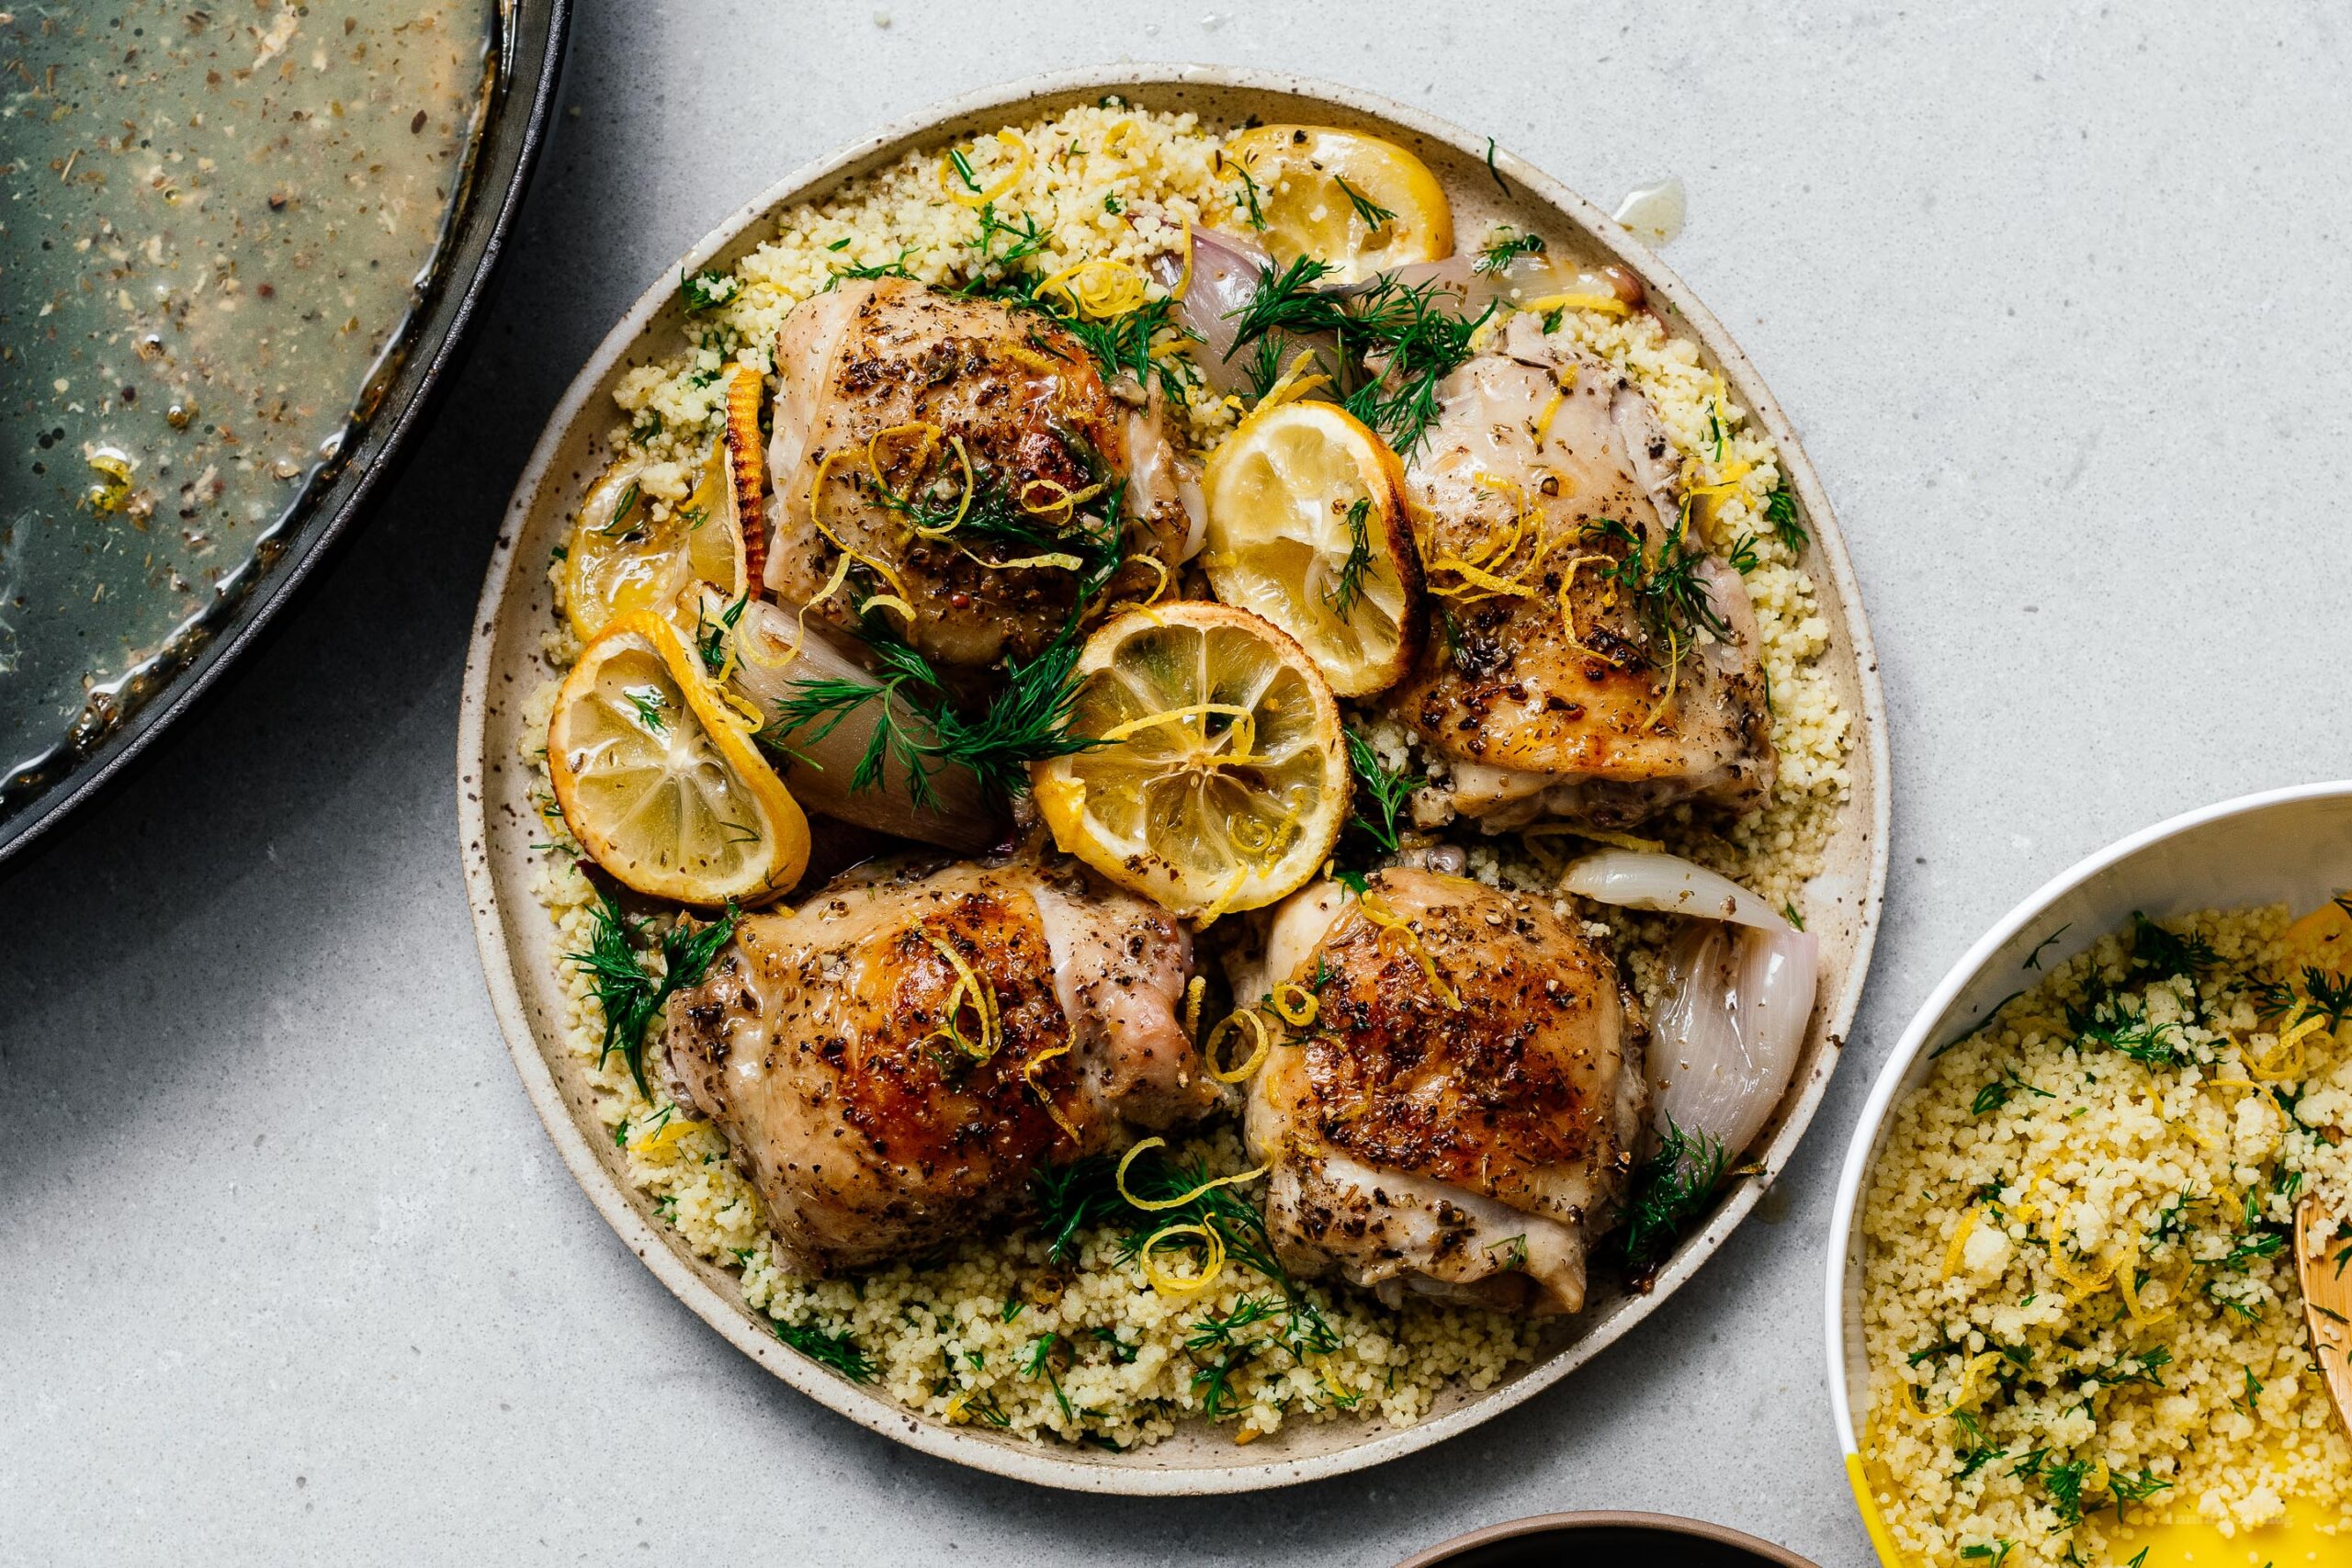
I Am... Lemon Pepper Chicken
This lemon pepper chicken served with cous cous is the answer to all your dinner questions. After a long day, there’s nothing I want more than to order in. But then I think: I need to do the adulting thing and the next best thing I can think of is a really easy to make dinner. Something fast, and delicious that requires minimal prep and maximal chill time. Let’s face it, chicken and carbs is always the answer.
What is lemon pepper chicken?
The name is pretty self explanatory: lemon and pepper and chicken. The name comes from the seasoning, creatively named “lemon pepper.” Most lemon pepper chicken is simply chicken sprinkled with store bought lemon pepper. Store bought lemon pepper is made with granulated lemon zest and cracked black peppercorns. The store bought version sometimes contains things like salt, sugar, granulated garlic, and citric acid. It’s a pretty easy flavor profile to mimic. As easy as it would be to shake on some seasoning, making this lemon pepper chicken is just as easy and a thousand times more delicious. Think: fresh juicy lemon slices, with the help of the oven heat, turning jammy and extra sweet while mixing with savory chicken juices to create the most delicious sauce. The sauce is pure gold and perfect for scooping over cous cous (or rice!). Those fluffy little kernels just soak it up turning into tiny little bits of pure flavor.How to make lemon pepper chicken
- Prep. Pull bone-in skin on chicken thighs from the fridge and place them in an oven proof-dish. Season them with salt and pepper and let them hang out and temper on the counter while you finish off your prep.
- Heat. Turn on the oven - we want it hot, 450°F hot so the chicken gets nice and brown on the tops and the lemons caramelize and release all their juice.
- Chop and mix. While the oven is heating and the chicken is tempering, peel 2 shallots and halve them. Wash some dill, roughly chop, and set aside. Wash and zest a lemon, setting the zest aside for later. Cut the lemon in half. Thinly slice half of the lemon and nestle the slices into the baking dish with the chicken. Juice the remaining half of the lemon into a small bowl. Mix in olive oil, oregano, and a pinch of salt and pepper to the lemon juice.
- Bake. By now your oven should be hot. Pour the lemon pepper sauce into the baking dish and place on the middle rack of the oven and roast for 20-30 minutes, depending on size, or until cooked through.
- Boil. When the chicken is almost done cooking, it’s time to make the cous cous. Bring a pot of salted water to a boil. When it’s bubbling, remove the pot from the stove, stir in your cous cous, cover, and let it steam.
- Fluff. When the cous cous is done, remove the lid, fluff, season with salt and pepper. Toss with olive oil and your prepped dill and lemon zest.
- Serve. When the chicken is done, serve, spooning up those delicious lemon-y, pepper-y, chicken-y juices onto the cous cous. Enjoy!
Lemon pepper chicken ingredients
- chicken - bone-in, skin-on chicken thighs please! Not only are they generally the cheapest cut of chicken, they happen to be the most flavorful and most forgiving. The skin and bone both prevents the chicken from over cooking. If you must, you can definitely use boneless skinless thighs or even chicken breast, but make sure you keep an eye on the time, they’ll cook a lot faster.
- olive oil - use the good stuff, but not the stuff that you don’t heat. Ie, use a high heat olive oil, not a finishing olive oil. As always, an extra virgin olive oil with a light and mild, unassertive flavor that will disappear into the background going to taste best.
- oregano - oregano adds a warm, earthy, lemon-y, slightly peppery flavor to this dish.
- shallots - I love shallots because they’re delicate and sweet with a less onion-y flavor. Plus their pretty purple color adds a vibe.
- lemon - a fresh lemon is going to give us zest (along with all those amazing lemon oils) and juice.
- pepper - freshly cracked black pepper is what you want here. Freshly cracked pepper has that amazing floral, earthy, spicy, pepper flavor we’re looking for. I don’t specify how much pepper in this recipe because really, it’s up to you! I know some people find black pepper spicy and some people find it incredibly mild. Add pepper to your desired taste. That being said, Mike and I are black pepper fiends and recently got some extra bold Tellicherry peppercorns, the best of the best in peppercorns. They’re punchy, bold, and incredibly peppery.
- cous cous - tiny little balls of pasta that are filling and fun to eat, more on cous cous below!
- dill - some chopped dill adds a herb-y brightness to your cous cous, making it irresistible.
What to serve with lemon pepper chicken
Personally I think cous cous is the perfect accompaniment to lemon pepper chicken. It’s filling, fast to make, and fun to eat. Of course you can’t go wrong with rice or roasted potatoes either!What is cous cous?
Contrary to popular belief, cous cous isn’t a grain, it’s a pasta! If you’re not too familiar with cous cous, you’re in for a treat. Cous cous are tiny steamed balls of crushed semolina. It’s usually served with stew or in salad. They are light and fluffy and are kind of like tiny tiny little roughly-shaped balls of pasta. Most of the cous cous that’s sold in stores in North American is pre-steamed and dried which makes it basically instant. All it takes is a quick five minute steam, making it way faster than rice, pasta, or other grains. You can find cous cous in the rice and grains aisle or online.How to cook cous cous
Measure out how much cous cous you want to make, then add the exact same amount of water to a pot or saucepan with a lid. Bring the water to a boil and when it’s boiling, stir in the cous cous, cover the pot, then remove from the heat. Let the cous cous steam for 5 minutes, then remove the lid and fluff. Your cous cous is done!Cous cous to water ratio
The ratio for water to cous cous is 1:1 which makes it incredibly easy to remember. That’s its! Who knew I could write so much about lemon, chicken, and cous cous!??!Lemon Pepper Chicken with Lemon and Dill Cous Cous
Oven baked lemon pepper chicken thighs served with lemon dill cous cous
Lemon Pepper Chicken
- 4 bone in skin on chicken thighs
- 1/4 cup olive oil
- 1 tsp oregano
- 2 shallots (peeled and halved)
- 1 lemon
Dill Cous Cous
- 1/2 cup cous cous
- salt and pepper to taste
- 2 tbsp chopped dill
- 1-2 tbsp extra virgin olive oil (or to taste)
- lemon zest
Heat the oven to 450°F. Place the chicken thighs and shallots in an oven proof dish, and season with salt and pepper. Leave the chicken on the counter to temper while you prep the rest of the dish.
Zest the lemon and thinly slice half the lemon. Juice the other half of the lemon in a small bowl. Mix in 1/4 cup olive oil into the lemon juice and stir in the oregano. Season with salt and pepper.
Top the chicken with the lemon slices and pour on the sauce. Roast for 20-30 minutes, depending on the size of the thighs, or until the meat is cooked through.
While the chicken is cooking, make the cous cous: Bring 1/2 cup salted water to a boil. Add 1/2 cup cous cous, stir and cover. Remove from the heat and let stand for five minutes. Fluff and season with salt and pepper. Toss with the olive oil, dill and lemon zest.
Serve the chicken (spoon the juices up as well) on top of the lemon cous cous, finishing with the lemon zest and extra fresh dill. Enjoy immediately.

I Am... Tokyo Food Guide: Where to Eat the Best Udon in Tokyo
Are you here because you want to know where to eat the best udon in Tokyo? Don't worry, I've got your back, especially if you invite me to the udon bar with you!
Read More →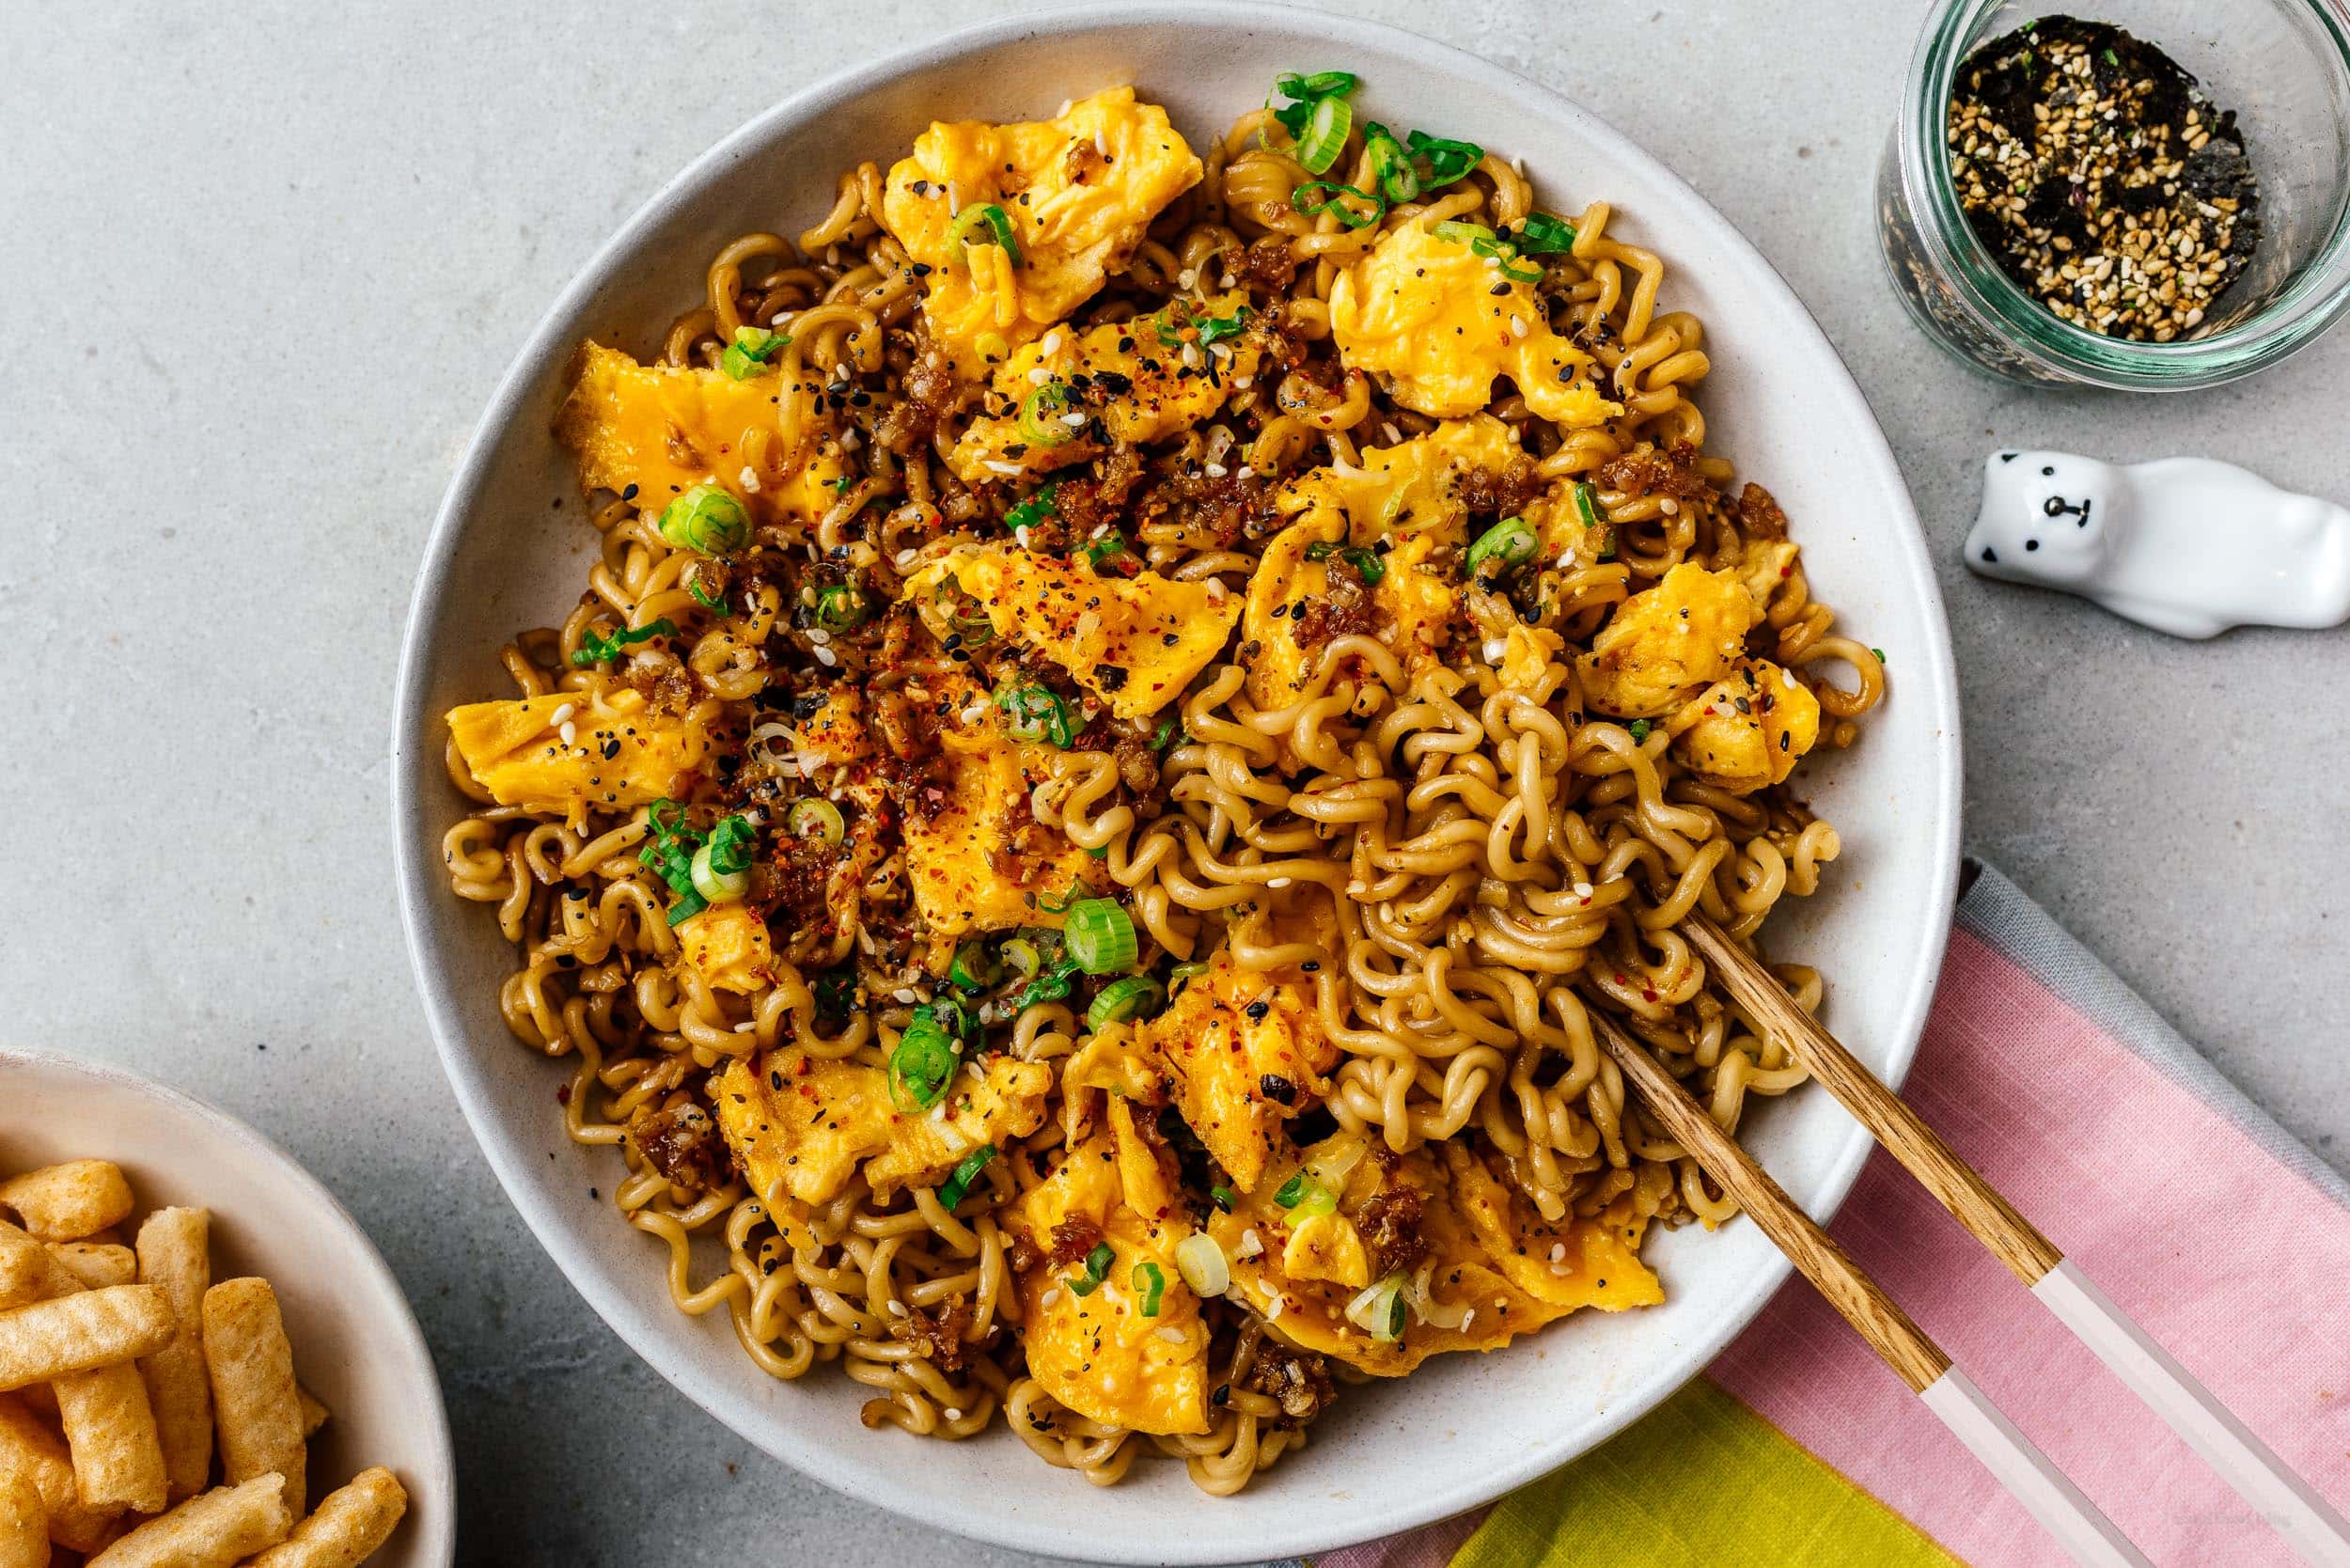
I Am... Tiktok Ramen
Hello! I’m back at it again with a recipe for Tiktok ramen. I’m pretty sure I’m addicted to Tiktok and all the viral food hacks they have - I’m HOOKED. This Tiktok ramen was too easy to not try. I had all the ingredients in the pantry so it made for a quick and satisfying lunch. It was delicious! Tiktok ramen is saucy, slightly sweet, full of umami, and really good. The flavors kind of remind me of an extra garlicky version of one of my all time favorite instant noodles: Indomie Mi Goreng, which is a take on Indonesian fried noodles. I feel like everyone has their own favorite way of making instant ramen. To be honest, I think instant ramen is one of the greatest inventions out there! The person who invented it, Momofuku Ando, a Taiwanese-Japanese inventor, has a quote that I love: Human beings are noodle beings. I am definitely a noodle being and all I want to do is eat noodles and live that noodle life.
What is Tiktok ramen?
Tiktok ramen is where you use instant ramen noodles, ditch the seasoning packet, and make your own sauce. Unlike soup-y ramen, Tiktok ramen is a soup-less ramen, kind of like mazemen or sesame noodles. Ramen noodles are tossed in a garlic butter soy brown sugar sauce, cooked with an egg and finished with a sprinkle of everything bagel seasoning.Does Tiktok ramen taste good?
In a word: YES! Tiktok ramen is sweet and savory with added richness from the butter and egg, and just a hint of spice. Super addictive.How to make Tiktok ramen
- Cook your instant ramen. Don’t overcook it - mushy noodles are a travesty. Instant ramen should have an al dente bite. Pop the noodles into boiling water, set a timer, use a pair of chopsticks to loose the them up, and when the time is up, instantly drain them and set them aside. Pro tip: if you’re a true noodle lover, cook the noodles slightly less than the suggested cooking time, they will cook up a bit more while you’re tossing them in the sauce. This way you’ll have perfectly al dente noodles.
- Make the sauce. In a pan, heat up the butter over low heat. Add the garlic and cook until soft. Stir in the crushed red pepper, then the brown sugar and soy sauce.
- Toss. Add the drained noodles to the pan, turn up the heat, and toss to coat.
- Cook the egg. Push the noodles to one side and add an egg to the pan and scramble until just set.
- Serve. Place the noodles in a bowl and finish with sliced scallions and everything bagel spice. Enjoy hot!
Tiktok ramen ingredients
instant ramen - choose your favorite brand of instant ramen. The flavor doesn’t matter because you’re not going to use the seasoning packet. Our favorite noodles are Nong Shim Shin Ramyun because of how thick the noodles are.- butter - just bit of butter is melted down to cook up some garlic.
- garlic - you need about 1 teaspoon of chopped or minced garlic. Or, if you’re a garlic lover, use as many cloves as you can handle.
- brown sugar - the brown sugar adds a bit of caramel sweetness and color. If you don’t have brown sugar, you can use regular sugar or even honey.
- soy sauce - use your favorite soy sauce - we like Yamasa or Kikkoman.
- crushed red pepper flakes - you can add as many chili flakes as you like or leave them out all together, depending on your spice tolerance.
- egg - throw an egg on it because ramen without an egg isn’t even ramen.
- everything bagel spice - make it rain everything bagel spice!
Proteins
Do you want proteins to make this a full meal? Asian kids know: adding firm tofu, ground beef, shredded chicken, or (if you want to get fancy) boiled shrimp to instant ramen is the key to a happy tummy. The tofu and the ground beef you can easily fry up in the same pan before you make the sauce. For the shrimp and the chicken, just throw it into your noodle water for a few minutes (until fully cooked) and you're good to go!Why everything bagel spice?
Everything bagel spice is LIFE. Also, when you think about it, everything bagel spice is essentially furikake, which is Japanese rice seasoning. Furikake is a seasoning made up of toasted sesame seeds and seaweed and is eaten on rice and noodles. In Japan, they even have furikake chips. It makes sense that Tiktok ramen uses everything bagel spice to dress up ramen, after all they have sesame seeds in common.How to make homemade everything bagel spice
If you don’t have any everything bagel spice, it’s super easy to mix up your own. In a small bowl, mix together: 1.5 tbsp toasted sesame seeds 1 tbsp each poppy seeds, minced garlic, and minced onion 1 teaspoon coarse or flaky salt Sprinkle it on everything!Best ramen noodles
Our favorite brand of ramen is Nongshim, a Korean brand. They’re incredibly popular, both in Korea and all over the world. There’s actually a Nongshim noodle factory in LA and we visited it once. It was amazing! The chew and thickness of Nongshim noodles is just perfect. We usually buy either Shin Ramyun or Shin Black. Both have amazing texture.If you’re looking for other quick and easy noodles, try these
Happy noodling!Tiktok Ramen
Tiktok ramen is instant noodles stir fried with butter, garlic, egg, and soy sauce. It's saucy, sweet, full of umami, and really good.
- 1 package instant ramen (Korean brand preferred)
- 1 tbsp butter
- 1 tsp garlic (minced)
- 1/4 tsp red pepper flakes (or to taste)
- 1 tsp brown sugar
- 1 tbsp soy sauce
- 1 egg (lightly beaten)
- 1 tsp everything bagel spice (or to taste)
Cook the ramen according to the package directions and drain well.
In a pan, heat up the butter over medium heat. Stir in the garlic and red pepper flakes. When the garlic is soft, stir in the brown sugar and soy sauce.
Add the drained noodles to the sauce and toss to coat. Push the noodles to one side of the pan.
Turn the heat up and add the lightly beaten egg to the pan. Scramble until set.
Enjoy hot topped with everything bagel spice.
Cooking times and estimated nutrition depend on your chosen instant noodles.

I Am... Sweet and Sour Pork
Homemade sweet and sour pork is so much easier, cheaper, and healthier than takeout. This version has less than 10 ingredients and is easier than using an app to order! Sweet and sour pork is one of the best Chinese dishes whether it is cheap takeout, from a high-dollar Michelin starred restaurant, or part of a homemade feast. It's tangy, sweet, crispy, crunchy, and deliciously porky. This better than takeout version is not only easier, it's better for you too. Best of all, it uses pork chops, which are my favorite cut of pork because they are easy to come by, easy to cook, and taste great.
How to make sweet and sour pork
- Cube the pork chops. More surface area equals more crunch: 1.5" cubes are just about right.
- Coat the pork. Put the pork in a ziplock bag or a bowl with corn starch to get a crispy coating without deep frying.
- Bake the pork. Bake (or air fry, see below) the pork at 450ºF for 40 minutes, flipping halfway through for even browning.
- Make the sauce. While the pork is baking, make the sauce with the remaining ingredients in a nonstick skillet.
- Put it all together. Take the pork out of the oven and immediately toss it in the sauce until everything is well coated. Serve with plenty of rice and other sides.
Ingredients
This is an easy pantry recipe with few ingredients, perfect for a weeknight dinner:- Pork chops - pork chops make the best sweet and sour pork. Look for thick cut chops with good marbling. Other cuts you can use include pork shoulder/butt, loin, or even boneless ribs.
- Cornstarch - cornstarch is how you get the light crispy coating. We use it pretty much all the time in asian cooking as a sauce thickener and a coating. You can't really sub it out, but if you have extra, it's pretty easy to find other recipes to use it for.
- Soy sauce - you can use any soy sauce but for authenticity, try a Chinese light soy sauce brand such as Lee Kum Kee or Pearl River Bridge.
- Rice vinegar - Rice vinegar is what gives this dish its signature tanginess.
- Ketchup - yes, ketchup - not only was ketchup originally invented in China, it’s the secret ingredient to get that unique tanginess you find in truly authentic Chinese sweet and sour pork. Ketchup plays a role in many authentic Chinese and Asian dishes.
- Vegetables - don't skip the veggies, they provide an essential crunch and brightness. Onions and bell peppers are the most essential ones, but you can add whatever your heart desires. Pineapple, whether canned or fresh, is a pretty traditional addition.
Healthy sweet and sour pork
Some people don’t know that sweet and sour pork is deep fried and not at all healthy. This version is healthier but just as delicious, with no added oil and no deep frying. It's as crispy and the sauce is as authentic as you’d find in any Chinese restaurant. We often make this for dinner instead of ordering in when we're craving Chinese.Tips and tricks
If you want the pork crispier and you have a can of cooking spray such as pam handy, hit it with a light coat of oil before you dust with corn starch to get even more crunch.Air fryer sweet and sour pork
You can air fry these instead of baking. All you need to do is switch the oven out for an air fryer. Coat the pork with cornstarch as per the recipe, then place the pork into the air fryer basket with at least 1/4" gap between pieces, in a single layer and set the air fryer to 375ºF for 8 minutes. Once done, coat with sauce as directed.Serve it with
- Fluffy White Rice
- Sweet and Sour Chicken
- Hot and Sour Soup
- Gaii Lan/Chinese Broccoli
- Beef and Broccoli Stir Fry
Sweet And Sour Pork Recipe
You won't believe how easy this no fry sweet and sour pork recipe is.
- 1 lb pork chop (cubed, or shoulder)
- 2 tbsp cornstarch
- 1/4 cup sugar
- 3 tbsp ketchup
- 2 tbsp vinegar (rice vinegar preferred)
- 1 tbsp soy sauce (light soy sauce preferred)
- 1 bell pepper (roughly chopped)
- 1/2 onion (roughly chopped)
- 1 cup pineapple (optional)
Preheat your oven to 450ºF and season your pork with salt and pepper.
Transfer your pork to a plastic bag or ziploc bag along with 1 tablespoon of cornstarch. Shake well until the pork is lightly coated and then place on an oiled tray in a foil lined baking sheet.
Bake your pork for 40 minutes, flipping once after 20 minutes.
While the pork is baking, make your sauce: add the remaining 1 tablespoon of cornstarch to 1 tablespoon of water in a cup and stir until a smooth slurry forms.
Finish making your sauce by adding sugar, ketchup, vinegar, soy sauce, corn starch slurry, and 1/4 cup of water to a pan and bringing it to a boil. Once boiling, turn the heat to low and add your vegetables. Cook until your desired doneness and then remove from heat (for us that means almost raw).
Add your pork to the sauce and toss until well coated. Enjoy!
To airfry: Coat the pork with cornstarch, then place into the air fryer basket with at least 1/4" gap between pieces, in a single layer. Set the air fryer to 375ºF for 8 minutes, then toss in sauce as directed.
Serves 2 as a main or 4 with rice and other sides. Estimated nutrition is for 4 servings.

I Am... Barbacoa
Barbacoa is a Mexican beef dish that's slow cooked til juicy, soft and tender, then coated in a savory red chile sauce that has just a tiny hint of spice and a huge hit of flavor. If you like carnitas, al pastor, adovada, carne asada, or birria tacos, you're going to love barbacoa. But even better, it's one of the easiest taco fillings to make at home.
What is barbacoa?
Barbacoa originated in the Caribbean as an in-ground slow cooked whole animal wrapped in leaves, but these days it's most closely associated with Mexican food. Barbacoa is said to be the original word for barbeque, and it's basically the same thing: slow cooked meat imbued with a lot of flavor. Mexican barbacoa as we know it today is a juicy and flavorful soft shredded beef/lamb/goat seasoned with dried chiles and spices and cooked until it falls apart. It's sweet, tangy, and just a little spicy. You can serve it in tacos, burritos, enchiladas, quesadillas, flautas, and much more. This version is an easy and simplified barbacoa de res, which translates to barbacoa beef, although you could adapt this recipe to lamb or goat if you want.How to make barbacoa
- Soak the peppers. Soak the peppers in super hot water to rehydrate them. If you want to be extra, you can toast them over a low flame to coax out some extra flavor before soaking.
- Season the meat. While the peppers are soaking, season your meat generously with salt and freshly ground pepper.
- Make the marinade. Grab your blender and blend together the peppers, garlic, oregano, cumin, beef stock, and vinegar.
- Marinate overnight. Marinate as long as you can, or for at least 2 hours so the beef can absorb the flavors. Don’t forget to season your beef with salt and pepper first.
- Make the stew. Caramelize the onions to add a little sweetness, add the beef (you can sear it if you want, but we’re aiming for soft and tender meat) along with all the marinade, then top it off with extra beef stock, bay leaves, and cloves.
Barbacoa ingredients
Barbacoa is made of beef, dried chile, garlic, onions, spices, vinegar, and beef broth. It’s amazing how such simple ingredients combine together to create a deeply flavorful, out of this world taste.- Dried guajillo chiles. These sun dried peppers add an authentic touch of mexican flavor to any stew and you can usually find them in the Mexican aisle of your local grocery store. They are like a mild-medium pepper and don’t add any heat. If you can’t find guajillo, sub any dried mexican/southwestern peppers, such as ancho, new mexico, california, or pasilla. If you really can’t find them, you can sub a can of chipotle peppers in adobo.
- Mexican oregano. Mexican oregano is different than Mediterranean oregano; it's actually a different plant. Mexican oregano is indigenous to Mexico and has a more woodsy, citrus-lime earthy flavor compared to Mediterranean oregano. You can find it in the Mexican aisle at the grocery store.
- Cumin. Cumin gives the barbacoa a nutty, earthy, spicy, almost lemon-y aroma.
- Vinegar. Vinegar tenderizes the beef and balances out the richness of the meat. You can use whatever vinegar you have on hand.
Barbacoa tacos
In my opinion, barbacoa is the best homemade taco filling other than birria. Once you have your barbacoa made, it's easy:- Shred the meat. When the beef is done cooking, take the beef out of the consomé and use a couple of forks to shred it up. It’ll be so tender that it’ll basically fall apart instantly. Spoon some extra consomé back on so it’s extra juicy.
- Warm the tortillas. You need warm tortillas for the best taco experience. Soft and pliable tacos are where it’s at. We like using a tortilla warmer but you can just wrap your tortillas up in slightly damp paper towels and pop them in the microwave for 30 seconds. You can also char them on the stove for some crispy edges or lightly frying them on a nonstick skillet.
- Fill the tacos. Be generous and top up your tacos with beef and a little drizzle of the consomé that the beef cooked in.
- Top it up. Finish off your tacos with some toppings. Classic is chopped cilantro and onions, but you can go with anything you like. We added some pickled onions and sliced jalapeños. Don’t forget the hot sauce!
Beef barbacoa
For barbacoa de res, the meat is traditionally beef brisket, but you can choose any kind you like. Because it's a stew, you want a cheaper cut that has some connective tissue and a little fat. The best cuts of beef that are ideal for stewing are: chuck, brisket, shank, cheek, and short ribs. The recipe specifies just one cut, but I usually do a combination of two or more, usually chuck and short ribs for some richness.Instant Pot Barbacoa
This recipe is best made in the Instant Pot because it's easy, fast, and it locks in flavor. It's truly a one pot, set and forget kind of affair.Slow cooker barbacoa
If you don't have an Instant Pot, you can make this in a crockpot or other slow cooker. Saute the onions first on high heat, then add the rest of the ingredients and set to low heat for 4-6 hours, until the beef is tender and shreddable.Stovetop barbacoa
Saute the onions over med-high in a deep stockpot, then add the rest of the ingredients. Cover slightly ajar and turn down to a bare simmer for 4-6 hours, until the beef is tender and shreddable. Keep an eye on the liquid level by checking back every hour or so, adding more beef broth as necessary.Oven-braised barbacoa
This is the same as stovetop with the bonus advantage that you don't need to worry about it ever burning. Saute the onions over med-high in an oven proof pot such as a dutch oven, then add the rest of the ingredients. Cover and place in a 300ºF 4-6 hours, until the beef is tender and shreddable.What to serve with barbacoa
- Have a taco party with some other taco fillings like carnitas, al pastor, adovada, carne asada, or birria
- Since you'll have tortillas on hand, nothing beats homemade fresh fried tortilla chips
- Finish off with some mexican rice
- And of course, pairing anything guacamole is always the answer.
Barbacoa Recipe
Tacos filled with juicy, soft and tender beef coated in a savory red chile sauce that has just a tiny hint of spice and a huge hit of flavor.
- blender
- 2 lbs beef (cheek, brisket, short ribs, shank, chuck roast, or mix)
- salt and freshly ground pepper
Marinade
- 3 dried guajillo peppers
- 6 cloves garlic
- 2 tsp dried oregano (Mexican preferred)
- 2 tsp cumin
- 1/4 cup beef stock (low sodium preferred)
- 1/4 cup vinegar
Consomé
- 1 medium onion (diced)
- 3 bay leaves
- 6 whole cloves
- 1 cup beef stock (low sodium preferred)
To serve
- 12-16 4" corn or flour tortillas (or more as needed)
- 1/2 bunch fresh cilantro (roughly chopped)
- 1 medium onion (diced)
- 1 lime (cut into wedges)
- 2-4 jalapeños (sliced)
Bring a pot of water to a boil and then remove from heat. Soak your dried guajillo peppers for 15 minutes. Meanwhile, cube the beef and season all sides with salt and pepper. Set aside.
Add marinade ingredients to the blender. When the peppers are done soaking, hold them by the tip over the sink and use scissors to cut the stem off and allow the seeds to fall out, then add to blender. Blend into a smooth paste and rub all over the beef. Marinate for a minimum of two hours or up to overnight.
Set your Instant Pot on saute high. Add 1-2 tbsp oil, then saute the onions until golden and translucent (6-8 minutes). See notes for stovetop or crockpot instructions.
Add the meat with the marinade, bay leaves, and cloves to the pot. Barely cover with beef broth, then set to high pressure for 45 minutes.
When the Instant Pot is done, allow a natural release, then remove the meat from the consomé and shred. Spoon some of the consomé onto the beef after you’ve shredded it.
Make the tacos: warm the tortillas and build the tacos: a generous amount of barbacoa beef, and toppings. Enjoy immediately.
If using a slow cooker or stovetop, saute the onions first on slow-cooker-high or stovetop-med-high, then add the rest of the ingredients and set to low heat for 4-6 hours, until the beef is tender and shreddable. Check back every hour or so to make sure you have enough liquid, and add beef broth as necessary.
Estimated nutrition doesn't include tortillas, toppings, or consomé.

I Am... Buc-ee’s Review: Best Ever Road Trip Stop
Have you even been to Texas if you haven’t been to Buc-ees? If you've never been, read this Buc-ee's review to learn exactly why you need to make this a stop on your next road trip! For the uninitiated, Buc-ee’s is a beloved Texas institution of gas station slash convenience store slash travel center. It’s hard to explain the hold Buc-ee’s has on Texans, and, even though I’m not Texan, on me. They have a beaver for a logo, every single road trip snack you could ever want, brisket, tacos, souvenirs, and very cutely branded apparel. I am writing this post in advance of visiting my first ever Buc-ee’s, that’s how excited I am. After the visit, I’ll let you know my impressions and if everything lived up to expectation. My main goals are: a Buc-ee’s tee and allllllll the snacks. I’m doing the research and they reconnaissance so you don’t have to. I’m back and it was more glorious than I imagined!!
What to expect during your first visit to Buc-ee’s
First off, Buc-ee’s is no tiny gas station mart - it’s HUGE. It’s truly a 24/7 travel center with endless freshly made foods, aisles and aisles of snacks and drinks, and for some reason, houseware. It’s more a shopping destination than a quick convenience stop. Second, you’ll be bombarded everywhere with Bucky the Beaver: stuffies, branded snacks, tees, inflatables, you imagine it, they’ve got it. It’s like visiting an amusement park, if amusement parks were actually gas stations. Third, Buc-ee’s prides itself on being clean. And it is! Everything, from the restrooms, to the pumps, to the parking lot, to the floors is immaculate.A review of the famous Buc-ee’s foods and snacks
That's really why we're here, after all!Beaver Nuggets
I was most excited to try Beaver Nuggets. I wanted to try them ALLLLLLLLL and I’ve boughten every package. The classic is caramel corn, but with a puffed corn nugget without any hull. It’s sweet and crunchy and like caramel kettle corn without any of the annoying bits. Beaver Nuggets also come in sea salt carmel, cinnamon, and chocolate covered.Buc-ee’s Nugees
Basically the same as the sweet nuggets, a puffed corn that’s savory instead of sweet. So far they have white cheddar, bold-n-spicy, and habanero.Gummies
Gummy candies galore! All your favorites and probably a few that you haven’t tried before like the chamoy peach rings. They’re sweet, spicy and savory thanks to chamoy, the Mexican salty, sweet-n-sour, sauce that’s served with fruit.Fudge
Fresh slabs of house-made fudge, in more than 20 flavors are sold by the pound or you can mix and match packages of pre-cut squares.Beaver Tails
If you’ve been to Canada, you’ve probably had a beaver tail pastry, but the Buc-ee’s version is totally different. Essentially a long, flat cinnamon croissant roll, it’s flaky, buttery, sweet, and cinnamon-y.Jerky
Buc-ee’s is synonymous with jerky. They have an entire daily counter that serves up fresh jerky you can buy by weight, as well as a wall of jerky packages. They come in a huge amount of flavors and they sample them too! I’m not a huge jerky fan, but I tasted the sweet jerky and the garlic jerky and as far as jerkies go, they were great.Banana Pudding
Banana pudding is a classic southern treat, but not one you’ll usually see at a gas station. If you haven’t had banana pudding before - essentially a parfait with vanilla wafers, slices of banana, vanilla pudding, and whipped cream - try it here! They come in small and large cups and are house made daily.Kolaches
Texas has a huge American Czech community and as a result, kolaches, a pillowy hand-held bread filled with sweet or savory stuffings are incredibly popular. Buc-ee’s sells them too, in a variety of sweet and savory flavors and they’re a bread-y, satisfying snack.Brisket
Walk into Buc-ee’s and you’ll immediately smell the brisket, thanks to the central counter where they’re smoking and chopping up fresh brisket all day long. They serve it up in sandwiches, tacos, or sliced or chopped.Beaver Chips
Everything is beaver themed, even the chips. But honestly, where have you ever seen freshly fried chips at a gas station? They come in brown bags, hot-n-fresh, to best accompany those beaver brisket sandwiches.Roasted Nuts
Sugar-y glazed nuts, in both regularl and cinnamon-glazed are a Texan favorite. They’re candy coated right in store and kept warm until you pick up a package for snacking on. It’s kinda like you’re at the state fair, but in a gas station!Hot Sauce
Apparently Texans like hot sauce. Buc-ee’s has their own branded craft sauces ranging from okay hot to extremely hot. We were definitely tempted to buy all of them to do a hot ones Buc-ee’s hot sauce challenge. That’s it! Buc-ee’s was everything I dreamed and more. I’m wearing my Buc-ee’s hoodie right now and am going to enjoy by cup of banana pudding. I’ll be back, Buc-ee’s! Until then, I’ll be dreaming about you! xoxo steph Read More →
I Am... Chicken Tinga Recipe
Tinga is life. Juicy chunks of chicken in a tangy slightly spicy tomato and chipotle sauce is so, so good and I am addicted. Recently Mike found a new-to-us super authentic Mexican place and since he was feeling like burritos we planned to spend the afternoon with some food to go and a little late-summer picnic. He had already decided on a chicken tinga burrito but I was kind of unsure. I have this thing where I’m super indecisive when it comes to food. I always want to make the best decision possible. Anyway, Mike ordered his burrito while I waffled between ALL the other choices. His burrito was ready in a flash and I insisted that he eat it right away - because I wanted to taste it too so I could make an informed decision. One bite and I was sold. It was SO delicious. Huge chunks of juicy chicken in a tomatoey chipotle sauce. The plentiful caramelized onions were sweet and smoky and some diced potatoes added a bit of creaminess. I was dead. I had to recreate it the moment we got home.
What is tinga?
Tinga is a Mexican dish made with chicken, called tinga de pollo in Spanish. It’s made with shredded chicken and onions simmered in a tomato and chipotle in adobo sauce. Tinga is super popular in tacos or on a tostada with refried beans, lettuce, cheese, crema, and salsa. It’s smoky, with just a hint of heat. It’s SO GOOD I sometimes just eat it as a stew without rice or tortillas or anything. The best part is that it comes together super quickly but tastes like you’ve been simmering for hours.How to make tinga
Making tinga is super easy:-
- Blend the sauce. This part is easy, just pop the chipotle in adobo, tomatoes, garlic, oregano, and cumin into a blender and blend until smooth.
- Caramelize the onions. Take your time and caramelize the onions until they are golden, soft, and drive you wild with how good they smell.
- Simmer the stew. Add the sauce to the pan, along with the chicken, bay leaves, and chicken stock and simmer until all the flavors meld and everything is delicious.
Chicken tinga ingredients
-
-
- Chicken. Tinga usually uses chicken that’s already been cooked which makes it come together amazingly fast. You can use leftover shredded rotisserie chicken, or just cook some chicken and shred it especially for tinga. Or you can just shred whatever leftover roast chicken you have in your fridge. I like chicken thighs because they’re super juicy but usually I see tinga made with breast, so it’s up to you whichever you like best.
- Chipotle in adobo. This is what adds such a huge amount of flavor to your tinga! Chipotle in adobo come in little cans and are ruby red salty-sweet-spicy-tangy-smoky deliciousness. They are the base of so many Mexican stews and marinades. You can pretty much find them in all grocery stores.
- Tomatoes. Tomatoes add a bit of tang and sweetness to your tinga. We used fire roasted tomatoes for an extra bit of smokiness but you can use regular canned tomatoes or even just sub 4 fresh tomatoes, chopped.
- Onions. Tinga needs onions. They add caramelized sweetness and so much flavor. Take your time where you’re cooking the onions, you want them to brown but not turn black. Caramelizing onions always takes a long time but the flavor payoff is so worth it.
- Spices. Tinga is pretty light on the spices, but absolutely necessary is Mexican oregano and cumin. The cumin adds a warm earthy aroma and the oregano adds lemon-y citrus flavors. But only if you use Mexican oregano, which is different than the usual oregano you find in the spice aisle. Mexican oregano can be found near the Mexican food stuffs in the grocery store and it’s pretty cheap to get a bag. If you don’t have any, you can always sub regular oregano, but try and find some when you have a chance.
-
What are chipotles in adobo?
Chipotles in adobo are key to so many Mexican stews and marinades. Essentially, chipotle in adobo are smoked and dried jalapeños rehydrated and canned in tomatoes, vinegar, garlic, and spices. Keep a couple of cans in your pantry, it’s what we do because we use them all the time. They are super versatile and add so much flavor. You can use them in sauces, glazes, marinades, braises, soups, salsas, almost anything. We usually end up using the can in one go, but you can easily just use one or two and save the rest in a container in your fridge (or freeze them) and use them to add extra umami to anything.Instant Pot chicken tinga
- Blend the sauce and set aside.
- Caramelize the onions on sauté high then add the sauce, raw chicken, and chicken stock to the pot.
- Set to 5 minutes at high pressure. Quick release when done.
- Open the lid carefully then remove and shred the chicken.
- Add the chicken back to the sauce and simmer on sauté high for a couple more minutes until the sauce is reduced.
Crockpot chicken tinga
- Blend the sauce and set aside.
- Sauté some onions in a pan on the stove and when caramelized, add them to the slow cooker, along with the raw chicken, sauce, and chicken stock.
- Set the slow cooker to 2-3 hours on low or 1-2 hours on high. When the time is up, remove the chicken and shred, then add back into the sauce.
Chicken tinga FAQ
The key to making the BEST chicken tingaThe onions:
Caramelized onions are key. They add sweetness, depth, and umami to the dish. Lots of people want to rush this step, but caramelizing onions takes time. Pro tip: use low heat and don’t move the onions around too much.The chicken:
How the chicken is cooked is also super important. Most tinga recipes (including this one) start with precooked chicken so it’s important that your chicken isn’t overcooked. My favorite way to cook chicken is to do it in the air fryer. You can also just poach your chicken right in the sauce, especially if you’re making Instant Pot or Crockpot chicken tinga.The oregano:
Mexican oregano is a different plant than the usual oregano you see in the spice aisle. It’s indigenous to Mexico and has a more woodsy, citrus-lime earthy flavor compared to your typical oregano, which is from the Mediterranean. You can find Mexican oregano in the Mexican aisle at the grocery store and if you can’t, you can sub regular oregano, but try and find some, it makes a difference.How to serve chicken tinga
- as tacos tucked into warm tortillas
- on a crispy tostada with refined beans, lettuce, cheese, crema, and salsa
- In a burrito
- on a giant leafy salad
- on top of nachos topped with a ton of cheese
- as a stew with some Mexican rice
- in taquitos!
What to serve with chicken tinga
Make a plate and serve it up with Mexican rice, beans, pico de gallo, warm tortillas, shredded lettuce, salsa, guacamole, and tortilla chipsIf you have some extra chipotle in adobo, try these recipes:
I feel like I can talk about chicken tinga forever but you probably are drooling, so I’m going to let you go so you can get started on dinner! xoxo stephTinga
The best Mexican inspired chicken stew or taco/burrito filling ever
- instant pot
- 6 cloves garlic
- 7 oz chipotle peppers in adobo (1 small can)
- 15 oz fire roasted tomatoes
- 1 tsp Mexican oregano (sub regular oregano if needed)
- 1 tsp cumin
- 1 medium onion (sliced)
- 1 cup chicken stock (low sodium preferred)
- 2 bay leaves
- 4 cups cooked shredded chicken (or 2lbs boneless skinless chicken)
Add the garlic, chipotles, tomatoes, oregano, and cumin to a blender and blend until smooth. Set aside.
Heat up 1-2 tablespoons oil in a frying pan or skillet over medium heat. Add the onions and cook, slowly, until caramelized and brown, stirring every so often, 5-8 minutes.
Stir in the blended sauce, the chicken stock, bay leaves, and the cooked chicken. Bring to a simmer and cook, covered, for 10 minutes. Taste and season with salt and pepper if needed. Enjoy in tacos, burritos, burrito bowls, flautas, with tortillas and rice, or just as is!
Alternately, if you want to just cook the chicken in the sauce, add the boneless skinless chicken thighs or boneless skinless chicken breasts to the sauce and cook for 12-15 minutes, or until the chicken is cooked through. Remove from the sauce, shred and add back into the sauce.
If you want a less spicy version of this, use just 1/2 can of chipotle in adobo and if you’re really sensitive to spice, you can use only 1 or 2 peppers from your can of chipotle in adobo.

I Am... How to make kimbap
I was perusing the frozen section at Trader Joe’s last week, as one does, and I noticed that they had frozen kimbap. Of course we had to try it! I didn’t even know frozen kimbap was a thing, but apparently it’s super common in Korea and at Korean grocery stores. We tried it at home and were wowed. These days you might not be able to find it in store, or if you are looking for a more fresh version, read on for the recipe to make it at home yourself.
How to make kimbap
- Make and season the rice: Sprinkle salt and toasted sesame oil over warm rice, mixing in gently.
- Prep the beef: marinate thinly sliced beef with soy sauce, sugar, and toasted sesame oil. Fry it over medium high heat until it’s cooked through, then set aside.
- Prep the spinach: blanch the spinach, then squeeze out all of the water. Season with salt and a bit of toasted sesame oil.
- Prep the carrots: massage the carrots with a bit of salt and let them soften. Squeeze out any excess water then gently fry in toasted sesame oil and let cool.
- Prep the daikon: Trim the daikon radish into the right length spears so it fits neatly onto the seaweed sheet.
- Roll: Place a sheet of seaweed, shiny side down on a rolling mat. Evenly spread rice onto the seaweed, leaving a slight gap at the top. Place the fillings in the middle of the rice covered seaweed sheet, then use the mat to tightly roll the rice and seaweed over the fillings. Repeat as needed.
- Slice: Slice the kimbap into 1/4 inch slices and arrange onto a plate.
- Enjoy: Dig in and enjoy the fruits of your labor!
Kimbap ingredients
For this kimbap we’re going to go with a classic mix of pickled daikon, carrot, spinach, and beef.- rice - short grain rice is what you need because it’s soft and slightly sticky.
- seaweed - large sheets of roasted seaweed, just like the kind used for sushi.
- danmuji - danmuji is bright yellow pickled daikon. They sell it at Korean grocery stores whole and you can cut it yourself OR you can make it at home with fresh daikon. If
- you’re making danmuji at home, make sure you do it the day before because it needs to pickle for 24 hours.
- carrot - matchstick carrots are a massaged with salt then gently cooked so they add a bright orange punch and crunchy texture.
- spinach - blanched spinach seasoned with toasted sesame oil adds a hint of softness and color.
- beef - thinly slice steak marinated with soy and a bit of sugar hints at a quick take on bulgogi.
- toasted sesame oil - toasted sesame oil is key! It adds so much flavor to kimbap.
Trader Joe’s kimbap review
Spoiler alert: I liked them! Enough to want to buy them again! Mike wasn’t particularly invested, but after tasting it, we both agreed it was pretty good. We bought one roll to try the first time and I like it so much that the next time we went to Trader Joe’s we bought two rolls. I promptly ate both of them by myself and experienced major disappointment when they were sold out on our next TJ’s run. Apparently they’re having some supply chain issues – they didn’t expect it to become such a popular item and now won’t have any more available until November. Tragedy!How to eat frozen kimbap
Having never seen frozen kimbap, I wasn’t sure how it was going to work. Kimbap is almost always freshly made then served the same day, mostly due to the rice. Cold rice, as I’m sure you know, doesn’t retain the same softness and moisture as fresh rice. For the Trader Joe’s kimbap, the instructions have you microwave it for two minutes then let it rest for one. After resting, you just eat it! You don’t need any dipping sauces because unlike with sushi, Kimbap is meant to be perfectly seasoned as-is.What is kimbap
If you’re reading all this and wondering, what is kimbap, I got you! Kimbap (or gimbap) is a Korean roll similar to a maki sushi roll with rice, seaweed, vegetables and cooked protein. The name kimbap 김밥 comes from kim/gim which means seaweed and bap, which means rice. Unlike Japanese norimaki sushi rolls, kimbap is always made with cooked protein and finished with a brush of toasted sesame oil. Kimbap is for snacking, picnics, lunch boxes, and takeout. Its convenient portability and deliciousness makes it a perfect food.Controversy
Trader Joe’s kimbap went viral on Tiktok. There were a bunch of Tiktok taste test videos, ranging from high praise to don’t waste your money. That was more than enough to cause massive interest. A casual google search led to reddit threads where people reported customers buying up to 15 rolls in one shopping trip. Add to that many people saying that kimbap is easy to make and readily available at Korean grocery stores and you have yourself a full blown kimbap controversy.When will Trader Joe’s have more kimbap?
They’re saying a restock will happen in November but some Trader Joe’s still have a lot of rolls, so maybe they’ll move them around to stores that have demand. The kimbap comes from Korea and the factory there needs time to produce more.Where else can I find frozen kimbap?
If you live near a Korean or Asian grocery store, check the frozen aisle, you might find a variety of frozen kimbap there. There are multiple imported Korean brands that make frozen kimbap.Where can I find it fresh?
Korean grocery stores sell fresh kimpab in with they’re ready to eat offerings. You can also order kimbap from a Korean restaurant. If you live in a city with a large Korean population, you should be able to find at least one dedicated kimbap restaurant.Can you make it at home?
Definitely! It’s something that all Koreans enjoy at home. It takes a bit of time to make all the components but the process of cooking the components and assembly of the rolls is simple. The most common fillings are: pickled radish, carrots, cucumber, egg, spinach, imitation crab meat, burdock, fish cake, bulgogi, tuna salad, and kimchi. A mix and match of these ingredients is what you’ll find in most kimbap. Have you tried the Trader Joe’s rolls? Will you be making your own (recipe coming soon!) or are you going to make your way to a Korean grocery store to grab some freshly made rolls? Either way, happy kimbap-ing! xoxo stephKimbap
How to make the best kimbap
- 4 cups cooked rice (short grain preferred)
- 1/2 tsp kosher salt (or to taste)
- 4 tsp toasted sesame oil
- 1/2 lb steak of choice (thinly sliced)
- 2 tsp soy sauce
- 2 tsp sugar
- 8 oz spinach (baby spinach preferred)
- 1 large carrot (cut into small matchsticks)
- 4-8 strips danmuji (see notes)
- 4 sheets seaweed
Place warm rice in a large bowl and sprinkle with 1/2 tsp kosher salt and 1 tsp toasted sesame oil. Fluff the rice, mixing the salt and and oil into the rice evenly. Let cool while you prep the other ingredients.
Marinate the thin slices of steak with 2 tsp soy sauce, 2 tsp sugar, and 2 tsp toasted sesame oil. Set aside.
Quickly blanch the spinach in boiling hot water and cool immediately in ice water. Squeeze the water out of the spinach and mix with a sprinkle of salt and a 1/4 tsp toasted sesame oil. Set aside.
Massage the carrots with a sprinkle of salt and let soften for 2-3 minutes then squeeze any excess water out of the carrots. Sauté the carrots in a non-stick frying pan over medium low heat with a 1/4 tsp toasted sesame oil until slightly soft, 1-2 minutes. Remove from the pan and let cool.
If needed, prep the danmuji by making sure it’s trimmed to fit the length of the seaweed sheets.
Fry the beef in a nonstick frying pan over medium-high heat stirring as needed until cooked through. Remove from the pan and let cool.
Place a sheet of seaweed, shiny side down, on a rolling mat. Evenly spread 1 cup of the prepared rice onto the seaweed, leaving 2 inches uncovered on the top portion of the seaweed. Place 1/4 of the beef, carrots, daikon, and spinach evenly in a neat row in the middle of the rice.
Use both hands and the mat to roll up the rice and seaweed tightly over the fillings until you reach the top of the seaweed where there is no rice. Let the kimbap sit, seam side down, while you repeat with the remaining ingredients.
Lightly brush the rolls with toasted sesame oil then slice into 1/2 inch bite size pieces and enjoy!
Quick pickled danmuji
makes 1 lb picked daikon
prep 10 minutes
pickle 24 hours
8 inch length daikon
1 cup water
1 cup rice vinegar
1/4 cup sugar
2 tsp kosher salt
1/4 tsp ground turmeric
Peel and cut the daikon into 4 inch long strips that are about 1/4 inch thick.
Combine the water, rice vinegar, sugar, salt, and turmeric in a small pot and bring to a simmer of medium heat, stirring, until the sugar and salt dissolves. Remove from the heat.
Place the daikon strips into an airtight container and carefully pour the pickling water over the daikon. Let cool, then cover, submerging the daikon in the pickling juice. Pickle for 24 hours minimum before enjoying!
