
I Am... 5 Easy Baked Brie Recipes
Baked brie has got to be the most crowd pleasing, easiest appetizer there is. Everyone loves it, it seems fancier than it actually is, and it’s super easy and quick to prepare. Plus there are so many variations you can make! I remember the first time I ever had baked brie. It was the most magical thing ever, no joke. It was at a Christmas party years and years ago and I had no idea my life was about to change. The host brought out a baked brie out with a huge pile of crackers and all of a sudden I was that one person that was next to the cheese all night. Some people are extroverts, some people are introverts, I’m a cheese-o-vert. Melty brie is my idea of a good party.
What is baked brie?
Baked brie is the best melted cheese ever. Period. It’s brie, that’s baked. That simple, yet compelling and seductive. Cutting through the mild and tender rind to have the brie melt out like lava is addictive. With baked brie, everything is right with the world.Why you should make baked brie
It’s the easiest appetizer ever. All you do is pop brie into a warm oven (or even the microwave!), put it on a platter, add some crackers and it’s cheese pull heaven. Add some extra flavors and you too can change someone’s world.How to make baked brie
Bake it in a round, shallow oven proof dish. That’s it! If you don’t have a dish, place it on parchment paper and then use the parchment to transfer it to a serving plate later on.What kind of brie for baked brie
There are so many kinds of brie out there with different price points. I tend to grab 8 ounce rounds of brie that’s locally made or something that’s affordable.Do you take the rind off baked brie?
Nope! The rind of brie is perfectly edible and it helps the brie keep its shape and insulates the insides from drying out. You don’t need to take the rind off when you bake it, just cut straight into it when it comes out of the oven melty and hot. If you don’t prefer to eat the rind, simply remove the top layer before or after baking and dip into the brie like fondue.What to bake brie in?
Use an oven proof baking dish, skillet, or small rimmed shallow bowl that is just a bit larger than your brie. You can use a gratin dish, a mini cast iron skillet, or even just crumpled up parchment paper that you can then move to a plate after baking.How long will baked brie stay melted?
If you bake it in a skillet or dish, the dish will help keep the brie scoopable and gooey for about 15 minutes. You can reheat it gently in the microwave for 30 seconds at a time to make it gooey again.How do you serve baked brie?
I put the dish that it’s been baked on on a platter or a larger dish with crackers or crunchy things around it, kind of like how you would style a charcuterie board. Add a knife so people can optionally use it to scoop up some melty cheese, but most people will just take their crackers, toasts, or whatever and just dip and scoop.Baked brie ideas
If you’re looking for your own take on baked brie, here are some tips! Add something:- nutty - a little bit of crunch and nuttiness is never wrong. I like using toasted or candied nuts as opposed to raw ones. Try toasted walnuts, pecans, macadamia nuts, pistachios, almonds, hazelnuts, pine nuts or even seeds like roasted sesame or sunflower seeds
- sweet - honey, maple syrup, jams, compotes, and fresh fruits highlight the buttery richness of brie.
- savory - most of the time people do sweet things with baked brie but things like crispy bacon, crispy pancetta, roasted tomatoes, sun dried tomatoes, pesto, roasted garlic, caramelized onions, roasted mushrooms, or even chili oil are AMAZING.
- herby - fresh herbs are pretty and aromatic, try thyme, rosemary, mint, sage, basil, oregano
What to serve with baked brie
- sourdough crackers: amazing with baked brie!
- fruit: grapes, sliced pears, sliced apples, sliced peaches, or berries are delicious!
- nuts: toasted almonds, walnuts, pecans, candied nuts taste amazing with brie.
- kettle chips: this is my absolute favorite mix of high-low. You haven’t lived until you’ve dipped a folded over kettle chip into melty brie!
If you love brie, here are some other brie recipes to try!
- Cran-brie grilled cheese: cranberry and brie
- Four cheese pizza with mozza, parm, brie, and ricotta
- Roast beef and brie puffs
- The best charcuterie board featuring brie
Classic Baked Brie
Classics exist for a reason, amirite? This is essentially how you bake brie and warm it to a melty point. Accent the creamy, buttery flavor with a drizzle of honey and some fresh thyme or add your favorite jam or accents for your own take. Baked Brie serves 6 15 minutes 6-8 ounce round brie honey thyme sprigs- Heat the oven to 350°F.
- Unwrap the brie (leave the rind on) and place in a small, round shallow oven proof dish.
- Bake for 15-20 minutes. To see if it’s melty, gently poke the center of the brie, it should feel melty and wobbly under the rind.
- Remove from the oven and place the dish on a larger serving plate.
- Drizzle with a generous amount of honey and top with fresh thyme.
- Serve with crackers and a knife/spoon to help with scooping.
Jammy Pecan Baked Brie
Holiday vibes all around with this gorgeous baked brie. The red and white is super festive and sweet-tart cranberries and pecans are amazing together with melty brie. Jammy Pecan Baked Brie serves 6 5 minutes 15 minutes 6-8 ounce round brie 1/4 cup raspberry jam or jam of choice 1 teaspoon oil 1/4 cup pecans 1 tbsp brown sugar rosemary, to finish- Heat the oven to 350°F.
- Unwrap the brie (leave the rind on) and place in a small, round shallow oven proof dish.
- Top the brie with the cranberry jam.
- Toss the pecans with a bit of oil and brown sugar then place on top of the cranberry jam.
- Bake for 15-20 minutes. To see if it’s melty, gently poke the center of the brie, it should feel melty and wobbly under the rind.
- Remove from the oven and place the dish on a larger serving plate.
- Serve fresh rosemary and crackers and a knife/spoon to help with scooping.
Pistachio and Pear Baked Brie
Crunchy, nutty pistachios with warm, melty brie, a crisp pear, and a cracker are so delicious together. I love how the pistachios look against the brie and green Anjou pears echo the green of the pistachios. A little drizzle of honey and flaky sea salt makes this the perfect combination of sweet and salty. Pistachio and Pear Baked Brie serves 6 5 minutes 15 minutes 6-8 ounce round brie 1/4 cup chopped pistachios honey, to drizzle flaky sea salt 1 pear, thinly sliced- Heat the oven to 350°F.
- Unwrap the brie (leave the rind on) and place in a small, round shallow oven proof dish.
- Bake for 15-20 minutes. To see if it’s melty, gently poke the center of the brie, it should feel melty and wobbly under the rind.
- Remove from the oven and place the dish on a larger serving plate.
- Top with chopped pistachios, drizzle with honey, and finish with flaky sea salt.
- Serve thinly sliced pears, crackers and a knife/spoon to help with scooping.
Apricot and Almond Baked Brie
Apricot jam is velvety, tangy and sweet - and I absolutely love it with brie. When it warms in the oven, it almost turns into a glaze and helps caramelize the almonds a bit. The softness of the brie with the crunch of the almonds is divine. Apricot and Almond Baked Brie serves 6 5 minutes 15 minutes 6-8 ounce round brie 1/4 cup apricot jam 2 tbsp chopped almonds fresh thyme- Heat the oven to 350°F.
- Unwrap the brie (leave the rind on) and place in a small, round shallow oven proof dish.
- Top the brie with the jam and sliced almonds.
- Bake for 15-20 minutes. To see if it’s melty, gently poke the center of the brie, it should feel melty and wobbly under the rind.
- Remove from the oven and place the dish on a larger serving plate.
- Serve fresh thyme, crackers and a knife/spoon to help with scooping.
Mini Baked Brie Bites
Make these when you want to pull out all the stops! Baked brie en croute, the fancy French way of saying brie baked in pastry, is probably going to be one of the best bites you ever put in your mouth. Flaky, buttery puff pastry wrapped around gooey warm brie, and a tiny bit of sweetness from honey or jam. HEAVEN.Mini Baked Brie Bites
Make these when you want to pull out all the stops!
- 1 sheet puff pastry (thawed)
- 6 mini brie
- 3 tbsp jam (jam of choice, or honey)
- 1 large egg
Heat the oven to 400°F. Gently roll out the puff pastry to a 12x12 square, then cut into 9 equal squares. Place a teaspoon of jam or honey onto each square, then top each square with a mini brie bite.
Wrap the dough around the brie bite, pressing to secure. Flip the bites over so the smooth side is on top.
Lightly beat the egg with 1 tbsp water then brush the tops of the pastry with the egg. Score the tops with a sharp knife.
Bake for 20-25 minutes or until golden brown and cooked through. Let cool slightly and enjoy!
I Am... 9 Best Thanksgiving Leftover Recipes
Here are 9 of my favorite Thanksgiving leftover recipes turned into bestovers. The best part of Thanksgiving is the leftovers because you can enjoy all the food without any of the cooking! But, if you’re so inclined, sometimes, the things you can make with the leftovers is better than Thanksgiving dinner. Think: turkey noodle soups, the best sandwiches, deep fried croquettes, and turkey curry. I’m getting hungry just thinking about it!
Must try Thanksgiving leftover recipes
Potato turkey pot pie
It’s like a shepherd’s pie but make it turkey! Creamy béchamel, turkey, carrots, and peas tucked under a mashed potato blanket.Thanksgiving croquettes
All the best parts of a turkey dinner, mixed up and deep fried to perfection! Dip them in cranberry sauce for bonus points.Turkey rice bowl
You know that super viral Tiktok salmon rice bowl? Why not try it with turkey? Instead of leftover salmon, shred some leftover turkey and breakout the seaweed snacks!Noodle-based Thanksgiving leftover recipes
Turkey spaghetti
This super creamy, hearty, and comforting baked spaghetti is on my list this year. It’s chicken spaghetti, but with turkey and it’s so, so good.Turkey curry udon
Japanese curry is such a comfort food vibe! Creamy, thick, and so satisfying, especially with udon noodles.Turkey BBH
If you know Vietnamese food you know bun bo hue, the spicy Hue style beef noodle soup. Make it with turkey, it’s so incredibly flavorful and delicious!Asian Inspired Thanksgiving leftover recipes
Turkey fried rice
Fried rice forever and ever right?! Just make this egg fried rice and toss leftover cubed up turkey in. Seriously good.Turkey banh mi
A Vietnamese sub with turkey, crispy sunny side up eggs, cilantro, jalapeños, cucumbers, and carrots.Turkey yakiudon
Fancy up your yakiudon with turkey. Super simple, just substitute the pork for turkey and slurp away. Read More →
I Am... The Best Parker House Rolls
Pillow-y soft, light as air, chewy, and garlicky Parker House rolls are my dream bread. They’re so buttery, bread-y, and delicious. Recently, Mike and I went on a trip to Montreal. We stopped for dinner after a very long walk at McKiernan, a sister restaurant to the very famous Joe Beef. They had fresh baked-to-order garlic Parker House rolls on the menu and even though we ordered a huge amount of food, I couldn’t resist. They were a revelation. It was the single most delicious bun I’ve ever put in my mouth. They came with four and if I’m being honest, I ate all four except a tiny bite that Mike tried. I loved them. It was my first time trying Parker House rolls and I am obsessed. So, I’ve been making rolls now for about 3 weeks straight and this is my best version. So fluffy and dreamy. Sinking your teeth into a warm bun brushed with garlic butter and finished with a sprinkle of flaky sea salt is maybe the best thing ever? It’s definitely a must have on our Thanksgiving
But wait, what are Parker House Rolls?
Parker House come from the Parker House Hotel in Boston. They are buttery, soft, sweet, and have a crisp top. They’re not really round rolls like we see today, instead they’re ovals folded over with a pocket of butter inside. I didn’t shape these buns in the classic Parker House way and I didn’t leave them plain either. Instead I’ve slathered them in garlic butter because garlic. You’ll love these rolls. They’re buttery, soft, pillow-y and a bread lovers dream come true. And they’re simple to make too!How to make garlicky Parker House rolls
- Start by buttering a baking pan. This recipe makes 9-12 rolls so you can go with an 8x8 or a 7x11 inch pan. The butter is going to coat the bottoms of the rolls and make them extra delicious.
- Melt the butter in the milk and stir in the honey.
- In the bowl of a stand mixer (or a large bowl), stir together yeast, flour, and salt.
- Make an indent in the flour then add the milk mixture and 1 egg plus 1 egg yolk. Knead with the dough hook (or by hand) until smooth.
- Lightly butter a large bowl, form the dough into a ball, cover, and let rise for 1 hour or until doubled.
- Divide the dough into 9 or 12 equal pieces then shape into balls and place them in the buttered pan. Cover and let rise until doubled, about 1 hour.
- Brush them with the remaining egg white and bake. While they’re baking make the garlic butter by adding minced garlic to butter and heating it over low heat. Stir in some freshly chopped parsley.
- When the rolls come out, brush them generously with the garlic butter and enjoy warm!
Tips and Tricks
- These taste best fresh and warm but you can easily keep them in an air tight container or sealed bag at room temp for a couple of days.
- Warm them up again, wrapped in foil in a low 200°F oven to make them extra tasty the next day.
- A sprinkle of flaky sea salt adds prettiness and crunch.
- If you don’t have instant yeast you can use active dry yeast, just add the yeast to the warm milk and let bloom before stirring in the butter and honey.
- These rolls are perfect for making ahead, more on that below!
Make ahead Parker House rolls
If you want to make these the day before, just follow the recipe up until they’re shaped. Put the rolls in the pan, cover them tightly, and place them in the fridge to rise slowly overnight. When ready to bake, let them rest on the countertop for 30 minutes, then bake as directed. You can also go ahead and bake the rolls and save them already baked. Just cool completely and keep in an air tight container. Pop the rolls back into an oven safe container, wrap them in foil and warm in a 200°F oven for 10 minutes and serve with softened butter. Happy rolling! I hope these bring you as much joy as they brought me. I made 3 batches in 3 days! xoxo stephGarlic Parker House Rolls
- 1 cup milk
- 7 tbsp butter (plus extra for buttering the pan)
- 3 tbsp honey
- 1 large egg
- 1 large egg yolk
- 3 1/3 cup flour
- 1 tsp salt
- 3 tsp rapid rise instant yeast
- 4 cloves garlic (minced)
- 1 tbsp fresh flat leaf parsley (finely chopped)
- flaky sea salt (as desired)
Lightly butter an 8x8 or 11 x 7 inch baking dish or pan and set aside.
In a small pot, warm the milk and 3 tbsp butter over medium low heat until the butter melts. Stir in the honey.
Add the yeast, flour and salt to the bowl of a stand mixer. Add the milk mixture, 1 egg and 1 egg yolk. Use the dough hook and knead for 7-10 minutes or until smooth and elastic. The dough will be slightly tacky.
Lightly rub a large bowl with some butter. Shape the dough into a ball and transfer the dough to the bowl. Cover and let rise until doubled, about 1 hour. It will be soft and slightly sticky.
Punch the dough dough and divide it into 9 or 12 equal pieces. If you want to be precise, use your kitchen scale to see how much your dough weighs, then divide by 9 or 12.
Roll the dough into balls, stretching, and pinching and tucking into balls with smooth tops. Place them in the buttered pan, cover and let rise until doubled and puffy, about 1 hour.
Heat the oven to 350°F. Brush the tops of the rolls with the remaining egg white mixed with 1 teaspoon water. Bake until golden brown and cooked through, about 20-25 minutes.
While the buns are baking, make the garlic butter by melting the remaining 4 tbsp butter, along with the garlic over low heat in a small sauce pan. When melted, stir in the parsley.
Once the buns come out of the oven, immediately brush the tops with the garlic butter and finish with flaky sea salt. Enjoy warm!

I Am... The Ultimate Kale Salad
I have been living on this kale salad. It’s so pretty and festive and it just gets me in my fall feels. It has all the textures and flavors and is full of healthy stuff! It’s the perfect side for Thanksgiving or any special fall/winter meal. Heck, I eat it as a meal in itself all the time.
Why this kale salad is the best
I love how you can make this salad ahead of time, with dressing, and it just gets better and better. The kale and shredded Brussels sprouts stay hearty and hold up to the dressing and nothing wilts or gets limp and sad. The apples add a bit of sweetness and crunch, the cucumbers add crisp cool freshness, the carrots add color, and the sliced almonds are the nutty kiss on top. Even better is when you add chicken breast and roasted squash. Seriously, so good!The dressing
The dressing is a really simple but addictive mix of Japanese rice vinegar, soy, mirin, a touch of sugar and toasted sesame oil. It’s light and tangy and full of umami. It lets the salad ingredients shine while still bringing the flavor.What kind of kale for salad
My favorite kind of kale for kale salad is Tuscan kale, also known as dinosaur kale or Lacianto kale. It’s flat and a deep, dark green. It’s thinner and more tender than the classic curly kale you see and it tastes amazing raw. You can also use curly kale for this salad, but dinosaur kale is my kale of choice.How to prep kale
- Wash the kale and throughly dry.
- Use a pairing knife to cut out the center stems or simply tear the leaves off the stem. The stems are tough - you can discard them.
- Roll the leaves up into a tight roll and slice thinly, into ribbons.
- Your kale is ready for salad!
How to shave brussels sprouts for salad
I love brussels sprouts in salad - they’re just like tiny cabbages. To shred sprouts, easily, wash, trim the ends off, cut them in half, place them cut side down on the cutting board and thinly slice cross-wise to create shaved sprouts.How to make kale salad
- Make the dressing in a bowl or liquid measuring cup. Sometimes I like to use my milk frother to really emulsify the dressing.
- Toss together all the ingredients in a large bowl, but save some apples, cucumber, carrots, and almonds for garnish.
- Dress the salad according to taste - you might not need all the dressing. I tend to dress my salads on the lighter side, I usually make a half portion of dressing. This salad is all about you so dress accordingly!
- Finish up by garnishing the top of the salad with the reserved toppings and enjoy!
What to serve alongside kale salad
I like this salad as a meal but it makes an excellent side dish for proteins such as:- weeknight steak
- Italian style pork chops
- slow roasted salmon
- honey garlic mustard chicken thighs
- crispy oven baked tofu
- honeynut squash
The Ultimate Kale Salad
This kale salad is all the fall feels.
- 1/4 cup rice vinegar (Japanese preferred)
- 2 tbsp soy sauce
- 2 tbsp mirin
- 2 tbsp neutral oil
- 1 tbsp sugar
- 1 tbsp toasted sesame oil
- 2 bunches kale (thinly shredded, approx 8 cups, dinosaur/tuscan/lacinato preferred)
- 1 lb Brussels sprouts (shredded, approx 6 cups)
- 1 cucumber (sliced)
- 1 apple (cut into matchsticks, Fuji preferred)
- 1 carrot (shredded)
- 1/4 cup sliced almonds
- roasted chicken breast (sliced, optional)
- roasted squash (cubed, optional)
In a liquid measuring cup or bowl, whisk together the dressing ingredients, taste, and adjust.
Toss together the shredded kale, sprouts, cucumber, fuji apple, and carrots in a large bowl. Dress evenly to taste and top with sliced almonds.
Optionally top with roasted chicken breast and roasted squash! Enjoy!

I Am... Air Fryer Squash
If you love roasted squash it’s time to turn to the air fryer because roasted air fryer squash is AMAZING. Super crisp and tender squash in just a fraction of the time it takes to do in the oven.
It's gourd season!
Come fall, I’m all about the squash. It’s so hearty, delicious, filling, and nutritious. My favorite of all the fall/winter squashes are delicata and honeynut. But I also LOVE kabocha, butternut, buttercup, and acorn. I recently just tried red kuri, a small squash that looks kind of like pumpkin. All the squashes are just so perfect, especially when roasted in the air fryer. They turn golden brown, perfectly caramelized, sweet, salty, with the best buttery texture. It’s a must have fall dish. If I’m being honest, it’s an anytime of the year dish for me but when squash is in season, it’s definitely a daily thing. This is my go to roasted squash recipe. It’s super easy, with only 4 ingredients: squash, olive oil, salt and pepper. The prep takes hardly any time at all and it’s good enough to enjoy on its own, as a side dish, or in other recipes. Meal prep a bunch of roasted squash at the beginning of the week and you’ll have deliciousness on hand for days.How to prep squash
This depends on which squash you choose. Technically, all squash skin is edible. Still, that doesn’t mean that all squash skin tastes amazing. Sometimes the textural difference between the skin and the squash is too much. Generally, I tend to peel butternut and kabocha because their skins are a little tough. Honeynut, acorn, and delicata have tender, easy to chew skin so you don’t need to peel them. If you need to peel your squash, the easiest way is to use a vegetable peeler.How to cut squash
Get a large, heavy knife and a solid cutting board and chop off the stem then slice the squash in half, vertically. If the squash is super hard, you can pop it in the microwave for 1-2 minutes, which will soften it slightly. Use a spoon to scoop out the seeds and any pulp and then dice or slice the squash into evenly sized pieces.How to air fry squash
- Toss the cut squash with a generous drizzle of olive oil and salt and freshly ground pepper.
- Add the squash to the air fryer basket and air fry at 400°F for 12-15 minutes or until crisp and golden brown, shaking halfway.
- Let cool slightly and enjoy!
How long to air fry squash
I find that 12-15 minutes at 400°F is perfect! The high heat caramelizes the outsides and the timing is perfect for soft and tender insides.What air fryer do you have?
If you’re wondering which kind of air-fryer we have, it’s this style. It’s quiet and easy to clean and fairly wide. We love it.How to use roasted squash
Golden brown, caramelized air fried squash is delicious on its own or as a simple, hearty side dish. If you have any extra on had, there are tons of ways to use roasted squash. Here are some of my favorites:- in salads
- blended, in soups
- blended as dips
- in curries
- in omelettes
- with quiche or frittatas
- in savory tarts
- in tacos, burritos, or quesadillas
- with pasta (especially mac and cheese!)
- on pizza
- on toast
Air Fryer Squash
Super crisp and tender squash in just a fraction of the time it takes to do in the oven.
- air fryer
- 1 medium squash (eg. delicata, honeynut, butternut, buttercup, kabocha, red kuri, acorn)
- 1-2 tbsp olive oil
- salt and freshly ground pepper
Wash and dry your squash. If desired, peel. Then trim, de-seed, and cube your squash.
Toss with a generous drizzle of olive oil and season with salt and freshly ground pepper.
Add the squash to the insert of the air fryer and air fry for 12- 15 mins at 400°F, shaking halfway, or until tender and golden brown. Enjoy!

I Am... 10 Best Simmer Pot Recipes
We are deep into cozy season and I am here for it with 10 of my best simmer pot recipes. What is a simmer pot you ask?! It’s the absolute best way to make your home smell warm and inviting. All you do is bring a small pot of fruit and spices to a simmer – your house will fill with the most amazing smells.
Cottage core
Give me all the cottage core feels because in another life I would definitely be living out in the woods, wearing a long flowy dress with my chickens happy outside. Of course all my food would come from my garden and everything would be just so. Freshly baked sourdough and soup would be on the menu and everything would smell amazing because of my simmer pot! Ever since fall hit, I’ve been doing a different simmer pot everyday and it’s been so nice! It really adds something to the feels of home and having a pot simmering and steaming on the stove is so cozy. Usually I drive Mike nuts with lighting expensive candles, but I haven’t been giving in to my candle addiction as much because I’ve been all about the simmer pots.What is a simmer pot?
A simmer pot is an alternative to scented candles, completely all natural and beautiful smelling. All you do is simmer a pot of spices on the stove and your home fills up with the smells of a cozy fall day. Things like cinnamon sticks, apples, oranges, cloves, vanilla, star anise, and nutmeg makes it feel like you have the sweetest smelling home ever.What can I use for a simmer pot?
Anything you love the smell of! You can use whole fruits or you can save your fruit peels in the freezer until you have enough. Warming spices smell amazing and vanilla is a delicious touch.How to make a simmer pot
Fill a small saucepan with water and add your simmer pot ingredients, bring to a boil, then turn the heat down to a simmer. Add water every 30 minutes or so. The beauty of simmer pots is that they are an art, not a science. You don’t need definitely recipes and your house will still smell amazing. I’ve included my favorite combinations below!Crock pot simmer pot
If you don’t want to use your stove, you can easily use your slow cooker on low or simmer. Just fill it most of the way up, add the ingredients, turn the heat up until it stems, then turn the heat down.Apple cinnamon
- apples, cut in half, sliced or just peels
- 1-2 sticks cinnamon
- 2 tsp vanilla extract
Lemon bar
- 1 lemon, cut in half, sliced, or just peels
- 1 knob fresh ginger
- 2 tsp almond extract
Citrus vanilla
- 1 lemon, cut in half, sliced, or just peels
- 1 orange, cut in half, sliced, or just peels
- 2 tsp vanilla extract
Cranberry orange
- 1/2 cup fresh cranberries
- 1 orange, cut in half, sliced, or just peels
- 1 cinnamon stick
- 2 springs fresh rosemary
Pumpkin spice simmer pot
- pumpkin peels (if you have them)
- 2 sticks cinnamon
- 1 whole nutmeg
- 1 knob fresh ginger
- 5-6 whole cloves
Chai spice
- 1 knob fresh ginger
- 2 tsp fennel seeds
- 5 whole cardamom pods
- 5 whole cloves
- 1 stick cinnamon
- 2 star anise
- 1 tsp whole black peppercorns
Gingerbread
- 1 knob fresh ginger
- 1-2 sticks cinnamon
- 5 whole cloves
- 1 whole nutmeg
- 5 whole cardamom pods
- 2 whole star anise
Christmas clementine
- clementines, sliced in half (or clementine peels)
- cedar sprigs
- bay leaves
- fresh rosemary
Festive forest
- cedar sprigs
- spruce sprigs
- eucalyptus sprigs
Warm woods
- cedar sprigs
- pear, sliced or halved
- smoked wood chips (you can find these at outdoor/garden stores)
Simmer Pot Recipe
A simmer pot is the absolute best way to make your home smell warm and inviting.
- 1-2 cups aromatics
- 2-3 cups water
Add the simmer pot ingredient into a pot filled with 2-3 cups water. Heat over low heat until steaming and simmering. Add water when the water level gets low.
Enjoy the warming, cozy smells!

I Am... Dalgona Candy
You only need 2 ingredients to make the iconic Dalgona candy from Squid Game! I can’t remember the last time I had a birthday party but if I did one right now, it would definitely be a Squid Game themed party, minus the dying. We would compete for the money of course! One of the most iconic games in Squid Game was the dalgona candy game and I just had to make some for me and Mike to try. Spoiler, I lost, guess I’m ded LOL.
What is dalgona candy?
If dalgona candy sounds familiar it’s probably because you might have heard of the viral dalgona coffee sensation last year? Everyone and their grandmas made it! Dalgona candy is an old school Korean honeycomb candy that’s similar to seafoam or honeycomb toffee or the inside of a Crunchie bar. It’s sweet and crunchy and delicious. In Korea, street vendors sell dalgona (also known as ppopgi) stamped with shapes. If you manage to eat around the candy keeping the shape intact, sometimes they give you a free candy! Of course in Squid Game it’s much more deadly.How make dalgona candy?
Making dalgona is super easy, basically you melt sugar and mix in a bit of baking soda so it foams up. It ends up looking like whipped coffee, which is where dalgona coffee got the name from. After you stir in the baking soda and it foams up, you pour it out, stamp in a shape and let it cool.Ingredients
- sugar - sugar, when you heat it up, it turns a lovely golden caramel. You can use white or brown sugar, up to you! Brown sugar will come out much darker.
- baking soda - this is what makes the caramel foamy. Make sure you use baking SODA, not baking powder.
Dalgona tools
- stainless steel ladle
- wooden chopstick
- parchment paper
- a metal flat surface - I used the back of a metal round tin, you can also use a flat metal spatula, or even better, these okonomiyaki spatulas
- cookie cutters
Tips and tricks
I made so many of these, super frustrated that my dalgona kept sticking to the bottom of my flat metal tin. All the recipes on the internet said that you just need to wait 30-40 seconds before pressing but after lifting, the tops would just come off. Finally I decided to lightly oil and sugar the bottom of the tin and YAY, no sticking. I really recommend it if you’re having trouble. Here are some other tips and tricks I learned along the way.- Make sure you have all the tools and ingredients on hand: sugar, baking soda, lightly oiled and sugared flat metal surface, a parchment paper or silicon lined baking sheet, a metal spatula, a wooden chopstick, and the cookie cutters.
- You don’t need to stir the sugar too much, especially at first. Let it melt along the edges and the sides until it’s clear and melty, then start stirring. If you stir too early it will take forever for you to melt your sugar.
- Don’t add too much baking soda. It’ll make the candy bitter and it won’t taste good. You only need a very tiny pinch. Just make sure you stir it in really well and it will aerate and puff up the sugar.
- Let the candy cool a tiny bit before pressing it down or it will stick and you will be sad, like me. But even better, lightly oil and sugar the surface and you won’t have any problems with sticking.
- If you’re planning on making more than one (I made so many so I could get them perfect!), bring a pot of water to a boil then turn it off. After you pour out the candy, you can carefully add the ladle to the hot water and the excess candy will just melt right off. Just be careful because it will sizzle and expel a lot of heat.
- To get perfectly round dalgona candy, don’t worry about getting every little bit of candy out. Just use the chopstick to gently help the candy fall out into a blob. I tried using a rubber spatula to try to scrape everything out and ended up with blobs instead of circles.
Dalgona Candy
The iconic candy from Squid Game
- 1 tbsp sugar
- 1 small pinch baking soda
Gather all your tools and ingredients. Lightly oil and sugar a flat metal spatula. Add the sugar to the stainless steel ladle and hold over medium low heat.
Let the sugar melt along the edges until it’s clear, then stir with a wooden chopstick, until the sugar is melted and starts to caramelize. The sugar should be clear and lightly amber.
Move the ladle off the heat and stir in the baking soda, quickly until it starts to foam and turn a light caramel color. Move the ladle between on and off the heat to keep it warm.
Pour the candy onto a parchment paper lined baking sheet.
Let cool for 10-20 seconds and then press with the sugared spatula to the desired thickness.
Stamp with a cookie cutter part of the way through. Let cool until firm and crunch and enjoy!

I Am... Crispy Rice
I am absolutely in love with crispy rice. It’s beloved around the the world: the saffron yellow socarrat of Spanish paella, the golden crispiness of Persian tahdig, and the best parts of Korean hot stone bowl dolsot bibimbap. Crispy rice has the most aromatic toasty nuttiness and I can’t get enough. Sometimes when I make rice on the stove, I let the bottom get scorched a little just so I can have a little treat. I love it so much that whenever I see a crispy rice dish when we go out to eat, I have to have it. It’s pretty common on Korean or Japanese menus: a little crispy rice nugget topped off with spicy tuna or salmon with a pile of kimchi or thinly sliced scallions. It’s the best bite: savory and nutty from the crispy rice, fresh from the fish, a bit spicy, and full of flavor and texture.
What is crispy rice?
Crispy rice is a little crispy rice cake made from fresh or leftover rice. You can use plain rice, but it tastes even better if you season it as sushi rice. Press the rice into a pan and chill it overnight and the next day, you cut the rice into little cakes and fry them until crisp on the outside and tender on the inside. You can snack on the crispy rice cakes as is or top them off with a myriad of toppings!Tiktok crispy rice
Crispy rice has been trending all over Tiktok and I am here for it. There are so many Tiktoks of people making gorgeous little crispy rice cakes. Some people use leftover rice, some people make rice fresh, some of them deep fry, some shallow fry, basically anything goes in the crispy rice world. I’m not sure who trended first with crispy rice but for me, I based this recipe off of the spicy tuna volcano at Gyu Kaku, a Japanese BBQ place. The spicy tuna volcano is heap of spicy tuna on crispy fried rice and it’s so good. I always order it when we go. Tiktok inspired me to make my own at home!Crispy rice ingredients
All you need is:- rice - the best rice to use is short grain Japanese rice. That’s what they use to make sushi. We usually buy a bag of Koshihikari, which is a popular type of rice variety from Japan. Koshihikari is soft, moist, fluffy, a tiny bit nutty and sweet. It has amazing texture and flavor.
- rice vinegar - go for unseasoned rice vinegar because we’re going to season to taste with sugar and salt. They sell rice vinegar in the Asian aisle at most grocery stores. We usually buy Kikkoman or Marukan unseasoned rice vinegar.
- sugar - there’s a bit of sugar in sushi vinegar, it adds sweetness and rounds out the rice vinegar.
- salt - one of the three components of sushi vinegar.
- oil - you’ll need a bit of neutral oil to fry the rice cakes. I like using canola, rice bran, or grapeseed. You don’t need much, we’re not deep frying, just shallow frying.
- toppings - you can enjoy your crispy rice cakes plain (I do it all the time, dipped in spicy mayo!) or you can top it with whatever your heart desires. I included some inspiration down below.
How to make crispy rice
First off you need to make rice, preferably short grain rice! I like to make rice on the stove. Here’s how I do it:- Wash and rinse one cup of rice until the water runs clear.
- Add the rice and one and a quarter cup water to a pot with a lid. Bring everything to a boil over high heat and when it’s bubbling rapidly, turn the heat down and put the lid on.
- Let it cook on low, covered, without peeking, for 17 minutes.
- When the time is up, leave the lid on for the rice to steam for 10 minutes.
- When the 10 minutes are up, fluff up the rice.
- After you fluff the rice, pour the sushi vinegar over it and use a spatula or rice paddle to fold the vinegar into the rice.
- Press the sushi rice into a baking pan, cover and place in the fridge overnight.
- The next day, take the rice out of the pan and use a sharp knife to slice into 2 x 3/4 inch slices. Now you’re ready to crisp them up!
To pan fry
Heat up a generous amount of oil in a pan over medium heat. Add the rice cakes and fry until golden and crispy, flipping once.To air fry
Lightly coat the rice cakes with oil and air fry at 400°F for 15 minutes, flipping halfway through.To bake
Heat the oven to 475°F. Lay down a sheet of aluminum foil and lightly brush with neutral oil. Lightly coat the rice cakes with neutral oil and bake, flipping once, until crisp and lightly golden, 15-20 minutes.Tips and tricks
- Don’t skip out on seasoning the rice! Plain rice will definitely work for this, but seasoned sushi rice is better.
- Speaking of rice, if you have it, use short grain Japanese rice. Our favorite rice is Koshihikari.
- Lightly wet your hands or spatula when pressing the rice into the pan so it doesn’t stick.
- It’s tempting to just pop the rice into the fridge, give it an hour, and slice it up, but if wait until it solidifies overnight, you’ll end up with a much more neatly sliced rice cake.
- Take your time and crisp the rice until golden and crispy. It’s tempting to turn up the heat but low and slow is the way to go.
Crispy rice toppings
Go wild! Essentially you’re making a crispy sushi rice cake so anything that you’ve had on sushi will taste amazing. Try:- sashimi grade tuna or salmon diced and mixed with kewpie mayo, sriracha, and fish eggs
- crab, avocado, kewpie mayo
- miso baked eggplant
- miso tuna salad
- Japanese egg salad
- if you’re vegan, sub the tuna or salmon with cubes of tomato
Crispy Rice
How to make gorgeous, nutty, satisfying crispy rice cakes topped with spicy tuna or salmon.
- 1 cup short grain rice (preferably Koshihikari)
- 2 tbsp rice vinegar
- 1 tbsp sugar
- 1 tsp salt
- 1 lb tuna (sushi grade, or salmon)
- 1/4 cup kewpie mayo
- 1 tbsp sriracha
- 2 tsp soy sauce
- 1 tsp toasted sesame oil
- 1 avocado (sliced)
- 1-2 jalapeños (sliced)
- toasted sesame seeds (as needed)
Place the sushi rice in a colander, rinse throughly and let drain for 15 minutes. Cook rice according to the package instructions or your preference.
While the rice is cooking, mix together the rice vinegar, sugar, and salt, until the sugar and salt dissolves.
Transfer the rice to a large bowl and fluff. Sprinkle on the sushi vinegar and use a rice paddle to fold the sushi vinegar into the rice.
Line a baking tray with parchment paper or plastic wrap. Spread the rice out, pressing it down, until it is about 3/4 inch high. Cover and let cool in the fridge overnight.
The next day, make the spicy tuna and prep the toppings. Cut the tuna into small pieces. Combine the tuna with the kewpie mayo, sriracha, soy sauce, and toasted sesame oil. Keep cold in the fridge.
Take the rice out of the fridge and slice into 2 inch by 3/4 inch pieces. Heat up a generous amount of oil in a pan and heat it up over medium heat.
Add the rice cakes and fry until golden and crispy, flipping once. Drain on a wire rack.
Top the crispy rice with slices of avocado, the spicy tuna, a slice of jalapeño, and a sprinkle of toasted sesame seeds. Enjoy!
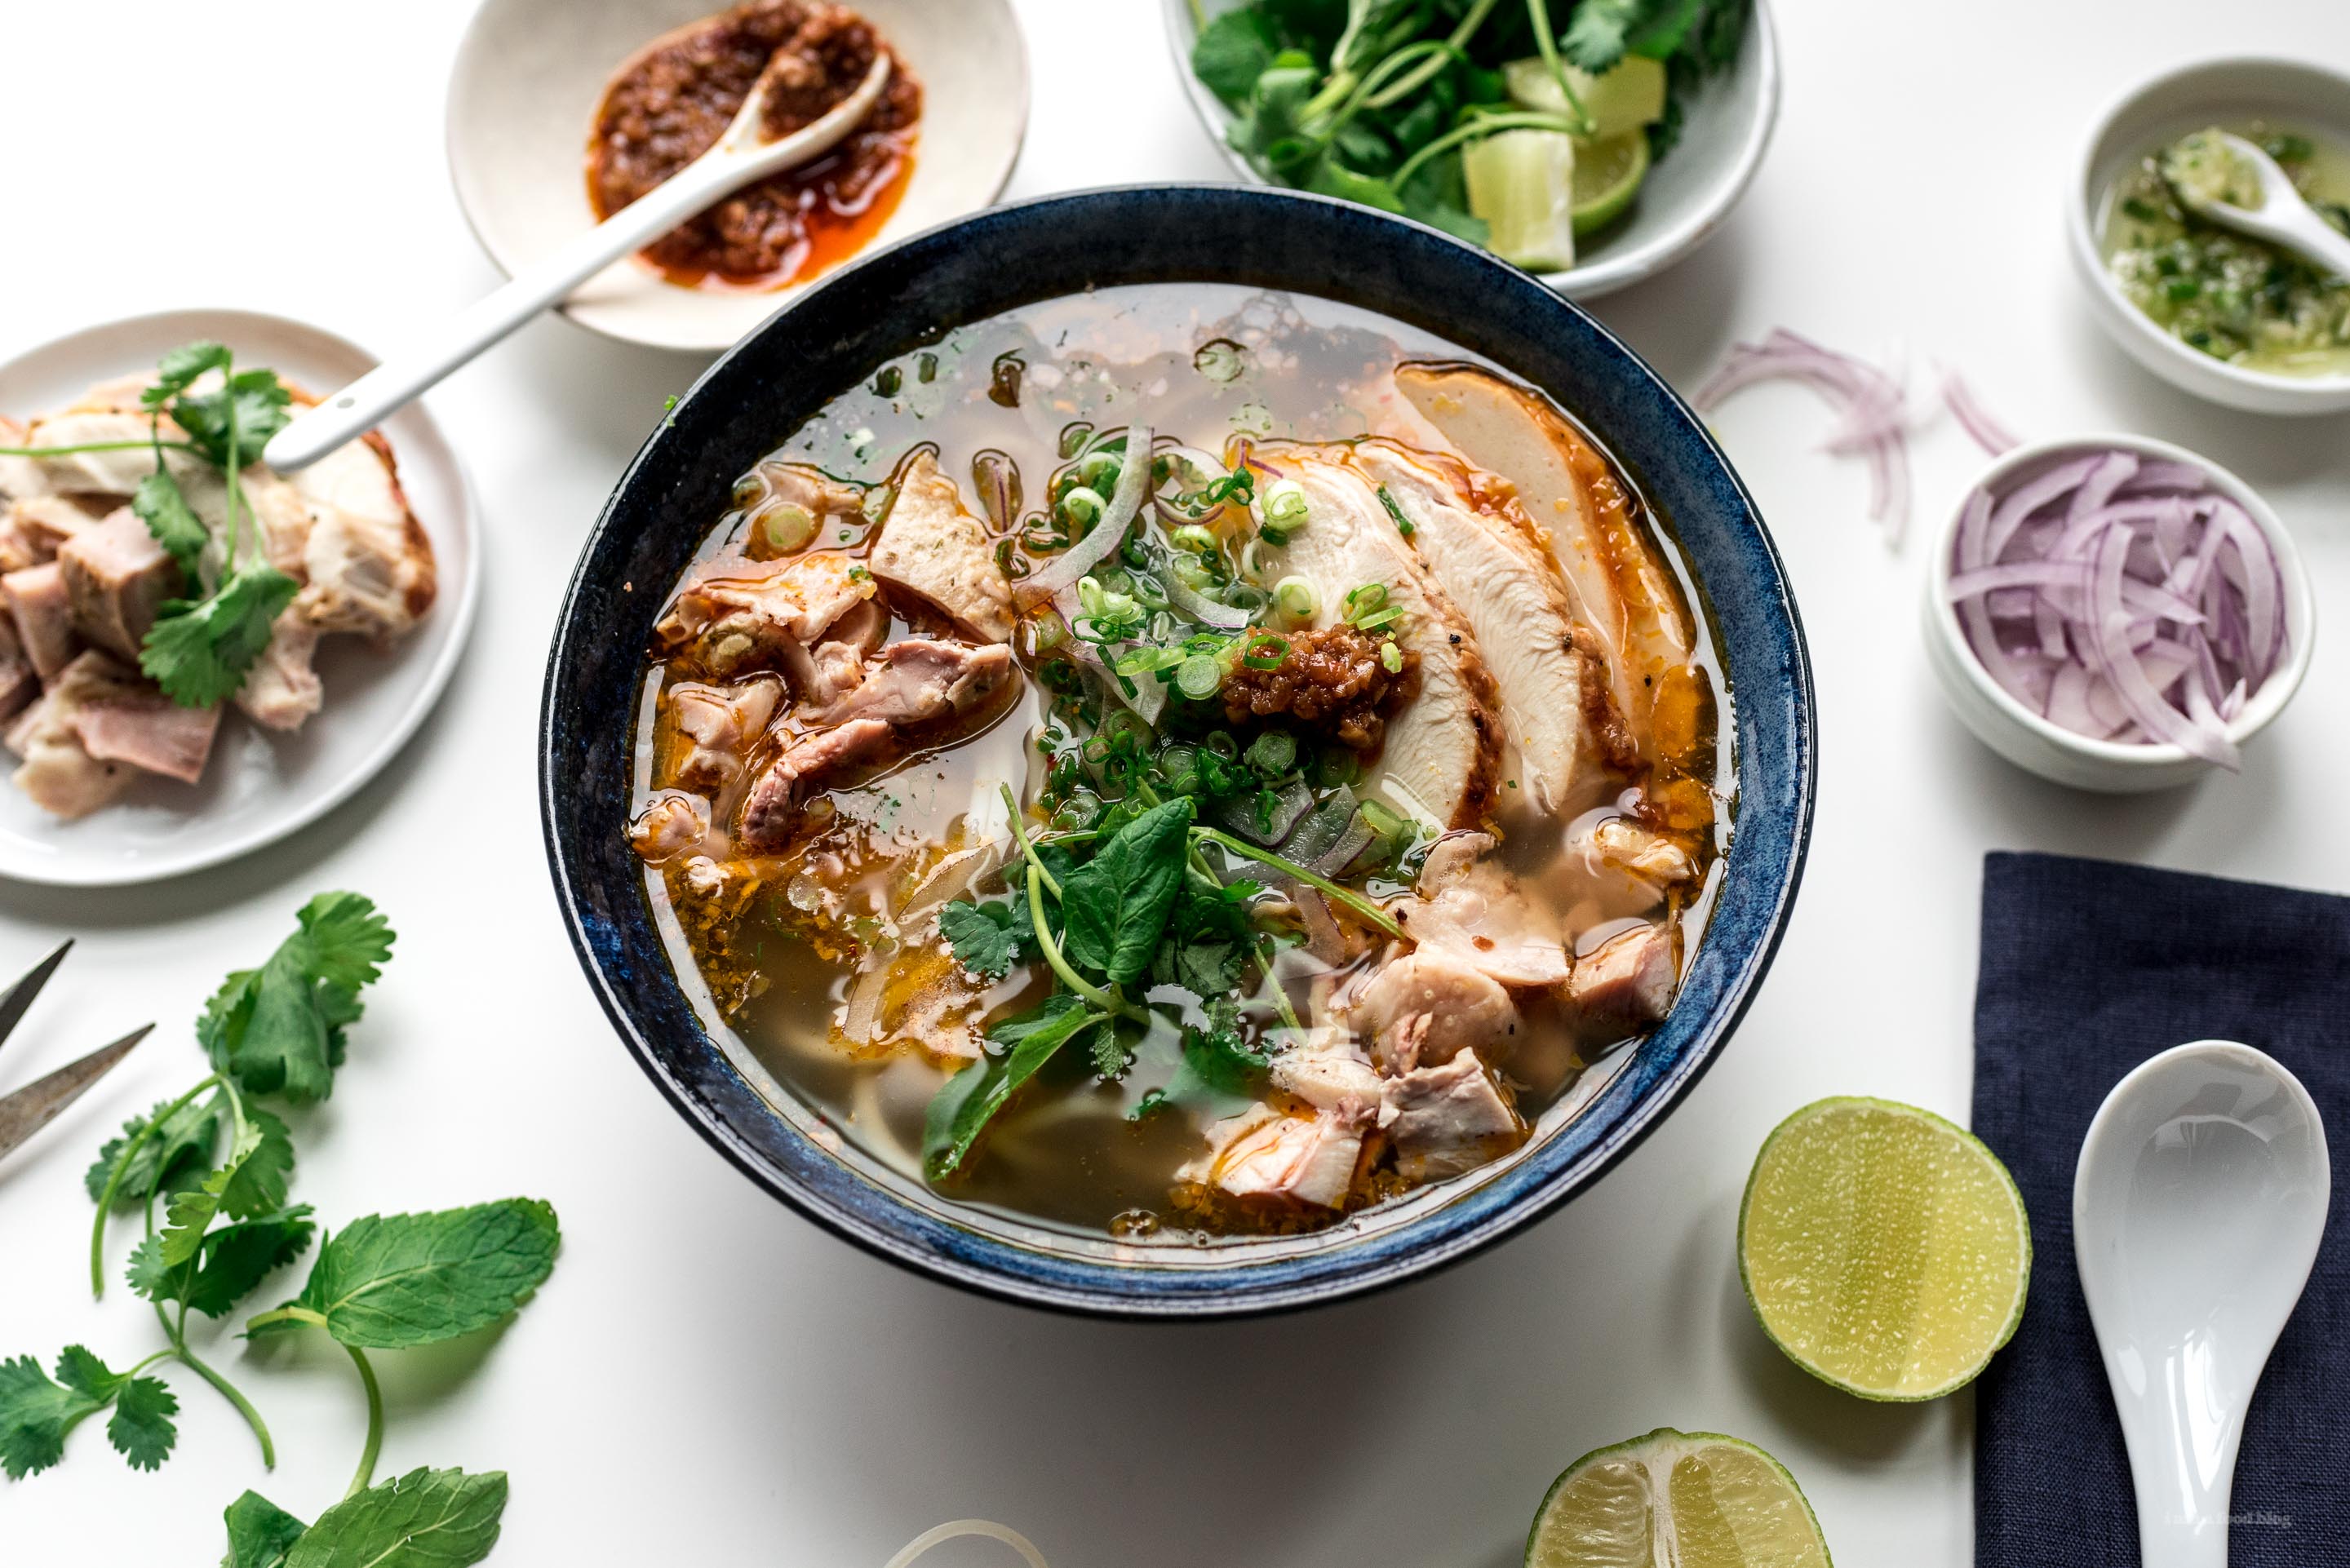
I Am... The ultimate guide to pho at home
This is the best bowl of pho I know how to make over 20 years of making pho from scratch. You know pho needs no introduction. The deeply spiced fragrant broth is the stuff dreams are made of. The bouncy rice noodles, tender fresh beef, and bright poppy herbs and that gentle hint of lime, it's all I need in life (other than Steph).
What is pho?
Pho is a cozy, beefy, aggressively spiced soup that is also light, fresh, and bright at the same time. The simple combination of fresh rare steak, melty brisket, tender rice noodles, and that magical soup comes together to rival anything out of a Michelin starred restaurant, usually under $15 (sigh, the days of a $5 bowl are sadly long gone). If you want to know everything about pho, you can read this 3000 word ode to pho, but I think it's better just to jump right into making it.Why this pho recipe?
This recipe includes all the little tips and tricks I’ve picked through 20 years of making pho. It includes key points such as:- Throwing your spices in at the end to preserve their subtle flavor.
- Drying out your rice noodles so they soak up extra flavor.
- Separating out the process over two days for ultimate tastiness and relaxation.
The two day version
When you want to go all out, optionally separating your pho making over two days gives the best results. On day 1, you make the pho and strain it into a container, then refrigerate the soup and the brisket separately. On the morning of the next day, the fat will have solidified on the top of the soup. Remove the fat and melt it down over low heat in a small pot, then strain it into a small container and refrigerate. Rinse/slice the toppings, wrap them up, and throw them in the fridge too. Finally, half an hour to an hour before you want to eat, reheat the pho soup and season it to taste. Make the noodles and let them hang out in a colander to dry out a bit. Neatly slice your cold brisket and drop the slices in the soup to reheat. Thinly slice your steak if you didn’t buy it presliced. Then just build your bowls, adding the fat back in if desired, and go to town.Oxtail makes the best pho soup
Over the years I’ve tried everything that can make a good soup, and when I want to go all out, I splurge on oxtail. It has the perfect combination of collagen for body, fat for taste, and of course, beefiness for beefiness. It’s a little on the expensive side but totally, 100% worth it. I long for the days when oxtail was cheap and unknown. When we live in the desert and it’s hard to get oxtail, marrow/soup bones are great. But oxtail is by far the best option for the best pho soup. Note: After you are done with the oxtail, the meat is a little tasteless but very tender and falls right off the bone - remove and enjoy it with some soy sauce or fish sauce as a chef’s treat, or serve it, it's up to you!How to make pho soup
- Blanch the oxtails. Rapidly boil the bones for 5 minutes to clear out any impurities that might be there. Tip: I like to use a small pot to blanch the meat faster while heating up my 8 cups of water in a larger pot simultaneously. That way, I can just use tongs to transfer the bones from the small pot to the big pot without a lot of effort, and it saves time because you’re heating up both pots at the same time, and also because then you don’t need to wash a giant pot; the little one just goes in the dishwasher.
- Char the onions and ginger. I use a blowtorch exclusively for this. You can char them in a pan on the stove or under the oven broiler, but a good blowtorch is a super essential kitchen tool that’s not very expensive, and bonus, you can make creme brulee.
- Simmer the oxtails, onions, and ginger as low as possible for 3.5 hours. I’ve tried this at 3 hours and 4 hours, and 3.5 hours is the right amount of time. You’re looking for something super low, like 1 bubble every 30 seconds low. Preferably put a slightly ajar lid on it. Check back at the 1.5 hour mark to make sure you have at least enough water to cover the bones.
- Char the other spices. This is an optional step that I always do. You don’t need a lot of time, just a brief kiss with the blowtorch. If you don’t have a blowtorch, toast the spices over low heat until they become fragrant.
- Drop the brisket and spices in at the 3.5 hour mark and continue simmering for another 2 hours.
- And you’re done. You’ll need to season it with fish sauce, salt, and sugar, but I save that for the second day.
Stovetop vs Crockpot vs Instant Pot
- Can you make this with a crockpot? Yes! You can do everything in a crockpot if you skip the blanching step since you’re straining it at the end anyway. Skip the blanching step and do everything else in a crockpot on high/low (as appropriate) and you’ll have the best crockpot pho ever.
- What about the instant pot? Also yes! The instant pot is one of my preferred ways to make pho when I want something simple, although, full disclosure: it’s not as good as the stovetop/crockpot version. Since the instant pot is about speed, you can just drop everything on high pressure for 40 minutes, and you’ll have some amazing (and amazingly fast) pho.
Ingredients for pho
While pho is easy to make, technique-wise, it can be a little daunting to gather all the ingredients. If it’s your first time, the spices can even seem a little much, but the spices are good for many, many bowls of pho, as well as many other awesome dishes.Oxtail
This is the key to the most amazing pho. It used to be super cheap back in the day. As it became more popular in recent years, it’s also gotten more expensive, but it’s 100% worth it. After you’re done making the pho soup, the meat falls right off the bone. I don’t usually include it in the pho because it’s not as aesthetically clean as all the sliced meats, but if you wanted to, you totally could. Have it with a little Thai chili crushed into some soy sauce as a reward for all that work you did.Brisket
If you want your brisket to be 100% fall apart in your mouth, cook it for 4 or even the whole 5.5 hours. Personally, i like mine to have a little body (the rare steak provides the softness anyway) so I only cook it for 2 hours, which both gives it structure and leaves most of the taste where it belongs, in the brisket. You probably don’t need a large brisket - the recipe calls for just 1/4lb per person - so if a large brisket is all you can find, switch it out for an equally as traditional flank steak.Sirloin
This is the traditional rare steak that is the basis of pho tai, the default (and amazing) pho bowl you get everywhere. It’s a tender fall-apart melt-in-your-month affair that’s raw when it comes to you on the table, both to show off the quality of the meat and to let you finish the cooking so that its as perfect as possible. Tip: If the thought of serving raw steak to your diners (or yourself) turns you off, cook it in the soup on the stove for 5 seconds or so, then serve it on a separate dish so it doesn’t overcook in the hot pho soup. Ask your butcher to slice this, or buy hot-pot ready meats.Spices & Aromatics
In order of importance, my pho spice mix is: star anise, cinnamon, cloves, coriander seeds, white (or black) peppercorns, cardamom, fennel, and cumin. You’ll also need onion and ginger.Toppings
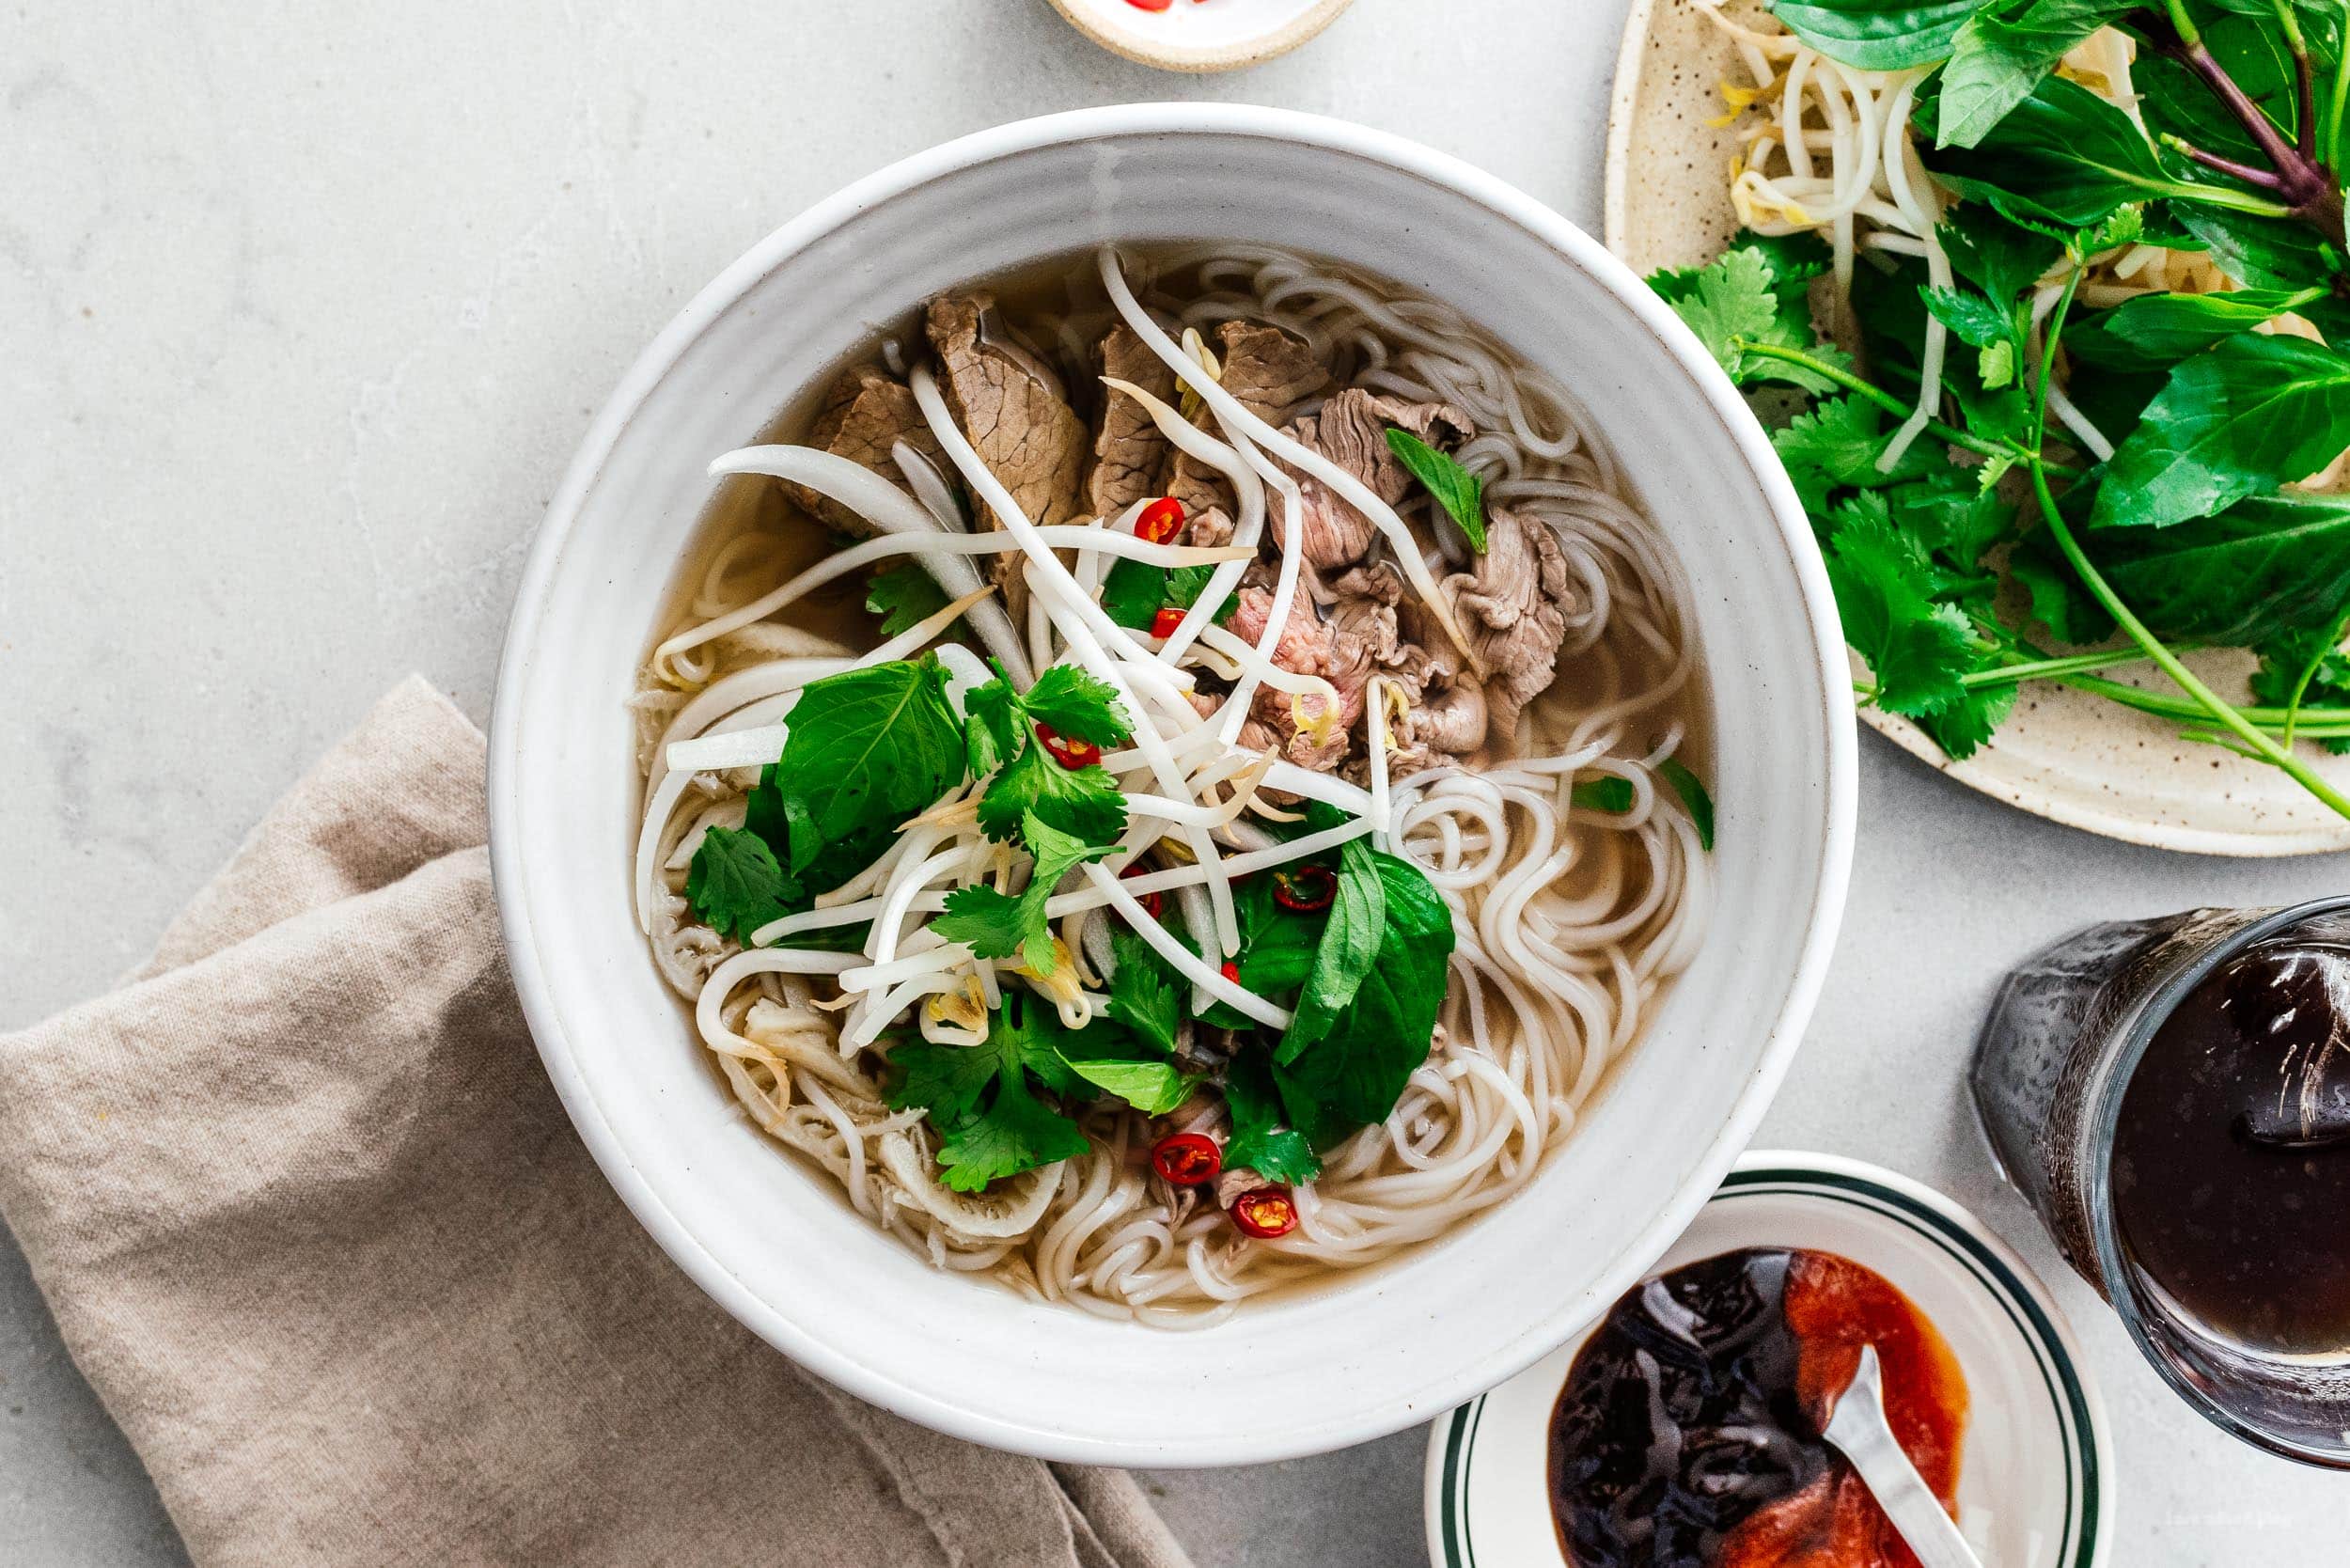
Toppings take a great noodle soup to the next level. For pho, we use lime wedges for brightness, fresh or blanched bean sprouts fior earthiness, fresh cilantro, sliced onions, fresh Thai basil, and jalapenos or thai chilis if you like spice.Pho noodles: dried or fresh?
Pho isn’t pho without rice noodles. As with almost all noodles, fresh pho noodles are best, but the dried stuff works too. Sometimes the noodles will be called rice stick or Thai rice stick noodles. For me, medium thickness is best. Unlike with ramen or other noodle-intensive dishes, the rice noodles are super forgiving. In fact, it’s better if you make them in advance. Briefly blanch the noodles about halfway to your desired softness, then drain and rinse them in cold water and let them dry out while you do other things. Letting the noodles sit and dry out seems counterintuitive since you just cooked them, but it’s the secret to flavorful noodles as they absorb the pho soup as they rehydrate.Assembling your pho
If you’ve never served multiple bowls of noodle soup simultaneously before, it can be a little complicated. Here's how to do it with the least amount of stress or fuss possible. You need large deep bowls that can fit 3 cups of liquid in them.- Heat your bowls by filling them with hot tap water for at least 2-3 minutes, then drain. Heating up your bowls ensures that the soup absorbs the heat of the bowl, instead of the other way around.
- Boil a pot of water for the noodles. In another pot over very low heat, warm up your pho soup .
- Cook your noodles half of the time indicated, then rinse them in cold water and drain. Divide evenly into each bowl.
- Prep the toppings: rinse and dry the bean sprouts, thai basil, and cilantro. Slice the onions and limes and plate everything. Put the bottles of sriracha and hoisin sauce on table.
- Slice your meats. The brisket should be 1/8” thick or so. Throw it in with the pho soup once it’s been sliced to warm it up. Slice the steak if you didn’t get that done for you at the shop, then divide both the steak and brisket evenly between each bowl.
- Once everyone is ready to eat, ladle the now piping hot soup over the raw beef in each bowl, then deliver to the tables.
- Eat as soon as possible, as loudly as possible, with as many toppings as possible.
Pho Recipe
An intensely cozy and beefy beef noodle soup.
- blowtorch
Pho Soup
- 1 lb oxtail
- 1/2 medium onion (charred)
- 2 oz ginger (halved lengthwise and charred, about 3")
- 8 cups water
Pho Spice Mix
- 5 star anise
- 1 cinnamon stick
- 1/2 tsp cloves
- 1/2 tsp coriander seeds
- 1/2 tsp peppercorns (white preferred)
- 5 cardamom pods
- 1/2 tsp fennel seeds
- 1/2 tsp whole cumin seeds
Assembly
- 1 lb brisket
- 1 lb sirloin (thinly sliced)
- 2 tbsp fish sauce
- 2 tbsp sugar (or to taste)
- 1-3 tsp sea salt (or to taste)
- 4 portions fresh pho noodles (or dried)
Toppings for Pho
- 4 lime wedges
- 1 cup bean sprouts (raw or blanched)
- 4 springs Thai Basil
- 4 springs cilantro
- 1/2 medium onion (thinly sliced)
Day 1
Bring a small pot of water to the boil and blanch the oxtails for 5 minutes. Bring a second, larger pot with 8 cups of water to a boil.
Transfer the oxtails to the second pot along with the charred onion, charred ginger, and 8 cups of water. Simmer on low for 3.5 hours.
Char pho spice mix, then add to the pho soup along with the brisket and continue simmering for another 2 hours (5.5 hours total)
Transfer the brisket to its own container, then strain and separate the pho soup. Refrigerate both.
Day 2
Skim the solidified fat from the pho soup with a fork and melt over low heat, then strain and refrigerate in a new small container. Prepare pho toppings as needed, cover and refrigerate.
When you are ready to serve
Combine the pho soup with enough water to make 8 cups, then season with fish sauce, sugar, and salt, if needed. I like 1 tsp of fine sea salt, but you should feel that your pho is on the verge of being too salty to compensate for the unsalted meat and noodles. Bring the soup to a low simmer. Slice the cold brisket and drop into the soup to reheat.
Bring a large pot of water to the boil and cook the noodles halfway, then rinse in cold water and drain. Heat up the bowls with hot tap water for 5 minutes, the drain. Divide the pho noodles evenly between bowls.
Slice sirloin if necessary, then divide between bowls along with brisket.
Ladle pho broth overtop, serve and enjoy immediately with many toppings.
See post for more detailed 2 day, instant pot, and crockpot instructions.

I Am... 8 Keto Starbucks Drinks for Fall
If you’re anything like me, you’re totally susceptible to all those pumpkin spice latte ads you’ve been seeing. But what about keto?! Here are some keto Starbucks options for all my keep peeps out there.
Read More →
I Am... Sausage Gravy
Sausage gravy and flaky buttermilk biscuits are the best breakfast out there - fight me! I still remember the first time I had sausage gravy. It was a revelation: creamy, thick super savory gravy studded with bits of well browned breakfast sausage smothering the perfect biscuit. It was at Pine State Biscuits in Portland way back when they first opened. I was absolutely hooked. From then on, it was sausage gravy or nothing. As someone who didn’t grow up in the South, I don’t have a family recipe. I didn’t grow up eating it and I’m not set in my sausage gravy ways. In my eyes, this is a good thing. I’ve been able to try countless sausage gravies throughout my adult life without being blinded by a childhood ideal of what it should be. I’m an impartial judge without any biases on whether it should contain milk or cream or bacon fat or cayenne pepper. I just want my gravy to taste good. After countless tests, this is my best sausage gravy. I think you’ll like it too!
What is sausage gravy
Sausage gravy is a traditional Southern American breakfast dish, typically served with biscuits. First, pork sausage is browned, then mixed with flour to create a roux. The cooked roux and sausage combine with milk to make a thick, pourable gravy that’s usually seasoned with lots of freshly ground black pepper, and that's it! Sausage gravy usually comes with flaky buttermilk biscuits.How to make sausage gravy
This is one of the easiest gravies to make!- Brown the sausage. Remove the breakfast sausage from the casing and brown in a skillet over medium high heat, breaking up the pieces into small bits.
- Add a bit of fat. Melt butter into the cooked sausage.
- Make a roux. Sprinkle on flour and stir, cooking the flour with the sausage fat and butter into a roux, which will thicken the gravy.
- Stir in milk. While whisking, slowly stir in the milk.
- Thicken. Let the gravy bubble and thicken.
- Enjoy. Season with plenty of freshly ground black pepper and enjoy!
Best sausages to use
Sausage gravy is typically made from breakfast sausage, which is fresh ground pork mixed with herbs and spices. Breakfast sausage comes in links, patties, or even loose. Besides your standard breakfast sausage seasoned with salt, black pepper, and sage, they also come in a multitude of flavors, including maple syrup, brown sugar, and spicy. You can go ahead and buy your favorite breakfast sausage from the store or you can make your own breakfast sausage mix using ground pork and spices.Can you make your own sausage
Yes! All you need to do is brown 1 lb of ground pork with 1 tbsp fresh chopped sage, 1 tsp fresh chopped thyme, 1 tsp crushed fennel seeds, and a pinch of nutmeg. Season to to taste with salt and pepper. If you like your breakfast sausage sweet, add a drizzle of maple syrup or a bit of brown sugar.Milk or cream
I like using milk but lots of people use cream or a mix of milk and cream. I find using cream makes the gravy a bit too thick and rich. The perfect sausage gravy isn’t too thick and whole milk is the best choice!Tips for the best sausage gravy
- Use a potato masher to crumble up the sausage into small bits as it cooks.
- You don’t have to buy sausage, you can make your own!
- Whole milk is going to give you the creamiest, most luxurious gravy.
- You can make it ahead of time and keep it in the fridge. To reheat, simply warm over medium on the stove in a pan, loosening with a splash of milk, if needed.
- Freshly cracked black pepper is absolutely needed, it adds that spicy, fresh aroma that is crucial to sausage gravy.
- Try some crispy fresh sage leaves to really amp up the flavor.
Pairings
- Biscuits of course!
- If you’ve ever tried steak with this, you know it’s amazing
- Mashed potatoes smothered with gravy is out of this world
- For a sweet-n-savory combo, try it on french toast with a drizzle of maple syrup - SO GOOD.
And if you’re wondering what to serve with biscuits and gravy, I’ve got you:
- Twisted bacon - try it, you’ll never eat bacon any other way
- Crispy fried eggs because what is breakfast if you don’t have eggs
- The best roastie potatoes so you can pour gravy on them
Sausage Gravy
Sausage gravy and flaky buttermilk biscuits are the best breakfast out there - fight me!
- 1 lb breakfast sausage
- 1 tbsp butter
- 1/4 cup all purpose flour
- 1 tsp garlic powder
- 1 tsp onion powder
- 2 1/4 cup whole milk
Remove the breakfast sausage from the casing and brown in a skillet over medium high heat, until browned and cooked through. Use a potato masher or a wooden spoon to break it up into little pieces. When the sausage is brown, melt the butter into the sausage then evenly sprinkle on the flour, garlic powder, and onion powder.
Stir in the flour and spices and cook over medium heat, until the flour is lightly toasted and cooked through 1-2 minutes.
Slowly stream in the milk while whisking and let come to a simmer to thicken. When thick, season with plenty of freshly ground black pepper. Enjoy!
Pro tip: Crisp up some sage for a little bit of extra love
Heat up a bit of oil or butter over medium heat and add whole sage leaves and fry, flipping as needed, until crisp, 15-20 seconds depending on size. Crumble into your sausage gravy or serve whole on top.

I Am... Panko Breadcrumbs Guide
If you love crunchy foods and you don’t know about the wonderful world of panko, your life is about to change!
What is panko?
Panko are Japanese breadcrumbs made from crustless white bread. They’re vastly different from regular breadcrumbs - fluffier and larger. The irregular flakes are what make Japanese tonkatsu so crunchy. Its drier and flakier consistency absorbs less oil which means lighter, crunchier fried foods. It's a big deal in Japan. Dedicated factories bake bread to different specifications just for panko. You can get fresh or dried versions in many different sized flakes. They even have different ways of baking the bread, either oven baked or electrically baked using currents. Many restaurants have fresh panko delivered daily. No panko, no life.What is panko made from?
It's made from a specific type of Japanese bread called shokupan (shown above), which literally means “eating bread” and can be thought of as “daily bread” or “regular bread.” Japanese shokupan is fluffy and soft, mild, and slightly sweet. Some say it is the best bread in the world and it inspires long lineups in Japan to get the best stuff.What’s the difference between panko and bread crumbs?
- Regular bread crumbs are made from all kinds of bread which have been torn with the crusts still on. Panko is made from crustless white bread, which makes it finer, flakier and evenly white.
- Breadcrumbs come seasoned. Panko is plain.
- Breadcrumbs are smaller and rounder. Panko is large flakes and shards.
Fresh (nama) panko/生パン粉
This kind has a light and super crispy texture. Fresh panko has the most moisture because the bread hasn’t been dried or toasted, and it's fluffier and more voluminous because it hasn’t been dried out. If you live in Japan you can buy the fresh stuff at bakeries and the grocery store, and no matter where you are, if you’re making it at home, you’re making nama panko!Dried (kansa) panko/乾燥パン粉
You use dried panko for breading or binding (like in meatballs). It’s the more common kind that you’ll find packaged in grocery stores.Flake sizes
- Large flakes: Used to give food a thicker, more voluminous coating.
- Medium flakes: The standard one.
- Small flakes: Mostly use for small ingredients and also items that have high moisture content - small flakes give you more coverage than large.
Where to buy
It's sold in most grocery stores in the Asian aisle but it’s cheaper to buy it at an Asian grocery store. You can also get it online. I prefer Japanese brands. With store brands, sometimes you’ll see something labeled panko but it looks like regular breadcrumbs. Check out the package and look for large, irregular, shards that are flat.What aisle would panko bread crumbs be in?
You can find it in the Asian aisle at most grocery stores, usually in a bag or cardboard box.How to make panko breadcrumbs
- Trim the crusts off of white bread.
- Use the grater attachment of your food processor and grate the bread OR let the bread dry out a bit then use a coarse cheese grater to grate the bread.
How to bread anything in a crispy, crunchy coat
- Set up three shallow dishes that are able to fit the items you are breading.
- Put flour in one dish, lightly beaten egg in the next dish, and panko in the last dish.
- Season your items with salt and pepper.
- Using one hand, dip your item in the flour, coating both sides. Shake off the excess flour and place it in the egg.
- Use your other (clean) hand to turn the items in the egg. Shake off any excess egg and place the items in the panko.
- Using the hand you used to flour, flip and press down on the items to coat, being sure to gently adhere the flakes all over. Shake off the excess flakes and you’re ready to cook!
Where to use
You can use it anywhere you would use regular breadcrumbs.- To coat fried food with a light, airy, delicately crisp texture.
- To bind meats, like meatballs or meatloaf.
- As a topping to add crunch to casseroles or pasta, like mac and cheese or Sicilian pasta.
If you’ve fallen in love, please try these recipes:
- Tonkatsu
- Korean corn dogs
- Salisbury steak
- Swedish meatballs
- Cheesy potato balls
- Crispy air fryer chicken strips
- Thanksgiving croquettes
- Cheddar cheese cauliflower tots
- Velveeta mac and cheese (as a crunchy topping!)
How to make panko breadcrumbs
It's probably better to buy the real thing though.
- food processor
- 1 loaf white bread (preferably unsliced)
Trim the crusts off your white bread. If using unsliced bread, cut the bread into manageable 3-4" cubes.
Use the grater attachment of your food processor and grate the bread OR let the bread dry out a bit (15-30 min uncovered) then use a coarse cheese grater to grate the bread.
