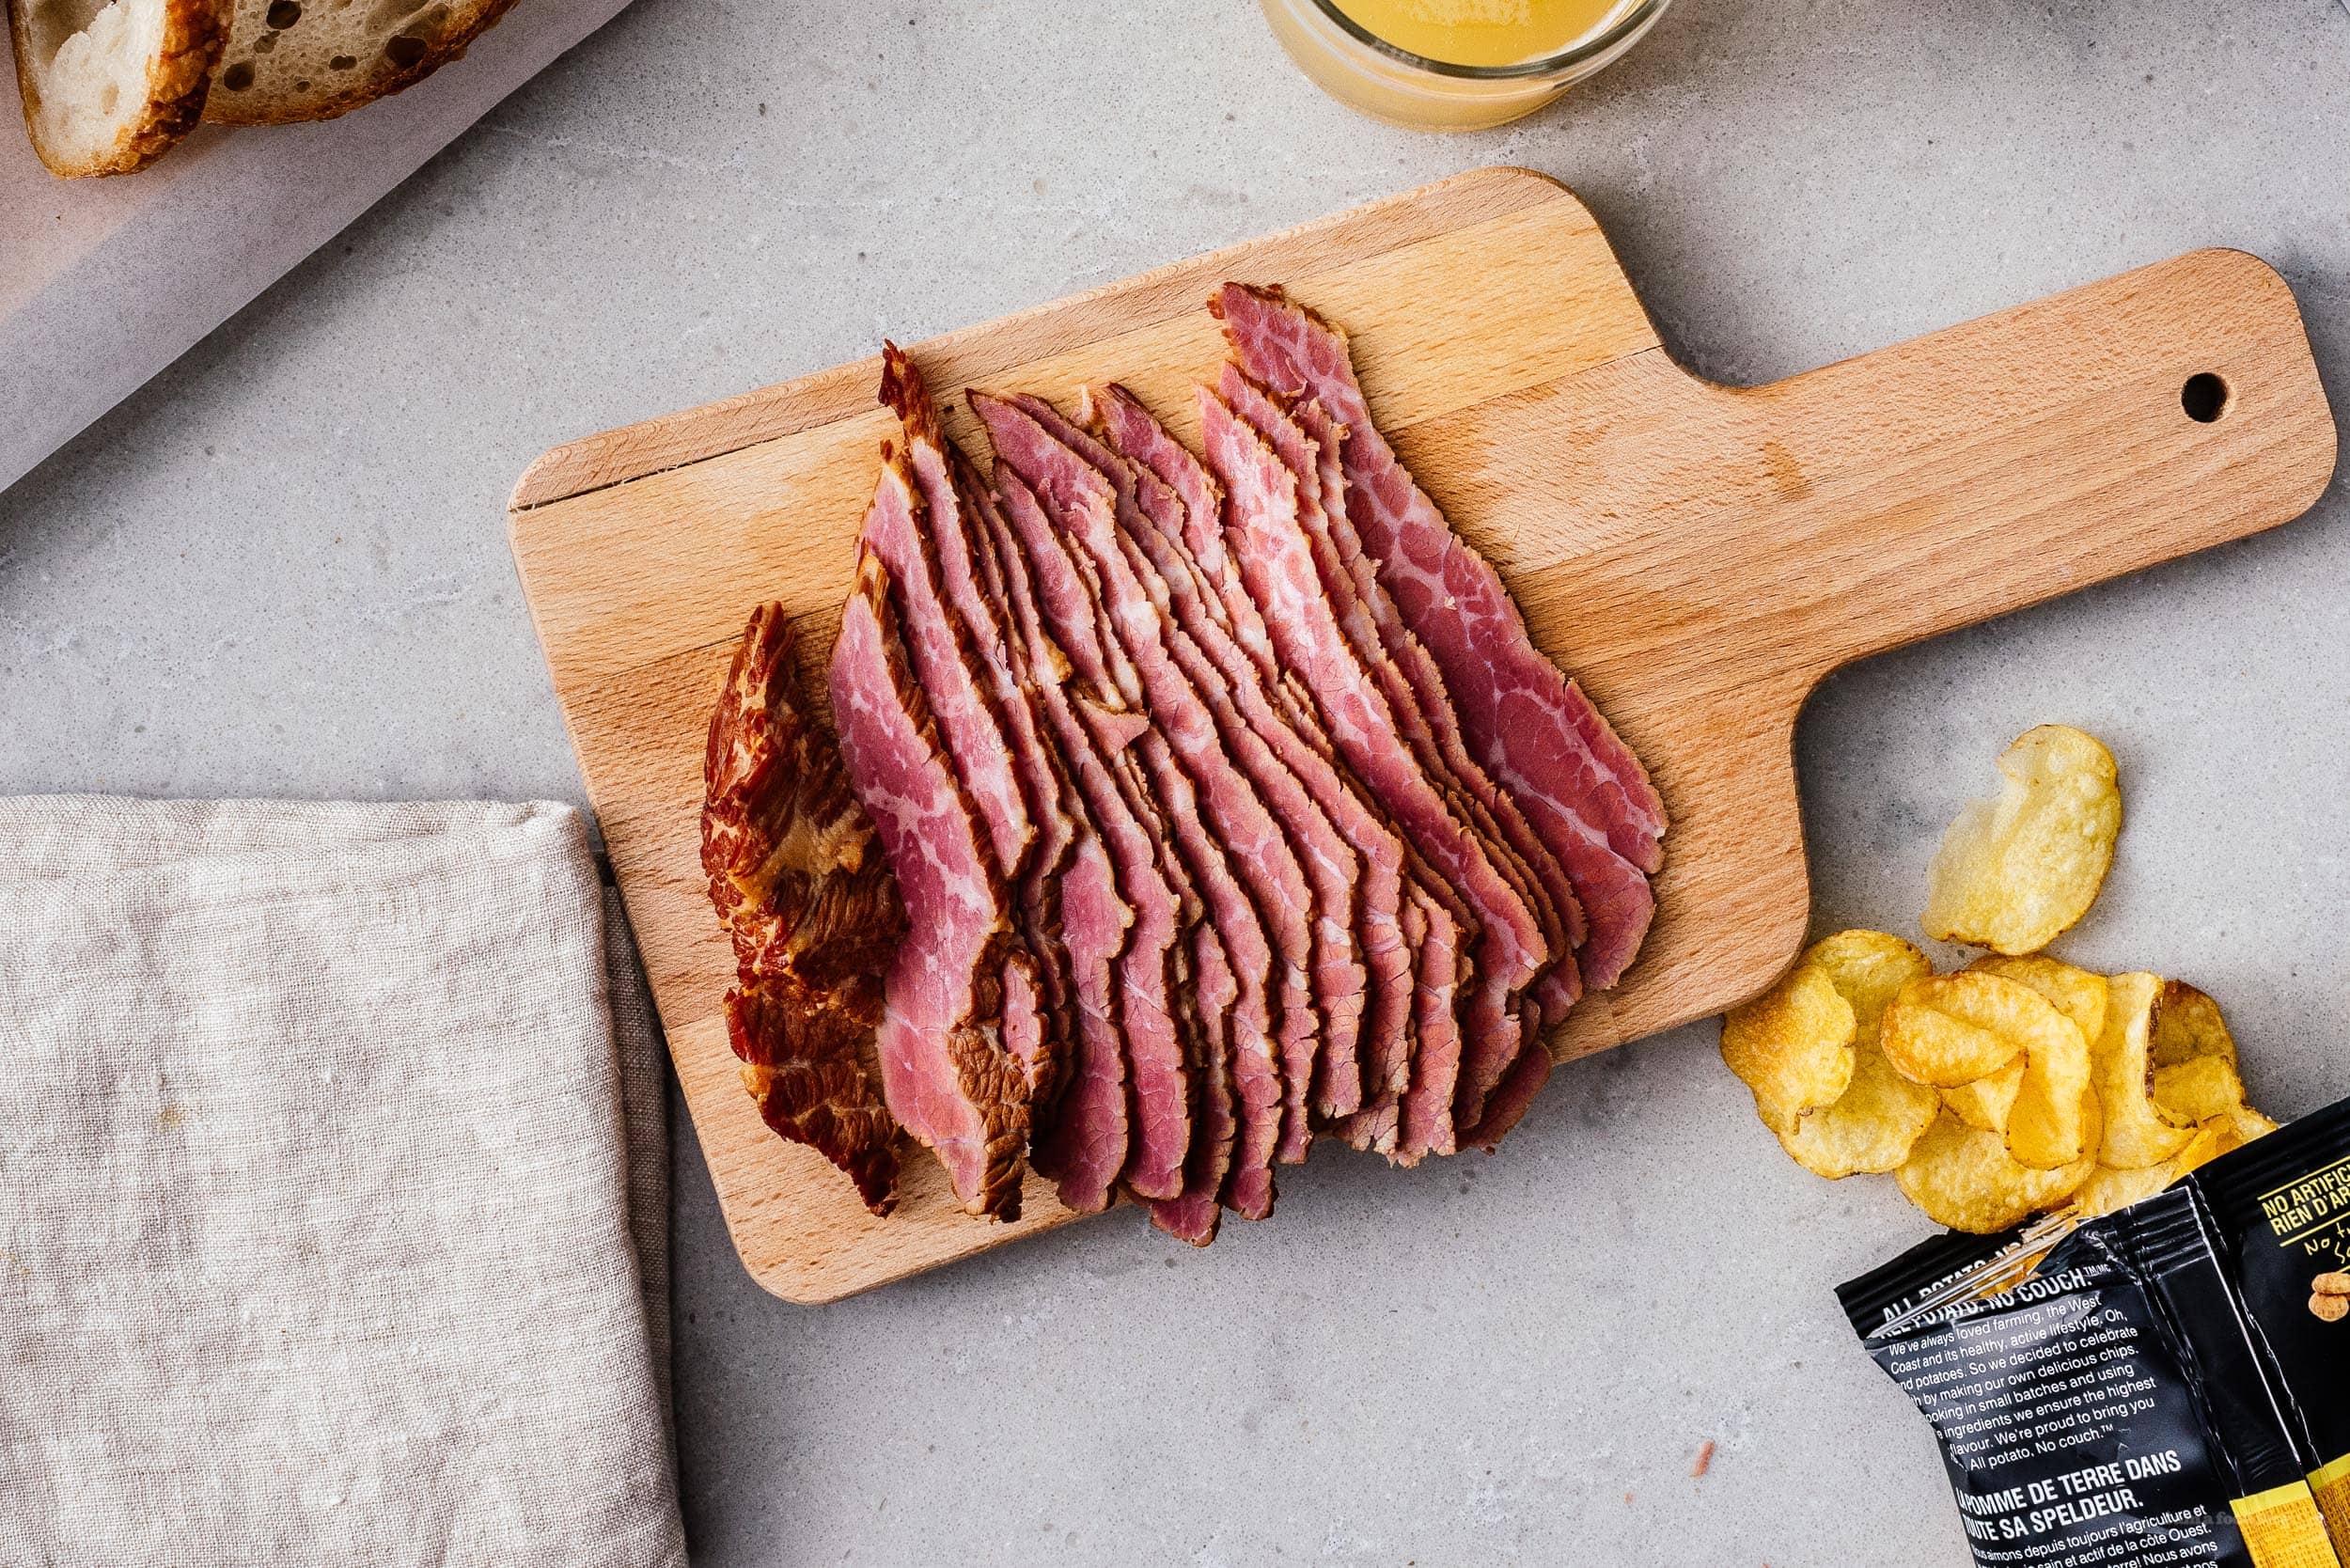
I Am... The Best Homemade Pastrami
Pastrami is one of the great meats of the world. Is there anything more incredible than a really well made pastrami sandwich? Or pastrami and eggs? With the holidays coming up, I almost feel like I'd rather have a few slices of pastrami to go along with my stuffing and mashed potatoes instead of turkey or ham. It’s super easy to make pastrami at home. You don’t even need a smoker. Homemade pastrami is really easy and really rewarding. You don’t have to do much, either: just plan ahead 1 week and get some pink salt and next thing you know, you have yourself some juicy, smoky, totally addictive pastrami to rival anything you could order from Katz or Wexler or your nearby pastrameria (is that a word?).
What is pastrami?
Pastrami is a smoked cured chunk of beef plate originally from Romania, but for me it's a brisket from New York. It’s luciously smoky red, a little bit tangy, intricately spiced (but not spicy) and incredibly, addictively juicy. Biting into a piece of freshly made pastrami is simultaneously hyper-beefy like a really good steak and fall-apart-y like really good real-deal southern BBQ brisket.How to make pastrami
- Make a spiced brine. Bring 5-6 cups of water to a boil with pickling spice, salt, and pink salt until everything is dissolved, then let cool.
- Cure the meat for one week. Soak the beef in the brine for 5-7 days. Weigh it down with a plate. Flip after day 3.
- Smoke your pastrami. 1-2 hours per pound.
- Optional: Steam your pastrami. This makes it juicier and more fall-apart-y.
Pastrami vs corned beef
Corned beef is just another way of saying salted meat. Pastrami is actually a corned beef that’s been smoked. Although technically any salted beef is corned beef, usually when people say corned beef, they mean a pickled brisket that’s been boiled or steamed, but not smoked. For me, the smoking is the main difference. Some people argue about which part of the brisket each comes from, but we won't get into that here. Corned beef is awesome too, and if you make this recipe without smoking it, you basically have really good corned beef. Read more about corned beef here.The best cut of beef for pastrami
Brisket is always the go-to cut for pastrami, but you can use any large, well marbled cut of beef, such as flank steak, skirt steak, tri tip, or anything else you can easily find. The leaner the meat, the less fall-apart-y it will be. Whatever meat you choose, be sure to remove the outside fat cap for a more attractive (and less fatty) finished product.Do you need a really big brisket for pastrami?
Yes… and no. If you want a really deep smoky flavor or a good looking smoke ring, a bigger brisket is often better so you don’t dry out the meat. Additionally, a properly made pastrami sandwich is often 1/4 to 1/2lb of meat, so you want a decent sized piece of meat, since it could be a long wait until your next batch. On the other hand, personally I think that smaller briskets absorb the flavors better, and if your meat is a little oversmoked, you can easily fix that by steaming it. So if you’re unsure about this, or don’t have a lot of people to feed, or like me, prefer more intense flavors, a smaller brisket is the way to go. Or many smaller ones - usually I make several at once.Should you spice rub your pastrami before smoking?
I don't, because I use such a small brisket that it would be overwhelming, but if you go big, I would rub it down with a 50/50 black pepper and ground picking spice mix.What if I don’t have a smoker?
You don’t need a giant smoker to make pastrami. You don’t need a smoker at all. You just need a heatproof, mostly airproof container that you can put on the bbq. Then you put chips in and put the pastrami in a tray overtop. We use a small stovetop smoker on top of our grill outside.Best kind of wood to smoke with
The best kind of wood to smoke with is whatever you like the smell of most. For me, that’s hickory, although in Japan we can get hakushu and that is pretty damned awesome. I also love Maple and Cedar. The easiest woods to get are Hickory, Mesquite, Cherry, or Apple. iWet wood or dry wood?
For best results, don't soak your wood chips before smoking. For pastrami, you want a pretty dry smoke so it infuses the meat with as much smoky flavor as possible.Making your own pickling spice
This is my recipe (makes one batch):- 1 tbsp mustard seed
- 1 tbsp coriander
- 1 tsp white pepper
- 1 bay leaf, torn up
- 1 cinnamon stick, broken up
- 1 tsp cloves
- 4 cardamom pods
- 1/2 tsp sichuan peppercorn (optional)
Do you need pink salt to make pastrami
Pink salt is the key to curing your brisket so it gets that amazing flaky pickled texture and reddish hue. A little goes a long way - we bought a small jar on Amazon years ago and it’s still going strong today, even with regular use.How do you serve pastrami
The very first thing you should do with your pastrami is slice the end off and try some. Then you should get some good bread (sourdough is great!), strong mustard, and pickles and make yourself a pastrami sandwich, one of the greatest foods ever. You can also make pastrami fried rice, pastrami omelette, or replace your holiday meals with it.Variations
Check out Steph's pho-strami with pho spices instead of the traditional pickling spice mix.Easy Pastrami Recipe
Juicy, fall apart pastrami smoked in the comfort of your own backyard.
- 1/2 cup kosher salt
- 1/2 cup sugar
- 2 tsp pink salt (see note)
- 2 tbsp pickling spice (see note)
- 2 lb beef brisket (fat trimmed)
In a large saucepan, make a brine by bringing 4 cups of water to a boil. Add salt, sugar, pink salt, and pickling spice. Stir to dissolve and then remove from heat. Allow to cool.
Transfer to a container large enough to hold your brisket(s). Add the cooled brine, and then top up with cool water as needed. Weigh down with a small plate, then store in the fridge for 5-7 days, flipping halfway.
Transfer the pieces of beef you want to smoke to a plate or metal tray. Place on top of wood chips in an airtight, heatproof container and heat on an outdoor grill for about 2-4 hours.
Enjoy as is, with lots of mustard, pickles, and bread.
Pink salt can be found on Amazon.
You can make your own pickling spice mix, here's mine:
- 1 tbsp mustard seed
- 1 tbsp coriander
- 1 tsp white pepper
- 1 bay leaf, torn up
- 1 cinnamon stick, broken up
- 1 tsp cloves
- 4 cardamom pods
- 1/2 tsp sichuan peppercorn (very optional)

I Am... Chili Powder
You probably have a bottle of chili powder languishing in your pantry right now. Spice up your life (and your food) by making homemade chili powder and increasing the tastiness of everything ten-thousand fold!
What is chili powder
Chili powder is a simple spice blend made up of herbs, spices, and ground up dried chile peppers. Everyone knows it's the primary flavoring for chili, but you can also use chili powder for soups, stews, beans, casseroles, meats, vegetables, or anything you want to add a smoky, slightly spicy kick to.Why make homemade chili powder
The stuff you buy at the store probably has filler ingredients, a ton of salt (which even if you don't care about sodium makes it harder to control your seasoning), and has been sitting around forever. Spices, especially ground spices, lose potency with time. Making fresh and homemade is easier than you think and way tastier. Another advantage is that that you can custom tailor it and toast the spices to make it more intense and flavorful.What’s in chili powder
The most common spices in chili powder are:- chile powders
- cumin
- garlic powder
- onion powder
- white or black pepper
- Mexican oregano
- ground bay leaves
- paprika, smoked or sweet
- coriander
Chili powder vs chile powder
You might be wondering, what’s the difference between chili powder and chile powder, besides the “i” and the “e”:- Chili powder with an “i” is a blend of spices (cumin, paprika, garlic powder, oregano) and ground up chile peppers. Chili is a stew.
- Chile powder with an “e” is ground up chile pepper (like ancho, cayenne, habanero, ghost, jalapeños, etc) and nothing more. Chile is how you properly spell it in the Southwest.
Is chili powder spicy?
Yes and no! It depends on how much chile powder is in your spice blend. Even store bought chili powders vary in spice levels; it’s why you should make your own, so you can have it as spicy or as mild as you want.The easy version
You probably have all these spices in your pantry right now so you’ll never have to buy chili powder again! Just mix these up in a small bowl:- ground cumin
- garlic powder
- onion powder
- smoked paprika
- Mexican oregano
- cayenne powder
- black pepper
The best chili powder
If you want to up your game, take it to the next level with this version. The best chili powder is a blend of dry roasted chilis and spices that you grind yourself. We love speciality chile pepper chile powders like: hatch green chile powder, Chimayo red chile powder, New Mexico red chile powder, and habanero. You can find these in the Mexican aisle of your grocery store or online. Regular chile powders like chipotle, cayenne, and ancho are pretty common in the spice aisle. Don’t go crazy and buy a huge amount though because older spices get potent. You can also toast and make your own chile powder from whole dried chiles (more on that below).- green chile powder
- Chimayo chile powder
- ancho chile powder
- smoked paprika
- Mexican oregano
- black pepper
- garlic powder
- onion powder
- cumin
- coriander
- ground bay leaf
The secret of toasting spices
Dry toasting spices intensifies their flavors by warming up and bringing out their aromatic oils. It also adds a layer of warm toasty-ness. To toast whole or ground spices heat them in a dry pan over low heat, stirring often, until they smell fragrant. Remove them from the pan immediately after they become aromatic and be careful not to burn.Toasting and grinding your own peppers
If you can find any specialty chile powders but want to make a special blend, toast and grind your own! Toasting and grinding your own peppers will always give you the most potent chile powders and allow you to have chile powders that you might not normally find in the regular spice aisle. Your local grocery store might have only one type of chile powder, but they’ll probably have at least 3 or 4 varieties of dried chiles.How to toast and grind chile powder from peppers:
- Using gloves, remove the stems, seeds, and membranes from the dried chiles.
- Lay the chiles out in a dry pan and heat over medium-low until they start to smell toasty, being careful not to burn. Remove them from the pan and cool.
- Place in a blender, food processor, or spic/coffee grinder and pulse until the chile becomes a powder.
- Carefully open (you don’t want the chile powder to fly into the air) and use in your chili blend.
How to store chili powder
The best place to keep chili powder in an airtight container in a cool dry place away from sunlight. It’ll last for a while, but it will lose its potency over time. Now that you know how easy it is to make it, there's no reason to keep giant jars around, so be sure to make what you think you'll use in 3 months or less.What can I use chili powder in?
- A hearty bowl of Texas style chili
- An authentic competition style chili
- A cajun chili rubbed steak
- A cheesy bowl of pumpkin queso
The second spice dump
Pro tip: Make more chili powder than you think is necessary if you’re making chili! That way you can do what the pro chili makers do: two spice dumps. A spice dump is when you add the spices. The pros do two dumps so you get maximum flavor. The first dump is at the beginning so the spices can mellow out and infuse the meat and one is added at the end right before you serve so you get fresh, full flavors.Chili Powder Recipe
Why buy store bought when you have all the spices you need at home? Makes enough for one batch of chili - use the scale button for more!
The Best Basic Chili Powder
- 1 tsp ground cumin
- 1 tsp garlic powder
- 1 tsp onion powder
- 1 tsp smoked paprika
- 1 tsp dried Mexican oregano
- 1 tsp black pepper
- 1/2 tsp ground cayenne pepper (or adjust to your preferred spice level)
Going the Distance
- 1 tbsp green chile powder (optional)
- 1 tbsp Chimayo chile powder (optional)
- 2 tsp ancho chile powder (optional)
- 1/2 tsp ground coriander (optional)
- 1/4 tsp ground bay leaf (optional)
Mix all the ingredients in a small bowl. Store in an airtight container.

I Am... 21 Halloween Treats to Make
Here are 21 super cute homemade Halloween treats to make and eat! Halloween is just around the corner. Are you going to be celebrating? Maybe doing some chute-or-treat? Mike told me about this the other day: apparently people are creating slides so they can slide candy down to trick-or-treaters from a safe distance. Personally I’m going to be making us a bunch of homemade halloween treats to nom on while we binge watch something scary but not too scary on Netflix. What about you?
Sweet (and cute) Halloween Treats
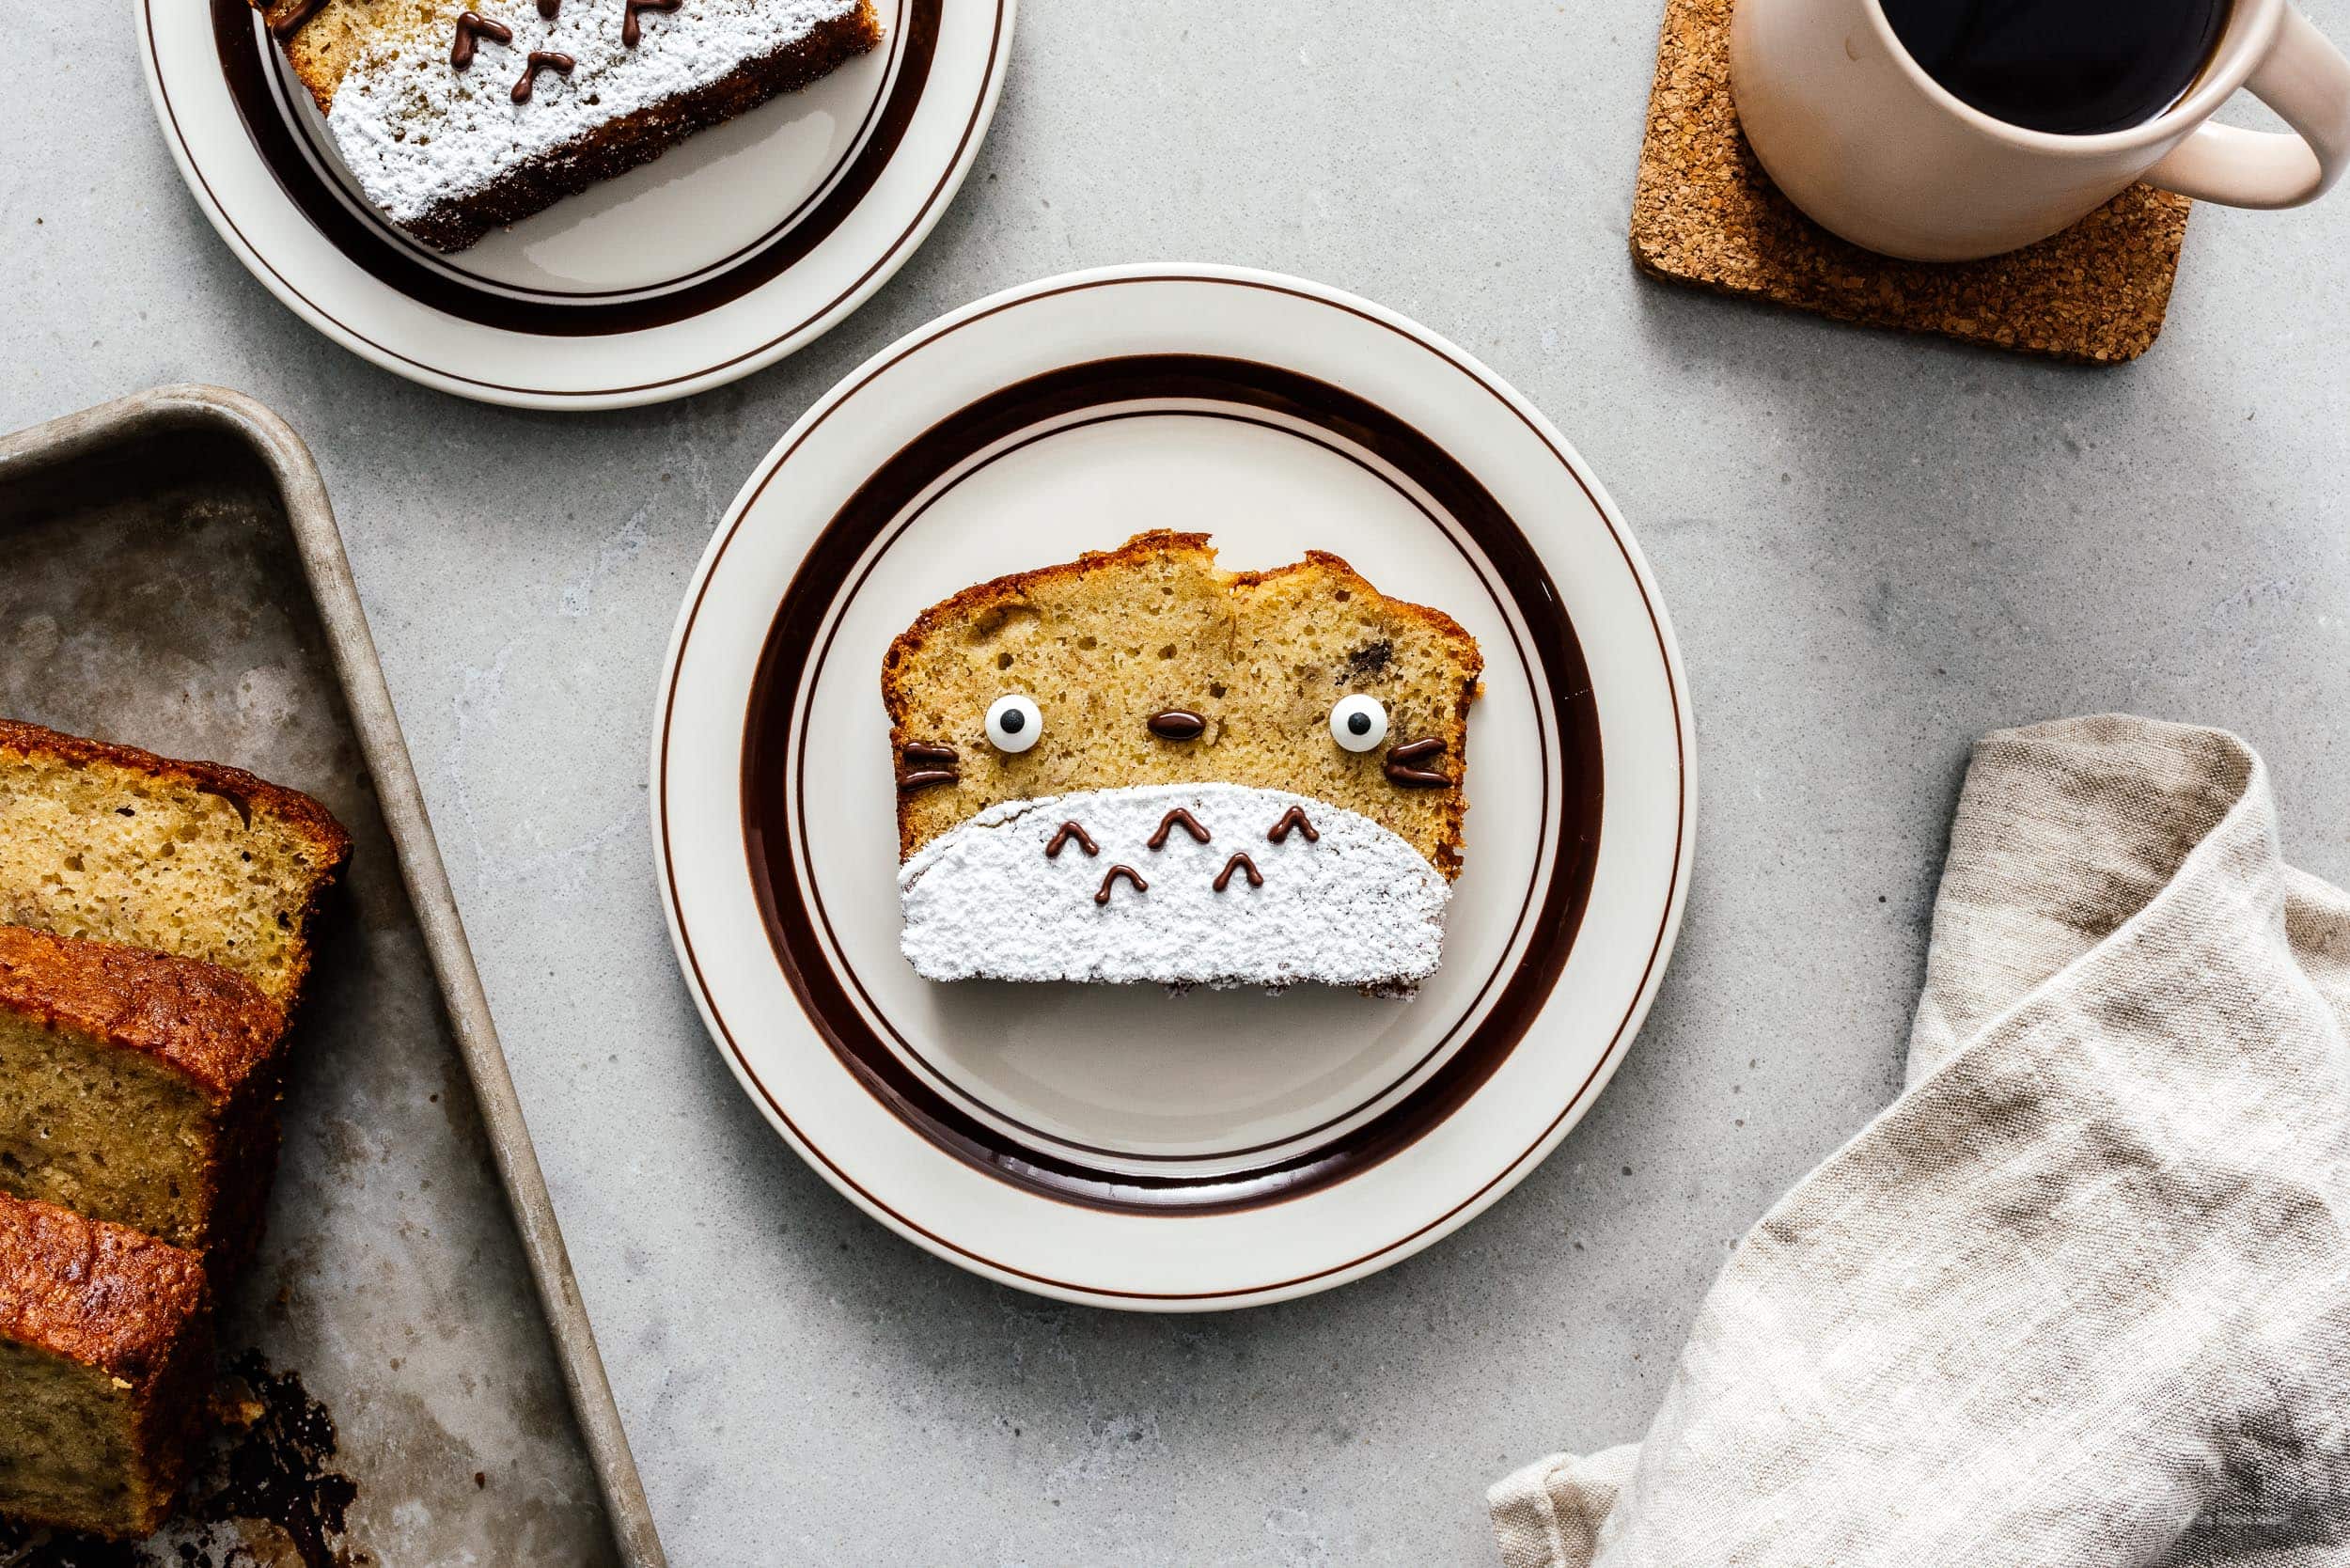
Totoro Banana Bread
I am legit addicted to banana bread and will straight up eat a whole loaf. And when Totoro’s face is on it?! I’m a goner. This banana bread is super moist (lol) and banana-y and really is my favorite banana bread. [wprm-recipe-roundup-item id="34991"]Chocolate Two Bite Brownie Soot Sprites
Two bite brownies for the win, but especially when they are as cute as this! Make them if you’re a Spirited Away fan and also have the hunger like No-Face. [wprm-recipe-roundup-item id="34825"]Totoro Rice Krispie Treats
AHH I had an accident when I made these rice krispie treats...I accidentally ate them ALL. I haven’t had rice krispie treats in forever and there is nothing on earth like a fresh homemade rice krispie treat. Make these even if you don’t want to decorate them. My recipe has extra marshmallows and a bit of extra butter and is so freaking good I can’t even. [wprm-recipe-roundup-item id="34781"]Soft and Chocolate-y Soot Sprite Cookies
More dust bunny Soot Sprite cuties! These ones are gluten free and melt in your mouth. I love them. [wprm-recipe-roundup-item link="https://peak-again.today/totoro-soot-sprite-chocolate-sparkle-cookie-recipe/" newtab="0" name="Soft and Chocolate-y Soot Sprite Cookies" summary="More dust bunny Soot Sprite cuties! These ones are gluten free and melt in your mouth. I love them." image="21021"]Pumpkin Totoro Whoopie Pies
Ooh, if you haven’t had a whoopie pie before, make these! Whoopie pies are a cross between a soft cake and a sandwich cookie and they are fluffy and delicious. These ones are pumpkins for extra festivity. And they look like Totoro! [wprm-recipe-roundup-item link="https://peak-again.today/totoro-pumpkin-whoopie-pies/" newtab="0" name="Pumpkin Totoro Whoopie Pies" summary="Whoopie pies are a cross between a soft cake and a sandwich cookie and they are fluffy and delicious. These ones are pumpkins for extra festivity. And they look like Totoro!" image="16494"]Totoro Marshmallows
This is a lil tutorial on how to use store bought marshmallows to melt down into your own shapes. My shape of choice...Totoro of course! Perfect if you have any extra marshmallows from making rice krispie squares. [wprm-recipe-roundup-item id="29579"]Totoro Pumpkin Cheesecake Bars
Give me ALL the cheesecake bars. Cheesecake bars are perfect because who doesn’t love holding food while they eat it? Plus, they’re pumpkin and over the top cute. [wprm-recipe-roundup-item link="https://peak-again.today/pumpkin-cheesecake-bars-totoro-edition/" newtab="0" name="Totoro Pumpkin Cheesecake Bars" summary="Cheesecake bars are perfect because who doesn’t love holding food while they eat it? Plus, they’re pumpkin and over the top cute." image="20993"]Totoro Pancakes
Do you want a spoopy breakfast? Totoro pancakes are for you. I have them three ways: apple pie pancakes, buttermilk and bacon, and pancake art style. [wprm-recipe-roundup-item link="https://peak-again.today/sunday-brunch-totoro-apple-pie-pancakes-recipe/" newtab="0" name="Totoro Pancakes" summary="Do you want a spoopy breakfast? Totoro pancakes are for you." image="11178"]Totoro Pumpkin Scones
Scones are such fall food. A toasty warm scone with a hot spiced chai is the epitome of cozy. These scones are pumpkin, of course. A Totoro-ly perfect halloween treat! [wprm-recipe-roundup-item link="https://peak-again.today/totoro-pumpkin-scone-recipe/" newtab="0" name="Totoro Pumpkin Scones" summary="A toasty warm scone with a hot spiced chai is the epitome of cozy. These scones are pumpkin, of course. " image="25075"]Soft and Squishy Totoro Pull-Apart Buns
My all time favorite buns. They are so soft and squishy and shreddable. The fact that they’re decorated like Totoro is a bonus, but even without his powdered sugar belly I would inhale a tray of these. [wprm-recipe-roundup-item link="https://peak-again.today/totoro-pull-apart-buns/" newtab="0" name="Soft and Squishy Totoro Pull-Apart Buns" summary="My all time favorite buns. They are so soft and squishy and shreddable. " image="16518"]Totoro Black Sesame Donuts
If you love the nutty taste of black sesame, these baked black sesame are nutty and soft and better for you than deep fried donuts. Win-win! [wprm-recipe-roundup-item link="https://peak-again.today/totoro-black-sesame-donuts-recipe/" newtab="0" name="Totoro Black Sesame Donuts" summary="If you love the nutty taste of black sesame, these baked black sesame are nutty and soft and better for you than deep fried donuts. Win-win!" image="6135"]Savory Halloween Treats
Sometimes you want a treat but you don’t want it to be sweet, am I right? These recipes are still special enough to be considered Halloween treats but they’re savory just in case you ate too much candy, like me.Totoro Soba
Soba is one of those noodles that is amazing and I’m not quite sure why it’s not as popular as ramen or udon in America. Proper soba is nutty and nourishing and the slurping is the best part. Which part of Totoro will you eat first? [wprm-recipe-roundup-item id="29567"]Totoro Inari
I’ll be the first to admit that these Totoro inari are a bit time consuming to make. I’ll also be the first in line to make them! They’re so cute and they taste good too. Inari are perfectly sweet and savory little tofu pockets filled with sushi rice. I could eat about 6 of them in one go. [wprm-recipe-roundup-item link="https://peak-again.today/totoro-inari-sushi-recipe/" newtab="0" name="Totoro Inari" summary="Inari are perfectly sweet and savory little tofu pockets filled with sushi rice. " image="20837"]Totoro Brie Grilled Cheese
YAY Totoro grilled cheese with a giant brie tummy! This cute and tasty fellow has some spice hiding inside him thanks to jalapeños, but if you’re not the spicy type, you can leave them out. I love how happy he looks to be eaten. [wprm-recipe-roundup-item link="https://peak-again.today/totoro-jalapeno-grilled-cheese-recipe/" newtab="0" name="Totoro Brie Grilled Cheese" summary="This cute and tasty fellow has some spice hiding inside him thanks to jalapeños, but if you’re not the spicy type, you can leave them out." image="6163"]Totoro Cream Cheese Bagels
This is probably one of the easiest treats to make and I think everyone should start their morning with a Totoro cream cheese bagel, toasted of course. I covered mine in scallions after because scallion cream cheese is where it’s at. [wprm-recipe-roundup-item link="https://peak-again.today/totoro-week-how-to-make-a-totoro-cream-cheese-bagel/" newtab="0" name="Totoro Cream Cheese Bagels" summary="This is probably one of the easiest treats to make and I think everyone should start their morning with a Totoro cream cheese bagel, toasted of course." image="25025"]Totoro Spam Musubi
The post that started it all. This was my first ever Totoro themed food item and ever since then I’ve been obsessed! Who knew spam could bring me so much joy!? [wprm-recipe-roundup-item link="https://peak-again.today/totoro-spam-musubi-recipe/" newtab="0" name="Totoro Spam Musubi" summary="This was my first ever Totoro themed food item and ever since then I’ve been obsessed! " image="21039"]Soot Sprite Avocado Onigiri
If you’ve ever been to Tokyo, you’re probably obsessed with onigiri. Who doesn’t love a hand held rice ball?! This lil soot sprite is filled with avocado seasoned with a touch of soy sauce all wrapped up in nori. So tasty, so cute. [wprm-recipe-roundup-item link="https://peak-again.today/totoro-soot-sprite-avocado-onigiri/" newtab="0" name="Soot Sprite Avocado Onigiri" summary="This lil soot sprite is filled with avocado seasoned with a touch of soy sauce all wrapped up in nori. So tasty, so cute." image="11198"]Creamy Pumpkin Soup with a Totoro Egg in a Hole
It’s pumpkin season so this creamy kabocha soup with a Totoro egg in a hole is the perfect way to warm up after an afternoon walk looking at leaves. [wprm-recipe-roundup-item link="https://peak-again.today/japanese-kabocha-pumpkin-soup-with-totoro-egg-toasts/" newtab="0" name="Creamy Pumpkin Soup with a Totoro Egg in a Hole" summary="It’s pumpkin season so this creamy kabocha soup with a Totoro egg in a hole is the perfect way to warm up after an afternoon walk looking at leaves." image="11226"]Super Fluffy Totoro Cheesecake
The softest, most jiggly Japanese cotton cheesecake decorated Totoro style! Often imitated, never duplicated, he was here first :) [wprm-recipe-roundup-item id="29574"]And for the bunny lovers out there, two bonus bunny halloween treats:
Miffy Lemon Shortbread
A snappy buttery lemon-scented shortbread that you can make into any shape. Because who says that halloween has to be all about the pumpkins anyway? [wprm-recipe-roundup-item link="https://peak-again.today/lemon-shortbread/" newtab="0" name="Lemon Shortbread" summary="A snappy buttery lemon-scented shortbread that you can make into any shape. Because who says that halloween has to be all about the pumpkins anyway?" image="9860"]Miffy Tuna Onigiri
Honestly I feel like I could make a whole halloween series of onigiri: ghosts, pumpkins, candy corn...but for now, here’s a rice ball shaped like a bunny. [wprm-recipe-roundup-item id="30840"]Whew! We made it.
Are you cute-ed out yet? I’m not. Give me ALL the cute! Happy almost Halloween! I know we could all use a little extra cute in our lives, so I hope you make one of these or if not, I hope they brought a smile to your face anyway because yes, there’s some crazy person out the in the world that took all that time to make that cute food. (It’s me. I’m the crazy person LOL) xoxo steph Read More →
I Am... Crispy Air Fryer Potatoes
Sometimes you need potatoes and you need them fast. You could roast them in the oven, but oven baking is kind of slow and you don’t always get those crispy results you’re craving. Instead, when I need potatoes and I need them now, I make air fryer potatoes! Thick cut wedges cook in no time and they’re super fluffy and soft on the inside and crispy on the outside. I have a dream. A potato dream. Have you ever seen those french fry boards floating around the internet? It’s like a charcuterie board but filled with different types of french fries and dips. It’s my idea of heaven. That and a roasted potato board and a chip board and a mashed potato board. I would legit feel like I won the lottery. I love all kinds of potatoes but the potatoes I like best of all are hot and fresh, crispy and a little crunchy on the outside and fluffy and potato-y on the inside. If you too are a potato lover, the air fryer is going to be your best friend.
Why air fryer potatoes?
If you love potatoes, air fryer potatoes are for you! You don’t have to turn on the oven and the result is 100% the same! The air that circulates around in an air fryer makes the outsides crispy all over and the insides perfectly soft. Plus they’re healthier than deep fried wedges or roasties because you hardly use any oil.How to make crispy air fryer potatoes
- Wash, dry, and prep your potatoes. Give your spuds a good wash, then pat them dry, throughly. Cut them into wedges.
- Oil and season. Give the wedges a little bit of oil to promote crispness, then season with salt and pepper. You can add extra spices too, like garlic powder, onion powder, paprika, or other spices.
- Air fry. Pop the potatoes, in a single layer into the air fryer, and fry, flipping once.
- Done. Eat all the crispy potatoes you want!
Which potatoes for crispy air fryer potatoes?
I like to use russets or Yukon golds because I think they have the best texture for roasted crispy potatoes: creamy with just enough starchiness.Potato seasoning ideas
I used a little bit of parmesan and thyme to season these guys, but the options are truly endless:- Garlic and herb - as much garlic powder as you can handle plus 2 tablespoons freshly chopped herbs of choice: dill, parsley, scallions, thyme, basil
- Everything bagel - make it rain everything bagel spice
- Sour cream and onion - mix together 1 tsp each buttermilk powder, onion powder, garlic powder, season to taste and add some scallions
- Seaweed and salt - a little crushed seaweed adds a huge amount of umami! Crush up a toasted seaweed snack pack and sprinkle on with salt, to taste.
- Five spice - a little take on the flavors of Taiwanese fried chicken: mix together 1/2 tsp each of salt, white pepper, black pepper, five spice, and garlic powder, then add it to the potatoes to taste
- Your favorite spice mix - just shake on your favorite spice mix to taste
Key points for extra crispy air fryer potatoes
- Cut the potatoes evenly so they all cook at the same time: cut your potato in half, the cut them in half a again so they are quarters. Then cut each quarter into two so you have 8 wedges from each potato.
- Don’t crowd or overlap the potatoes. They need space around them so the air can circulate and crisp.
- Be sure to flip! Sure, they potatoes will be cooked if you don’t flip, but flipping will make sure they are crisp on both sides.
- If you want them extra crispy, flip them a second time and give them another blast for 5 minutes at the end for ultra crispy potatoes.
Crispy air fryer potato FAQs:
Are air fried potatoes good for you/are air fryer potatoes healthy? They’re healthier than fried potatoes like french fries because they use less oil.Air fryer potatoes no oil
You can make these without oil but they won’t be as crispy and the outsides will be a touch dry. They still taste good but they taste better with just a slick of oil or cooking spray.What to serve with air fryer potatoes?
- Honey garlic ribs because the sweet and savory fall off the bone ribs with crispy fluffy potatoes is a match made in heaven
- Lemon pepper chicken for all those healthy, herby fresh flavor vibes
- This spicy grilled cheese as a grown up take on grilled cheese and fries!
Crispy Air Fryer Potatoes
Crispy golden fluffy homemade air fryer potatoes: the perfect combination of healthy and potato!
- 2 large russet potatoes
- 1 tbsp oil/cooking spray
- salt and freshly ground pepper
- 2 sprigs fresh thyme
- freshly grated parmesan (as desired)
Scrub the potatoes clean and cut into wedges.
Toss the potatoes with oil or cooking spray, salt, and ground pepper, then place the potatoes in the air fryer basket.
Turn the air fryer on at 400°F for 10 minutes. Shake and flip the potatoes, then set it again for 10 minutes at 400°F. At this point the potatoes should be crisp and tender. Remove from the basket, toss with thyme and parmesan, if using, and enjoy!
I Am... Halloween Treats: Totoro Banana Bread
Do you have bananas hanging out on your counter? Or, do you, like me, buy bananas specifically to make banana bread? I hardly ever eat bananas on their own, but extra ripe and brown bananas are the perfect excuse for making banana bread: they’re jammy, sweet, and extra moist – the perfect base for a flavorful quick bread.
Banana bread is my weakness.
If I could, I would eat a slice of it every morning with my morning coffee. Would that be great if a slice of morning banana bread was as standard as a morning coffee? Life would be glorious. I love ALL banana breads but this recipe in particular is my all time favorite. I’ve made a lot of banana breads and this is the one! I’m a purist when it comes to banana bread: no nuts, no chocolate, no dried banana chips. I like my banana bread to taste like bananas. I love how something magical happens when bananas are baked; the sugars caramelize and intensify, making the bananas taste even more banana-y.This loaf is everything I dream about.
The flavor is intensely banana-y and the inside is tender and moist. When you slice into it, there’s an even tight crumb, with a balanced springiness and stickiness. It’s sweet but not too sweet, with plenty of banana-y tones and subtle caramel notes.It’s a take on Joanne Chang’s famous Flour Bakery banana bread.
It’s the best moist banana bread recipe out there, dense with banana flavor, but somehow light on texture. Essentially, it’s her recipe with a bit of baking powder to give it some extra loft so the top rounds into that quintessential domed top hump. I sliced it up and decorated each slice as Totoro for a cute little halloween treat.But wait, is banana bread actually cake?
Now that I think about it, why is banana bread considered a morning treat? Is it because it’s called “bread”? Is it just cake disguised as a loaf and sliced? The answer is yes and no. Technically banana bread is quick bread: a baked good leavened with baking powder or baking soda as opposed to yeast. The umbrella term “quick breads”actually include cakes, as well as brownies, and of course things like banana bread or pumpkin bread. When most people tend to think of bread, they think of yeasted breads like sourdough, baguettes, or sandwich loaves. So, no, banana bread isn’t “bread,” but it’s called bread. Confusing, no? You can thank the English language for that one. But I guess the real question is, is it cake? Well, yes it is. It’s cake in a loaf form and that’s okay. Delicious in any shape!Banana bread with oil vs butter
I always prefer to make my loaf cakes with oil and you should too! Oil makes loaf cakes and quick breads more soft and moist. Oil will give you that classic banana bread flavor that you get when you buy a slice from a coffee shop.How to make the best banana bread
- Beat the eggs and sugar. I like to use a stand mixer or hand mixer for this, but you can also just use a whisk. You want the eggs and sugar to fluff up bit and be pale in color.
- Whisk in the oil. Slowly drizzle in the oil while whisking.
- Mix. Time to mix in the smashed banana, sour cream, and vanilla.
- Fold. Gently fold in the dry ingredients until there are no flour streaks.
- Bake. Pour everything into a oiled and floured (or nonstick) loaf pan and bake until golden and cooked through. Let cool, slice, and enjoy!
How to decorate into totoros
After your loaf is sliced and cooled, you can decorate the slices like Totoro: pop on some candy eyes, give him an icing sugar belly, and use melted chocolate to pipe on his nose and whiskers. He’ll be so cute you almost won’t want to eat him. But he tastes really good, so just do it!How to ripen bananas for banana bread
Usually before I want to make banana bread I’ll buy bananas a couple of days before so I can ripen them myself. There are a couple of different tricks to ripen bananas quickly:- Separate them. Separating bananas helps them ripen faster because they’ll release more ethylene (the gas that ripens fruit).
- Stick them in a paper bag. Pop the bananas in a paper bag and close off the top.
- Stick them in a warm spot. Leave the paper bag of bananas in a warm spot and if you have an apple add it in, it’ll release more ethylene and encourage the bananas to ripen.
- Bake them in a low oven. Technically this isn’t ripening, but it does sweeten bananas. Place unpeeled bananas on a baking sheet and let them bake in a low oven (300°F) for 15-30 minutes. The skins will darken and the bananas will get very soft.
The best loaf pan?
I love this oxo good grips 1lb non-stick loaf pan. It releases perfectly every time! Happy halloween month! xoxo stephTotoro Banana Bread
So cute you almost won’t want to eat him. But he tastes really good, so just do it!
- 1 2/3 cups all purpose flour (210 grams)
- 1.5 tsp baking powder
- 1/4 tsp baking soda
- 1/4 tsp ground cinnamon
- 1/2 tsp kosher salt
- 18 tbsp sugar (1 cup plus 2 tablespoons, 230grams)
- 2 large eggs
- 1/2 cup canola oil (or other flavorless oil, 100 grams)
- 3.5 bananas (very ripe, about 1.5 cups peeled and mashed, 340grams)
- 2 tbsp sour cream
- 1 tsp vanilla extract
With the rack in the center of the oven, preheat to 325°F. Lightly oil and flour a standard 9x5 loaf pan. Sift together the flour, baking powder, baking soda, cinnamon and salt in a bowl and set aside.
With a stand mixer fitted with the whip attachment, beat together the sugar and eggs on medium speed until light and fluffy, about 5 minutes. Switch to low speed and slowly drizzle in the oil, taking your time.
Add the bananas, sour cream, and vanilla, and continue to mix on low speed just until combined.
Use a rubber spatula to fold in the flour mixture until thoroughly combined. No flour streaks should be visible.
Pour the batter into the prepared loaf pan and bake for 1 to 1 1/4 hours. The banana bread should be golden brown on top and will spring back when you press it.
Let cool in the pan on a wire rack for 30 minutes, remove from the pan and let cool completely on the wire rack. Enjoy!
To decorate as Totoro
You need: candy eyes, melted dark chocolate, icing sugar, and a clean sheet of paper to make a stencil.
When the banana bread is completely cool, slice. Make a stencil for Totoro’s belly by taking a sheet of paper and cutting out a curved belly that fits the slice of banana bread. Place the stencil over the banana bread slice and give Totoro a generous dusting of icing sugar to create his belly.
Attach the candy eyes with melted chocolate and pipe out a nose, whiskers, and chest fur. Enjoy!
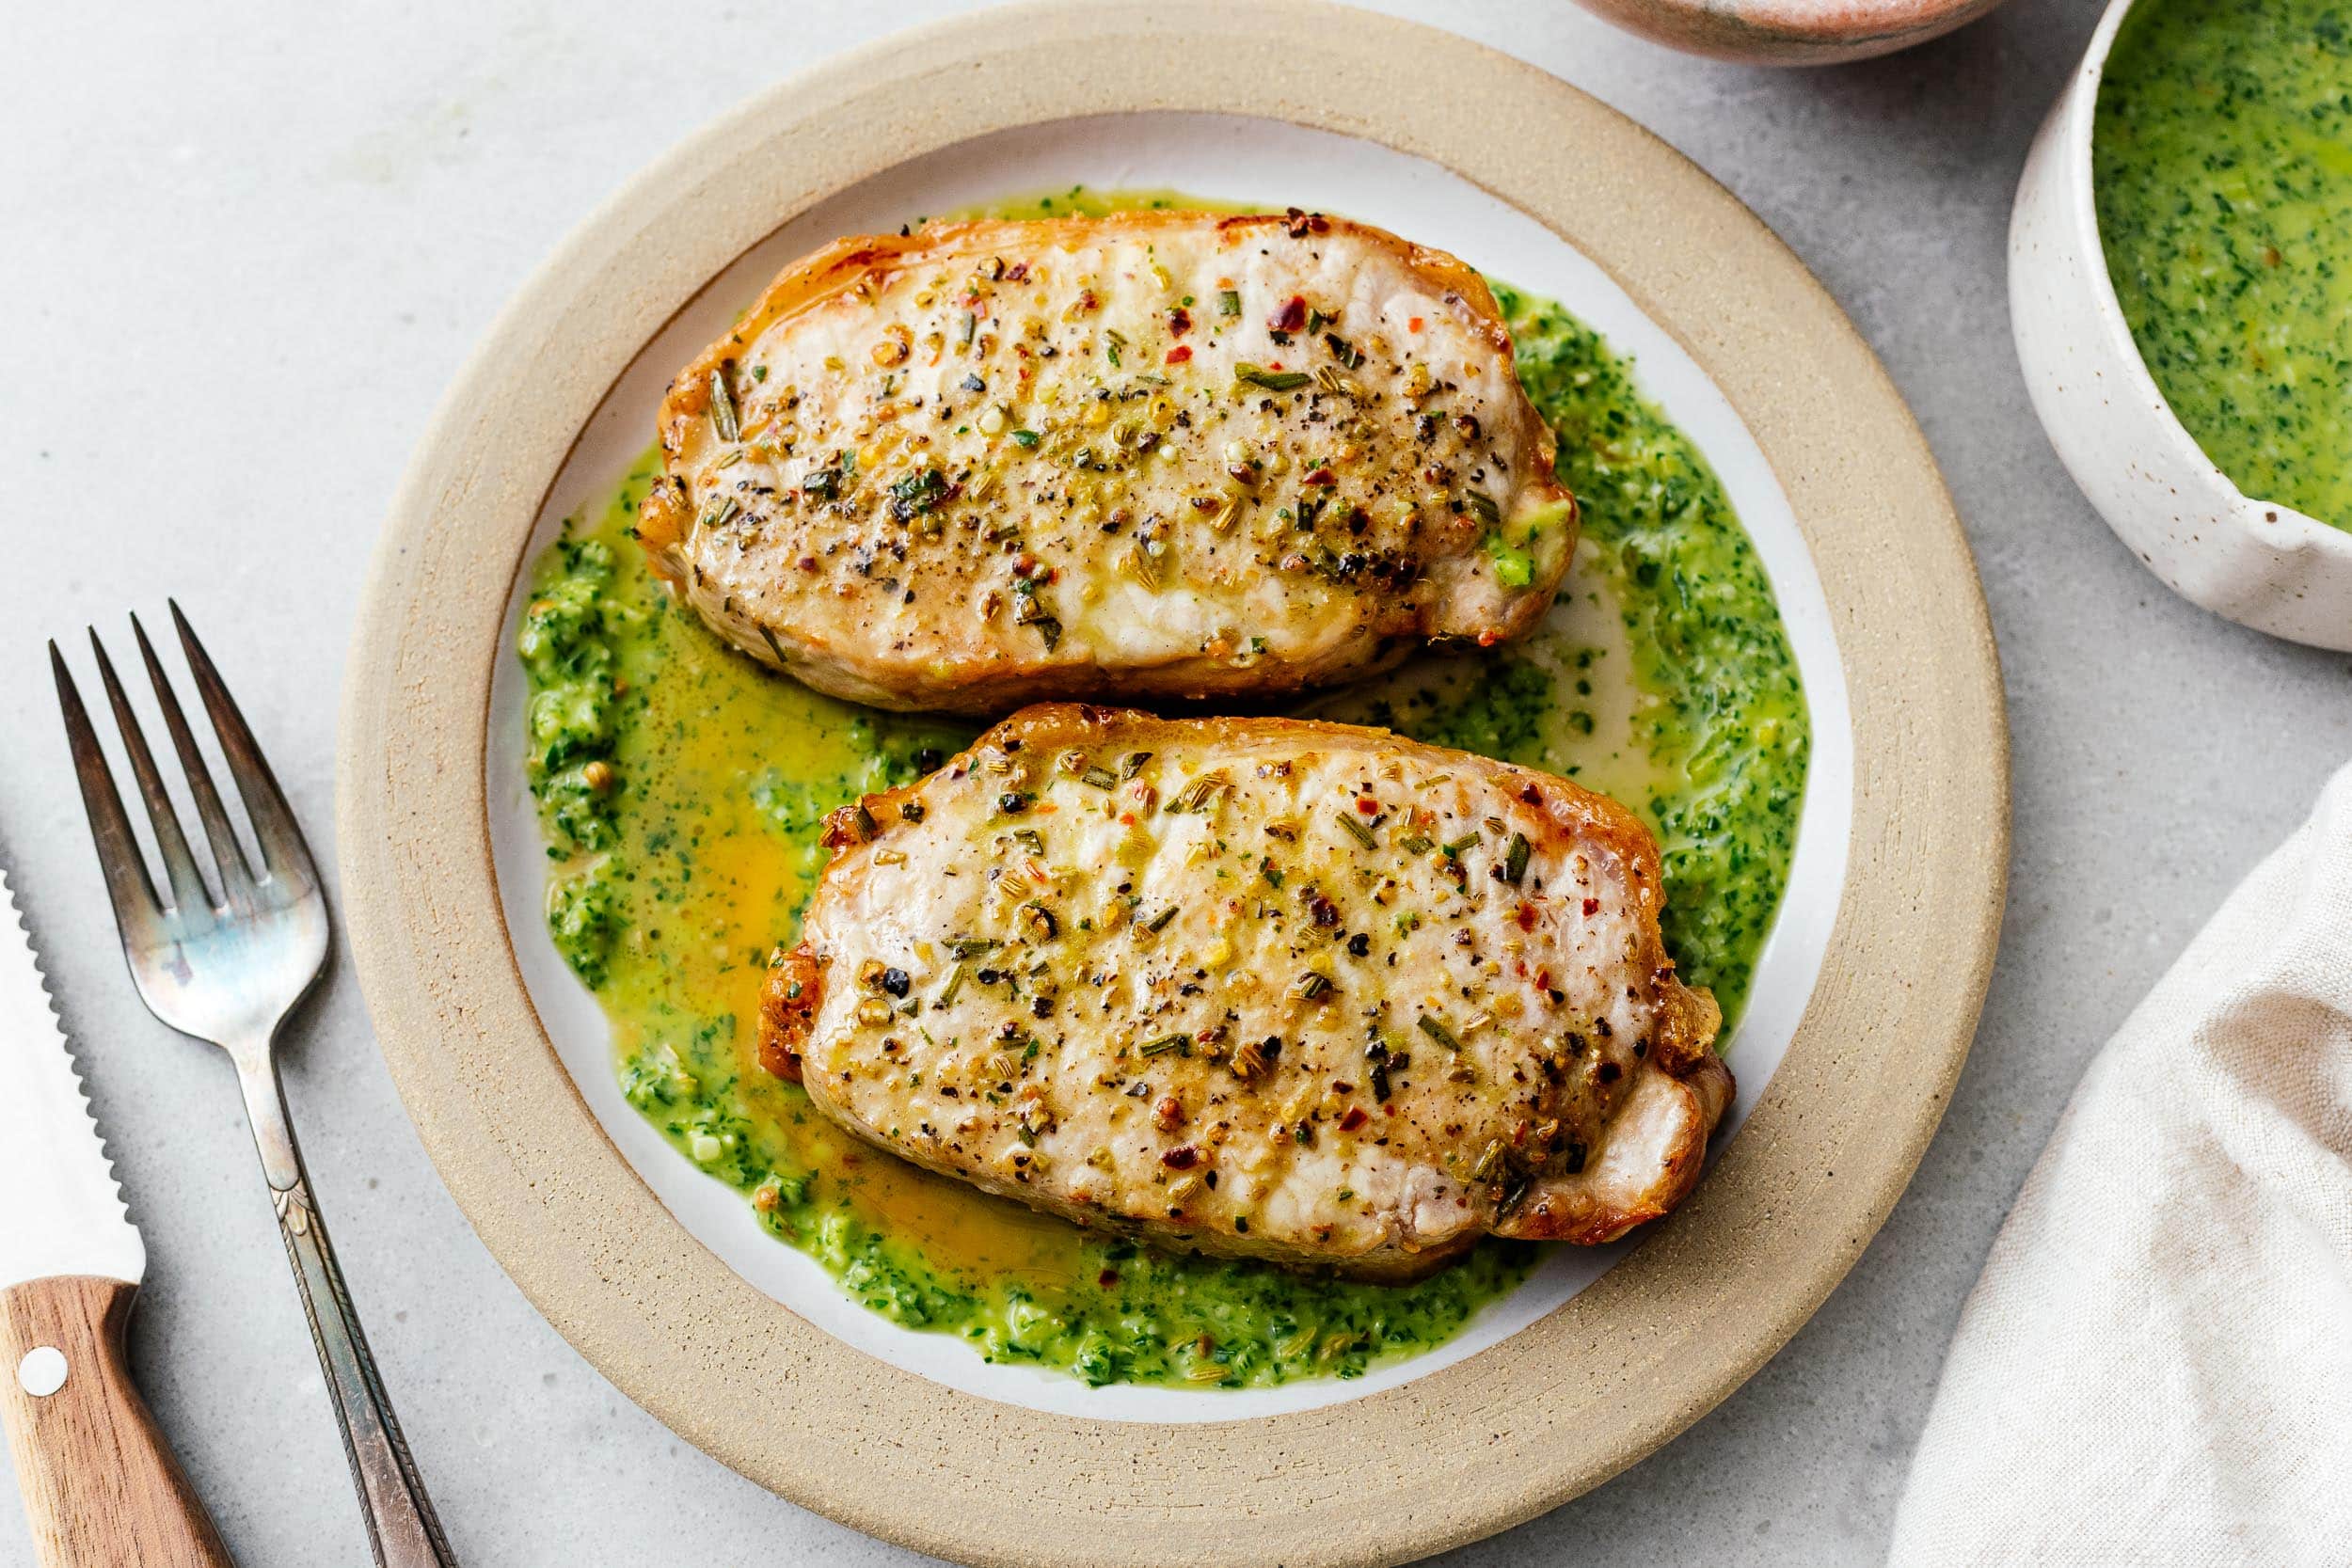
I Am... Air Fryer Pork Chops
Air fryer pork chops coming in hot and fast with the flavors of Italian porchetta! Do you ever wander by someone’s house and smell what they’re cooking for dinner? Every time Mike and I smell someone’s cooking and it smells good, we turn to each other and say, “PORK CHOPS!” To be honest, it’s probably not pork chops at all but Mike is low-key obsessed with pork chops and it’s a funny little thing we do. Anyway, both Mike and I love pork chops. What’s not to love about a thick cut of juicy pork? There are a couple of secrets to making the best pork chops and I’m going to share them ALL with you.
First off, let’s talk about flavors.
I seasoned these thick and juicy guys with the classic flavors of porchetta, the insanely iconic Italian pork roast that’s stuffed with rosemary, fennel, and herbs. To gild the lily I whipped up a quick salsa verde full of fresh herby lemon flavors. The green sauce and pork chops together are going to blow your mind.To make the best pork chops, buy the right kind of chop
Thick cut pork chops for the win! The best pork chops for air fryer pork chops (or any pork chop in general) is a thick, center cut pork chop. They can be bone-in or boneless, but you want them thick! Thin pork chops cook too quickly and end up being dry. So if you love pork chops, get them thick, at least 1.5 to 2 inches thick.Pork chop temp
The USDA recommends 145°F for pork chops.How to make juicy pork chops
They key to making juicy pork chops is not over cooking them. Pork chops tend to be lean and have a very small margin for overcooking. USDA says that the safe temp for pork is 145°F which is a bit rosy and quite juicy. Most people are used to overcooked pork chops so they’re scared of pink. If you want juicy chops, invest in an instant read thermometer, cook your pork to 145°F (or even to 140° and let the carryover heat bring it up to temp) and you’ll never eat dry pork chops again. Don’t fear the pink!How to cook pork chops in the air fryer
- Dry the chops. Give the pork chops a pat dry with some paper towels. This removes excess moisture from the pork chops so the surface doesn’t steam instead of caramelize.
- Oil and season. Give the pork chops a rub down with some oil (this promotes even browning) then rub on the good stuff: salt, pepper, rosemary, fennel seeds, and red pepper flakes.
- Air fry. Cook the pork chops for 12 minutes at 400°F, flipping halfway, or until the inside temp reaches 145°F.
- Rest. Remove the chops from the fryer (so they don’t over cook in the residual heat) and let rest for a couple minutes, then enjoy the juiciest pork chops you’ll ever eat!
Do I need to preheat my air fryer?
Most of the time I say that you don’t need to, but we did some A/B testing and preheating the air fryer when cooking pork chops led to juicier chops. Preheat your air fryer for 5 minutes at 400°F.How long to cook pork chops in the air fryer?
- Boneless thick cut pork chops: Air fry at 400°F for 10-12 mins, depending on size, flipping halfway.
- Bone in thick cut pork chops: Air fry at 400°F for 12-14 mins, depending on size, flipping halfway.
What if my pork chops are sad, oops I meant thin?
If you can only find sad pork chops at the store, you can still make juicy pork chops, just don’t overcook them. Prep them the same way, then cook at 375°F for 8-9 mins, flipping halfway.What should I serve with air fryer pork chops?
rice: pork chops and rice is one of my all time favorite combos and the green sauce with rice is life smooth and creamy mashed potatoes: who doesn’t love potatoes and pork? mac and cheese: those creamy cheezy noodles go so well with pork! kale with burrata: leafy greens braised in tomato sauce with some rich burrata might be the best paring ever If you’re wondering which air-fryer we have, it’s this one. I don’t know if it’s the best on the market because it’s the only one we’ve used, but it works great. It’s quiet and easy to clean and really big (which is good because you can put a lot of food in it and bad because it takes up a lot of room in our place).Air Fryer Pork Chops
Air fryer pork chops coming in hot and fast with the flavors of Italian porchetta!
- 2 pork chops (center cut, 1.5-2 inches thick)
- 1 tsp fresh rosemary (chopped)
- 1 tsp fennel seeds (crushed and divided)
- 1/4 tsp red pepper flakes (optional)
- 1/4 cup extra virgin olive oil
- 1 cup fresh flat leaf parsley (loosely packed)
- 2 tbsp freshly grated parmesan (authentic Parmigiano-Reggiano preferred)
- 1/2 tsp coriander seeds (crushed)
- 2 cloves garlic
- 1/2 lemon (zested and juiced)
Let the pork chops temper in a cool spot in your kitchen for 15-20 minutes. Preheat the air fryer for 5 minutes at 400°F. Make a rub: in a small bowl, combine 1 teaspoon salt and 1 teaspoon freshly cracked black pepper with the chopped rosemary, 1/2 teaspoon crushed fennel seeds, and red pepper flakes, if using.
Pat the pork chops dry with a paper towel. then rub them generously with 1-2 tablespoons olive oil. Coat them with the rub.
Place the chop in the air fryer at 400°F and cook for 12 minutes, flipping halfway, or until the internal temperature reaches 145°F.
While the chops are cooking, make the salsa verde: combining the remaining oil, parsley, Parmigiano, coriander seeds, remaining fennel seeds, garlic, and lemon zest and juice in a blender and pulse until smooth. Taste and season with salt and pepper.
When the chops are done, remove immediately and let rest for 5 minutes. Slice and serve with the salsa verde!
I Am... Halloween Treats: Spoopy Soot Sprite Brownies
The month of spoopy (cute and spooky) is here! October is truly great, not only because it’s full on autumn and I’m in love with fall leaves, but because it’s the month where we can obsess over ALL the treats. I always make some homemade halloween treats, especially brownies, once October hits because, why not? We all need a little bit of halloween cheer in our lives, am I right? The other day Mike and I were just talking about how the month of October could be so much more: halloween trees, halloween presents, halloween stockings, halloween advent calendars! Halloween all the things! And now that it looks like trick-or-treating is a thing of the past, home baked halloween treats are just the thing. These cute little googly-eyed brownies inspired by the soot sprites in Totoro are just the spoopy cute treat you need in your life.
But wait, what are soot sprites?
If you’re fan of Studio Ghibli and Totoro, then you probably know what soot sprites, or susuwatari, are. If you haven’t heard of them, they’re cute little round dust bunnies with googly eyes and are in two Miyazaki movies: Totoro and Spirited Away. They always remind me of Halloween because a.) they’re fuzzy and b.) Totoro and Spirited Away are both perfect for watching in October.Why soot sprite brownies?
There are a ton of soot sprite cupcakes out there and I’ve even made soot sprite cookies and soot sprite onigiri but these year I was feeling like brownies were the way to go. Who doesn’t love a brownie, especially one that’s been baked in a muffin tin so it’s nice and round and just the right shape for putting eyes onto and calling it a soot sprite?Cakey vs fudgy brownies
There are two brownie camps: cakey and fudgy. I’m a fudgy brownie person all the way. I love dense, thick brownies, and this brownie doesn’t disappoint in that department, but its also more of a balance between cakey and fudgy. It’s an oxymoron, if you will: soft and cakey on the edges with a slightly denser, melty, fudgy middle. I baked them in muffin tins so they all have edges (brownie edges for the win!) and the same structural integrity. As a bonus, you don’t have to cut your brownies and every single brownie looks the same. They also kind of look like slightly larger two-bite brownies, which is hilariously cute because I love two-bite brownies.Cocoa powder vs melted chocolate brownies
These brownies are an all cocoa brownie and you might be wondering, but will it be chocolatey enough? The answer is yes! Cocoa powder is 100 percent cocoa versus chocolate which contains sugar and cocoa fats. Cocoa powder gives you more control when making brownies - you get to decide how much sugar and fat goes into your brownies. Plus, who doesn’t have a canister of cocoa in their pantry? It’s a win-win in my books.The best cocoa powder for brownies
I use unsweetened dutch process cocoa powder, which is cocoa power that has had it’s acidity reduced making the cocoa darker and more chocolatey looking, but more mellow tasting than natural cocoa power. Because natural cocoa powder is simply powdered up cocoa beans it’s more acidic, bitter, and concentrated compared to dutch process.Can you stuff these brownies?
Yes! Simply spoon some of the batter into the muffin tin, put about 1 teaspoon of your stuffing in, then spoon some extra batter on top. You’ll get a stuffed brownie that’s extra melty with a surprise in the middle. Some ideas for stuffing:- chocolate chunks/chocolate chips
- nuts: hazelnuts, walnuts, macadamia nuts, pistachios, pecans
- spreads: nutella, jam, peanut butter, cookie butter
- cookies/candy bars: crushed up oreos, biscoff cookies, chopped up candy bars
How do you get brownies out of a muffin tin?
Make sure you generously butter your tin. I also like to place a strip of parchment paper with some overhang into the tin, so I can use the overhang to easily lift the brownies out.Can you freeze brownies?
Yes, just wrap them individually with plastic wrap and place them in a air tight container. They’ll keep in the freezer for at least a month, if they last that long.Can you make these brownies without the eyes?
Of course! These will make regular brownie bites too.How to make brownie bites
- Butter your tin and line with strips of parchment paper and preheat the oven.
- Melt the butter, let it cool slightly, then mix it with the sugar and salt. Stir in the cocoa powder and instant coffee.
- Mix in the eggs one at a time then stir in the vanilla and water.
- Add the dry ingredients and mix just until there are no flour streaks.
- Bake, cool, and enjoy!
Best brownie bites tips
- Better cocoa powder = better brownies! Use a good dutch processed cocoa powder. Dutch processed cocoa powder is less acidic than regular natural cocoa powder. It’s the key to a good chocolate brownie.
- Instant coffee is the secret ingredient. Instant coffee gives just the tiniest bit of bitterness which will contrast with the chocolate and make i taste even more chocolatey. You won’t taste the coffee at all.
- Under baking is better than over baking. When in doubt, pull the brownies out a bit early. No one likes a dry brownie and the brownies will continue to cook and firm up while they cool, so under bake instead of over bake.
- Let the brownies cool. Letting the brownies cool will make them gooier, and fudgier, with a more intense chocolate flavor. If you want a warm brownie the next day, just warm it up in 30 second increments in the microwave until it’s warmed to your liking.
Homemade Halloween Treats: Spooky Googly Eye Soot Sprite Brownies
These cute little googly-eyed brownies inspired by the soot sprites in Totoro are just the spoopy cute treat you need in your life.
- 1/2 cup unsalted butter (melted and cooled)
- 3/4 cup sugar
- 1/2 tsp salt
- 1/2 cup unsweetened cocoa powder (dutch processed preferred)
- 1 tsp instant coffee
- 2 large eggs (room temp)
- 2 tsp vanilla extract
- 1/4 tsp baking powder
- 6 tbsp all purpose flour
Preheat your oven to 350°F. Lightly butter and line your muffin tins with a strip of parchment paper (so you can pull the brownies out easily).
In a mixing bowl, whisk the melted butter with the sugar and salt. Add the cocoa powder and instant coffee and mix until well combined.
Add the eggs, one at a time, mixing well to combine. Sir in the vanilla and 1.5 tablespoons of water.
Sprinkle on the baking powder, then the flour and slowly mix until just combined with no flour streaks.
Spoon the batter evenly into the muffin tins. Bake for 11-12 minutes. When done the tops will be puffy and the sides will look set. Under baked is better than over baking for a moist and fudgy center. Let cool in the tins for 5 minutes before removing and cooling on a wire rack.
To decorate brownies as Soot Sprites, you’ll need some candy eyes. Push the candy eyes into the brownies right after they come out of the oven and are still soft.

I Am... Halloween Rice Krispie Treats
Hello! I’m back at it with some Halloween rice krispie treats dressed up as Totoro, the lovable giant bunny-cat-owl-racoon-looking creature straight from the imagination of Hayao Miyazaki. These treats are delicious, cute, and perfect for a Halloween movie night where you watch Totoro for the ten thousandth time. I feel like halloween rice krispie treats are a halloween tradition. I’ve made ones that look like candy corn, pumpkins, and mummies. This is my first year making Totoro rice krispie treats though. I love how they came out! They are SO CUTE and they taste great too. The rice krispie treats are soft and chewy and crispy: just the right ratio of butter to marshmallow to rice krispies. I don’t think I know anyone who doesn’t like rice krispie treats. They are pure treat perfection, especially when they’re homemade.
How to make super soft rice krispie treats
- Extra butter. Classic rice krispies calls for 3 tablespoon of butter, I’ve doubled it for just the right amount of butter to make these treats extra soft.
- Mini marshmallows. Use minis! They melt more consistently and give you a softer, fresher rice krispie.
- Don’t press down too hard. Don’t squish your treats! If you squish them down too much, when they cool down they won’t be as soft because everything will be compacted together.
- Eat them fresh. Fresh is best. They’ll keep for a couple of days but are softest on day one.
- Store them at room temp. Keep your treats tightly covered in a container at room temp.
How to make rice krispie treats
- Melt the butter. Melting butter over low heat is key, if the heat is too high it’ll burn.
- Melt the marshmallows. Use the residual heat from the pan and the butter to stir in and melt the marshmallows.
- Stir in the krispies. Use a spatula to fold in the krispies.
- Gently pat. Lightly pat the mix down into a pan being sure to not squish it down.
- Let set. It’s tempting to cut into them right away, but let them cool so you can get clean, sharp slices. Then, decorate or eat as many squares as you want!
How to make spoopy chocolate dipped totoro treats
- Make your rice krispies, let them cool, then slice.
- Melt your white chocolate melts or white chocolate in the microwave. The microwave is best for melting chocolate, especially if you do it in short bursts. Heat the chocolate in the microwave in a glass bowl in 15 second bursts, stirring in between until everything is smooth.
- Spoon or dip. You can either spoon or dip your treats. If you spoon, hold the treat over the bowl and use a spoon to repeatedly spoon over the melted chocolate, then tap the treat on the side of the bowl to shake off the excess. This will give you a thicker and smoother coating. Or, simply dip! Let the treats harden on a parchment paper lined baking sheet.
- Decorate. After the chocolate has harded, it’s time to decorate :)
Rice Krispie Treats Recipe
Super soft rice krispie treats that stay soft for days.
- 6 tbsp butter
- 10 oz mini marshmallows (one bag)
- 6 cups rice krispies
Line an 8x8 inch square baking dish with parchment paper. Add the butter to a large sauce pan over medium low heat. Melt the butter slowly, stirring occasionally.
When the butter is melted, turn the heat to very low and add the mini marshmallows, stirring until melted and smooth. Remove the pan the heat.
Use a rubber spatula to fold in the rice krispies until well coated.
Spoon the mixture into the prepared pan and very lightly spread the mix out, using buttered fingertips or a the spatula.
Let cool for 1 hour at room temp then cut into squares.
To decorate as Totoro
You need: 24 candy eyes and dark and white chocolate. In a microwave safe bowl, melt the white chocolate melts in 15 second intervals, stirring in between. Dip the squares halfway in the white chocolate to give Totoro his white belly or spoon white melted chocolate over the bottom half of the treat and tap off the excess. Set on a parchment paper lined baking sheet. Attach the candy eyes with melted chocolate and pipe a nose, whiskers, and chest furries.
To store: Keep in an air tight container at room temp for 3-5 days.

I Am... The Best Chop Suey
Chop suey is my comfort food. It was ubiquitous in my childhood. Even though the name chop suey has become unfashionable, versions of it are still everywhere. This modern chop suey is so good, you'll never need to go out again. We made a big batch of rice to eat it with but in the end we barely touched the rice at all. It was so satisfying all on its own. Perfectly balanced, as all things should be. I made this one up extra saucy because the whole point of chop suey is that crazy delicious sauce. This is the chop suey of my dreams.
What is chop suey?
There are a lot of people who try to answer this question with a history lesson, but I think that stuff doesn’t matter. At its core, chop suey is a glorious meat and vegetable stir fry with American ingredients. Chop suey is a stir fry of too many vegetables (some canned), a not-quite-authentic Chinese stir fry sauce, way more meat than they’d ever use in China, and way more delicious than it has any right to be. When I went to the mall with my friends as a teenager, my food court joint of choice was that place where I could pick out meat and vegetables by the pound, and they would stir fry it on a giant flat top and serve it over rice. I always got extra rice (grudgingly free, but how can you say no to teenage boys who need extra rice?) and they would always ask which of 10 different sauces I wanted. The answer was always “brown”. And what is that, if not a choose-your-own adventure chop suey?Authentic American chop suey
Other people will tell you it's just a Chinese stir fry gone wrong, but I disagree. Chop suey is through and through an American dish. Does that make it worse or less authentic than "real" Chinese food? I say no: it’s just as authentic as Italian American food, which used to be trashed by “real” Italians, but these days is celebrated as its own thing by people in the know. If you didn't grow up here, you'll probably dismiss chop suey as "westernized Chinese food." Chinese people (even including Steph) tend to instinctively look down on this dish, but they’ll come around, just like how authentic Italian pizzerias actually make American pizza and don't even know. (Update, after tasting this version, Steph came around).The magic of chop suey is in the sauce.
But, that doesn’t mean we shouldn’t incorporate proper Chinese cooking techniques and ingredients into this quintessentially American dish. In this recipe, we use all the secrets of real Chinese cooking (where applicable): Shaoxing wine to add complexity; toasted sesame oil for a creamy nutty umami note; velveting the meat to tenderize it. But is that what makes this what I humbly call the greatest chop suey recipe? No, what makes this a great chop suey recipe is ALL THAT SAUCE. It's gloriously generous, and it's so satisfying to eat. You can't make chop suey without enough sauce to drown in (even if you end up not eating it all).How to make chop suey
- Marinate and velvet the meat for 5-15 minutes (basically as long as it takes to prep everything else, but longer is better).
- Prep your carb base: cook your rice or soak your chow mein.
- Prep the vegetables by cutting them into spoon sized pieces.
- Make the sauce and thicken it.
- Stir fry the meats and garlic. Then remove and set aside so they don't overcook.
- Briefly cook the vegetables. I prefer my vegetables on the still crunchy side.
- Add the sauce and stir everything together.
- Eat to your heart's content.
Ingredients
For me, chop suey is a protein (chicken, pork, or tofu), all the veg you want, but at least one canned (I like baby corn; maybe you like water chestnuts or bamboo shoots?), bean sprouts, a generous amount of brown stir fry sauce, and a carby base: rice or noodles.- Protein: chicken thighs, chicken breast, or pork tenderloin, velveted in corn starch. Or tofu or ground meat too, no velveting needed
- Sauce: my chop suey sauce is mostly made of soy sauce, oyster sauce, corn starch, and the secret ingredient: chicken stock to get that volume up. Because of how much sauce we're making, you need to thicken it on its own instead of the traditional Chinese way of boiling it at the end with everything until it gets thick enough. If you do it that way, by the time the sauce is thickened, everything else will have overcooked.
- Canned vegetables: Canned baby corn/bamboo/water chestnuts provide a bright note and a hit of old school authenticity to this dish. If you didn't grow up with chop suey, you should skip this; it's an acquired taste.
- Fresh vegetables: because we’re better than canned now. Vegetables should be cut up into small bite sized pieces that you can eat with a spoon–chop suey shouldn't be eaten with chopsticks. That means squares, not long slices. The recipe has a list of suggestions but you should use whatever your heart desires: asparagus? check. snow or snap peas? check. All the colors of the rainbow bell peppers? triple check! Super authentic Chinese vegetables like gai lan or bok choy? Only if you want to.
- Carby base: rice or chow mein noodles, please!
Toasted sesame oil: the secret to that authentic restaurant taste
Even though this is firmly an American dish, we can still update some of the ingredients to more authentic fare than was available in the 1800s. The traditional secret of great Chinese food is Shaoxing wine, but in the modern world I would add that toasted sesame oil is on par with it in terms of importance and flavor, and universally available these days. It goes in everything and it’s that subtle nutty note that makes anything better. A little goes a long way though, so use it sparingly. You should be able to find toasted sesame oil in the Asian aisle of any grocery store (or online, as always). We prefer Kadoya, a japanese brand with an iconic bottle.The food of my childhood (and yours too I bet)
Chop suey was the first thing I ever cooked and I bet it was yours too. Like all kids, I had no recipe or any idea of what I was doing, but I knew deep down what I wanted to make: a stir fry with that delicious mystery Chinese brown sauce, the crunchy and colorful vegetables, and that velvety soft tender chicken (or pork) over rice that I got literally everywhere. I'm glad I updated it and made it again because I forgot how good it is. I hope you enjoy it as much as I did. It was simultaneously a throwback to the carefree days of childhood and just a genuinely good weeknight dinner that deserves a place in your rotation. So saucy, -MikeBest Chop Suey Recipe
The stir fry of your dreams.
Protein
- 1 lb chicken breast (sliced, or meat of choice, see notes)
- 1 tsp soy sauce
- 1 tsp oyster sauce
- 1 tsp corn starch
- 1 tsp toasted sesame oil
- 3 cloves garlic (sliced)
Chop Suey Sauce
- 1 tbsp soy sauce
- 1 tbsp oyster sauce
- 2 tbsp corn starch
- 1 cup chicken stock (no sodium preferred)
- 1 tsp sugar
- 1/2 tsp toasted sesame oil
- 1 tsp shaoxing wine (optional but highly recommended)
- 1 tsp dark soy sauce (very optional, for color)
- 1/2 tsp ground white pepper (optional, if you can find)
Suggested Vegetables
- 1 cup broccoli (cut into bite sized pieces)
- 1 cup mushrooms (sliced)
- 1 cup bean sprouts (rinsed)
- 7 oz baby corn (1/2 can)
- 1 bell pepper (cut into squares)
- 1/2 medium onion (sliced)
Combine all ingredients to marinate and velvet the meat (or tofu) and set aside.
Combine all the ingredients of your sauce. Reduce in a large nonstick skillet until suitably thickened, about 2 minutes. Transfer to another container and set aside.
Prepare your fluffy white rice or crispy chow mein if needed. Then, heat up 1 tbsp of oil in the same nonstick skillet over medium-high heat. When hot, add your protein and quickly stir fry until cooked through, about 3-4 minutes, then remove.
Add all the vegetables except the beansprouts to the now empty skillet and give them a very quick toss, 1-2 minutes (or to your preference).
Add the meats, bean sprouts, and sauce to the skillet and allow the sauce to come to a boil, 1-2 minutes. Serve immediately, with green onions and sesame seeds and chili flakes.
You can use any protein you like, such as pork chops, chicken thighs, tofu, etc. If using tofu or ground meats, omit the corn starch.
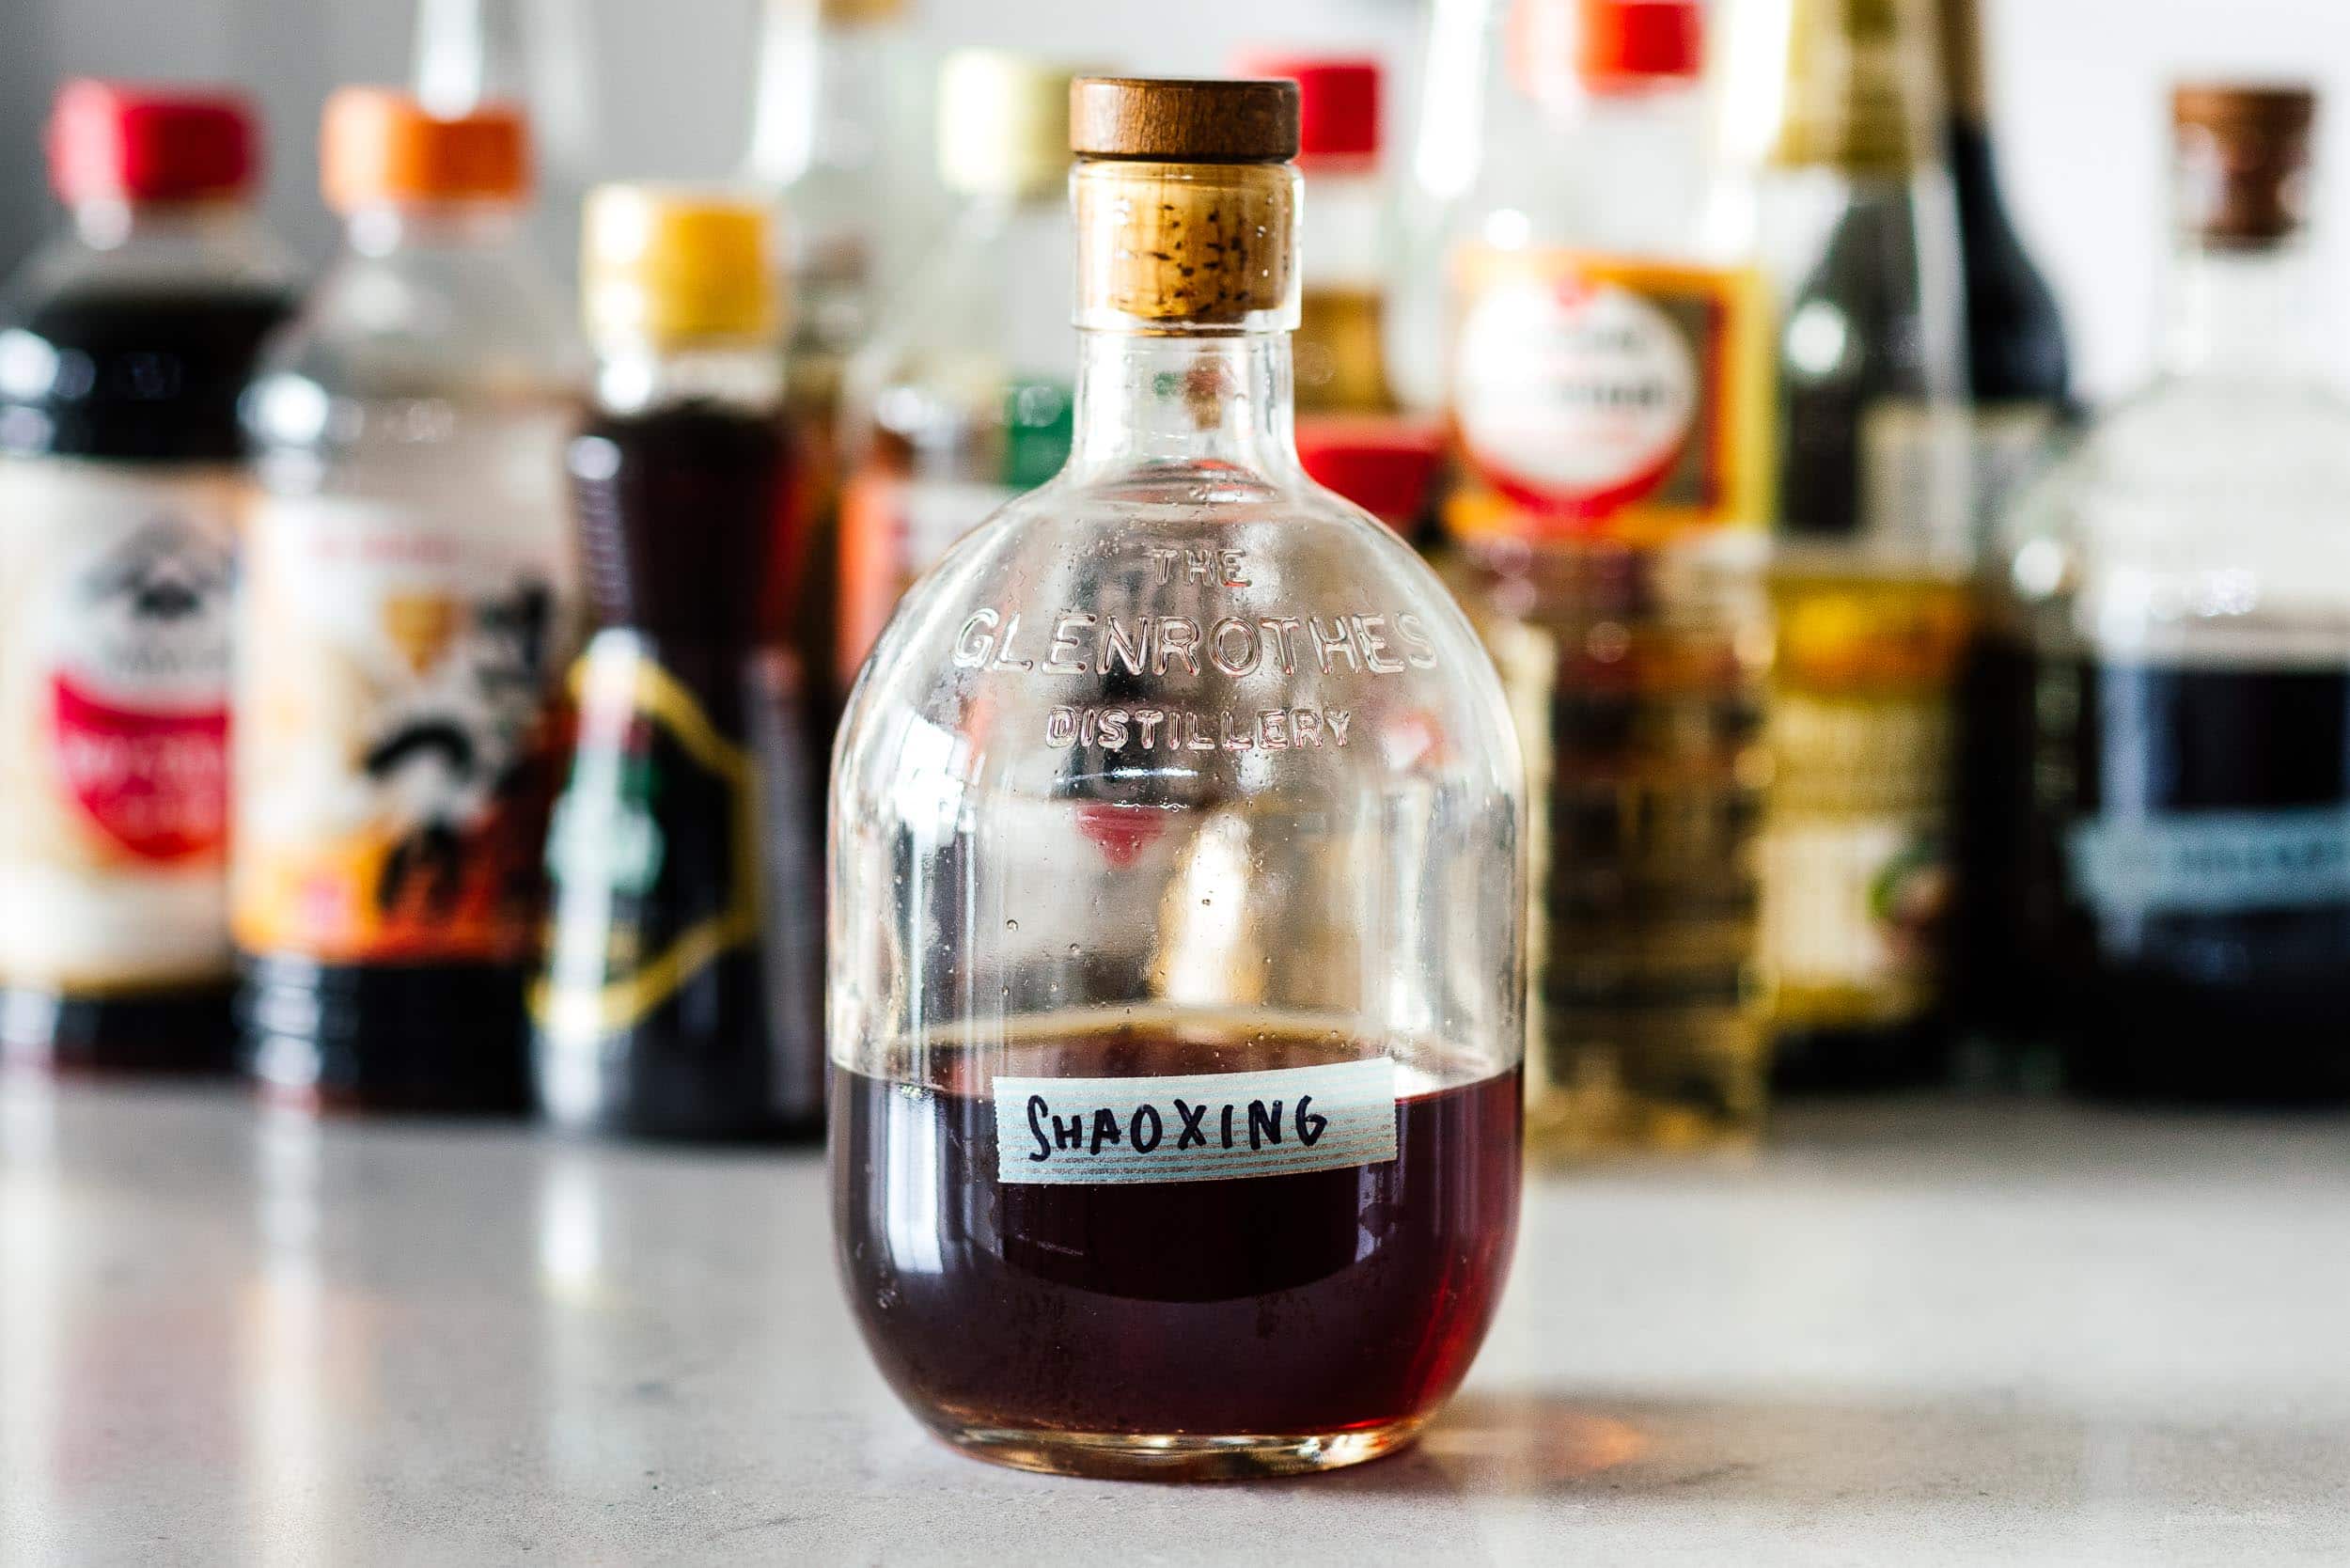
I Am... Shaoxing Wine
If you asked me what was in my pantry that is a surprise unsung hero, I would most definitely say Shaoxing wine. Shaoxing wine is the not so secret ingredient that adds an authentic flavor to all of our Chinese dishes. You know how sometimes you eat Chinese food, whether it's takeout or fine dining, and it's really really good and you can't quite put your finger on it? Maybe you've suspected it's MSG? It's actually not; most likely that flavor you can't identify is Shaoxing. Or if you cook Chinese food at home but feel like it’s missing that special something compared to restaurant Chinese food, it’s probably Shaoxing wine.
What is Shaoxing wine?
Shaoxing is a type of Chinese rice wine. In Chinese it’s called 绍兴黄酒 or Shaoxing huang jiu, which translates to Shaoxing yellow wine. The Shaoxing part of it refers to the city of Shaoxing, which is in the Zhejiang Province which is famous for rice wine. Shaoxing has a very long history, both as an alcoholic beverage and as a cooking wine. It’s made from fermenting brown glutinous rice, water, and a tiny bit of wheat. Shaoxing wine has a clear, translucent golden amber hue.Do I need it?
If you’re a fan of Chinese food and the Chinese food you’ve been making at home feels like it’s missing something, then yes, I recommend getting a bottle! It's fairly cheap (although very expensive versions exist), it lasts a long time, and it’s an ingredient you’ll use again and again in Chinese food and once you start cooking with it you’ll ask yourself how you ever lived without. It's as unthinkable as cooking Italian or French food without wine, or Japanese food without sake and mirin.Shaoxing wine substitute
The best substitute for Shaoxing wine is dry sherry. Use it as a one-to-one sub.Where to buy it
You can buy it at Asian grocery stores or online. Some well stocked supermarkets might have it in their Asian aisle. Depending on the laws where you live, the best place to find a good unsalted one might be a well stocked liquor store.Should I buy salted or unsalted?
Unsalted is the one you want! Check the label, it shouldn’t have any salt in it. They sell salted Shaoxing as way to label it as cooking wine so it doesn’t have to be exclusively sold in liquor stores. Salted Shaoxing is super salty and won’t add that delicate flavor you’re looking for. If it's what you can find, go for it, but you should reduce the salt in the rest of your recipe. Not this one:The best Shaoxing wine brand
Our favorite brand of Shaoxing wine is Pagoda Huadiao Rice Wine No Salt. It’s been around forever. You can also get a salted version on Amazon. If you somehow have a great selection at the Asian grocery or liquor store, as with most things, the more expensive the bottle, the better the product, and unsalted is always better than salted.Shaoxing vs mirin
Compared to mirin, Shaoxing is less sweet and has a completely different flavor profile. In a pinch, you can substitute mirin.Non alcoholic substitutes for Shaoxing wine
If you don’t do alcohol, I recommend using chicken broth as a sub.What does it taste like?
It’s kind of hard to describe but it tastes lightly sweet, nutty, earthy, and complex. It’s incredibly aromatic.Is it the same as rice wine?
Shaoxing is a rice wine so, yes. But if you’re asking if Shaoxing and sake are the same, the answer is no. Can you use sake as a sub for Shaoxing? Yes, but just know that it won’t taste exactly the same.How do I store Shaoxing wine?
Keep it in a cool dark place. We keep ours in our pantry. If you have space you can store it in the fridge, but it’s not necessary.What dishes use Shaoxing wine?
Shaoxing adds depth and complexity to Chinese dishes. It’s used as a marinade or in braises, or as a flavoring component to soup, meats, veggies, stir-fries, and dumplings. Shaoxing is in:- Potstickers
- Kung pao chicken
- Char siu
- Orange chicken
- Beef and broccoli chow mein
- 3 cup chicken
- General Tso’s chicken
- Chili oil wontons
- Claypot chicken rice
- Chicken chow mein
- Soy sauce chow mein
I Am... How to make TikTok Whipped Hot Chocolate
TikTok whipped hot chocolate coming in hot for all those fall feels! TikTok may be banned soon, but the TikTok food trends are still going strong! If you loved dalgona coffee and whipped matcha, whipped hot chocolate is here for you this fall season.
What is whipped hot chocolate?
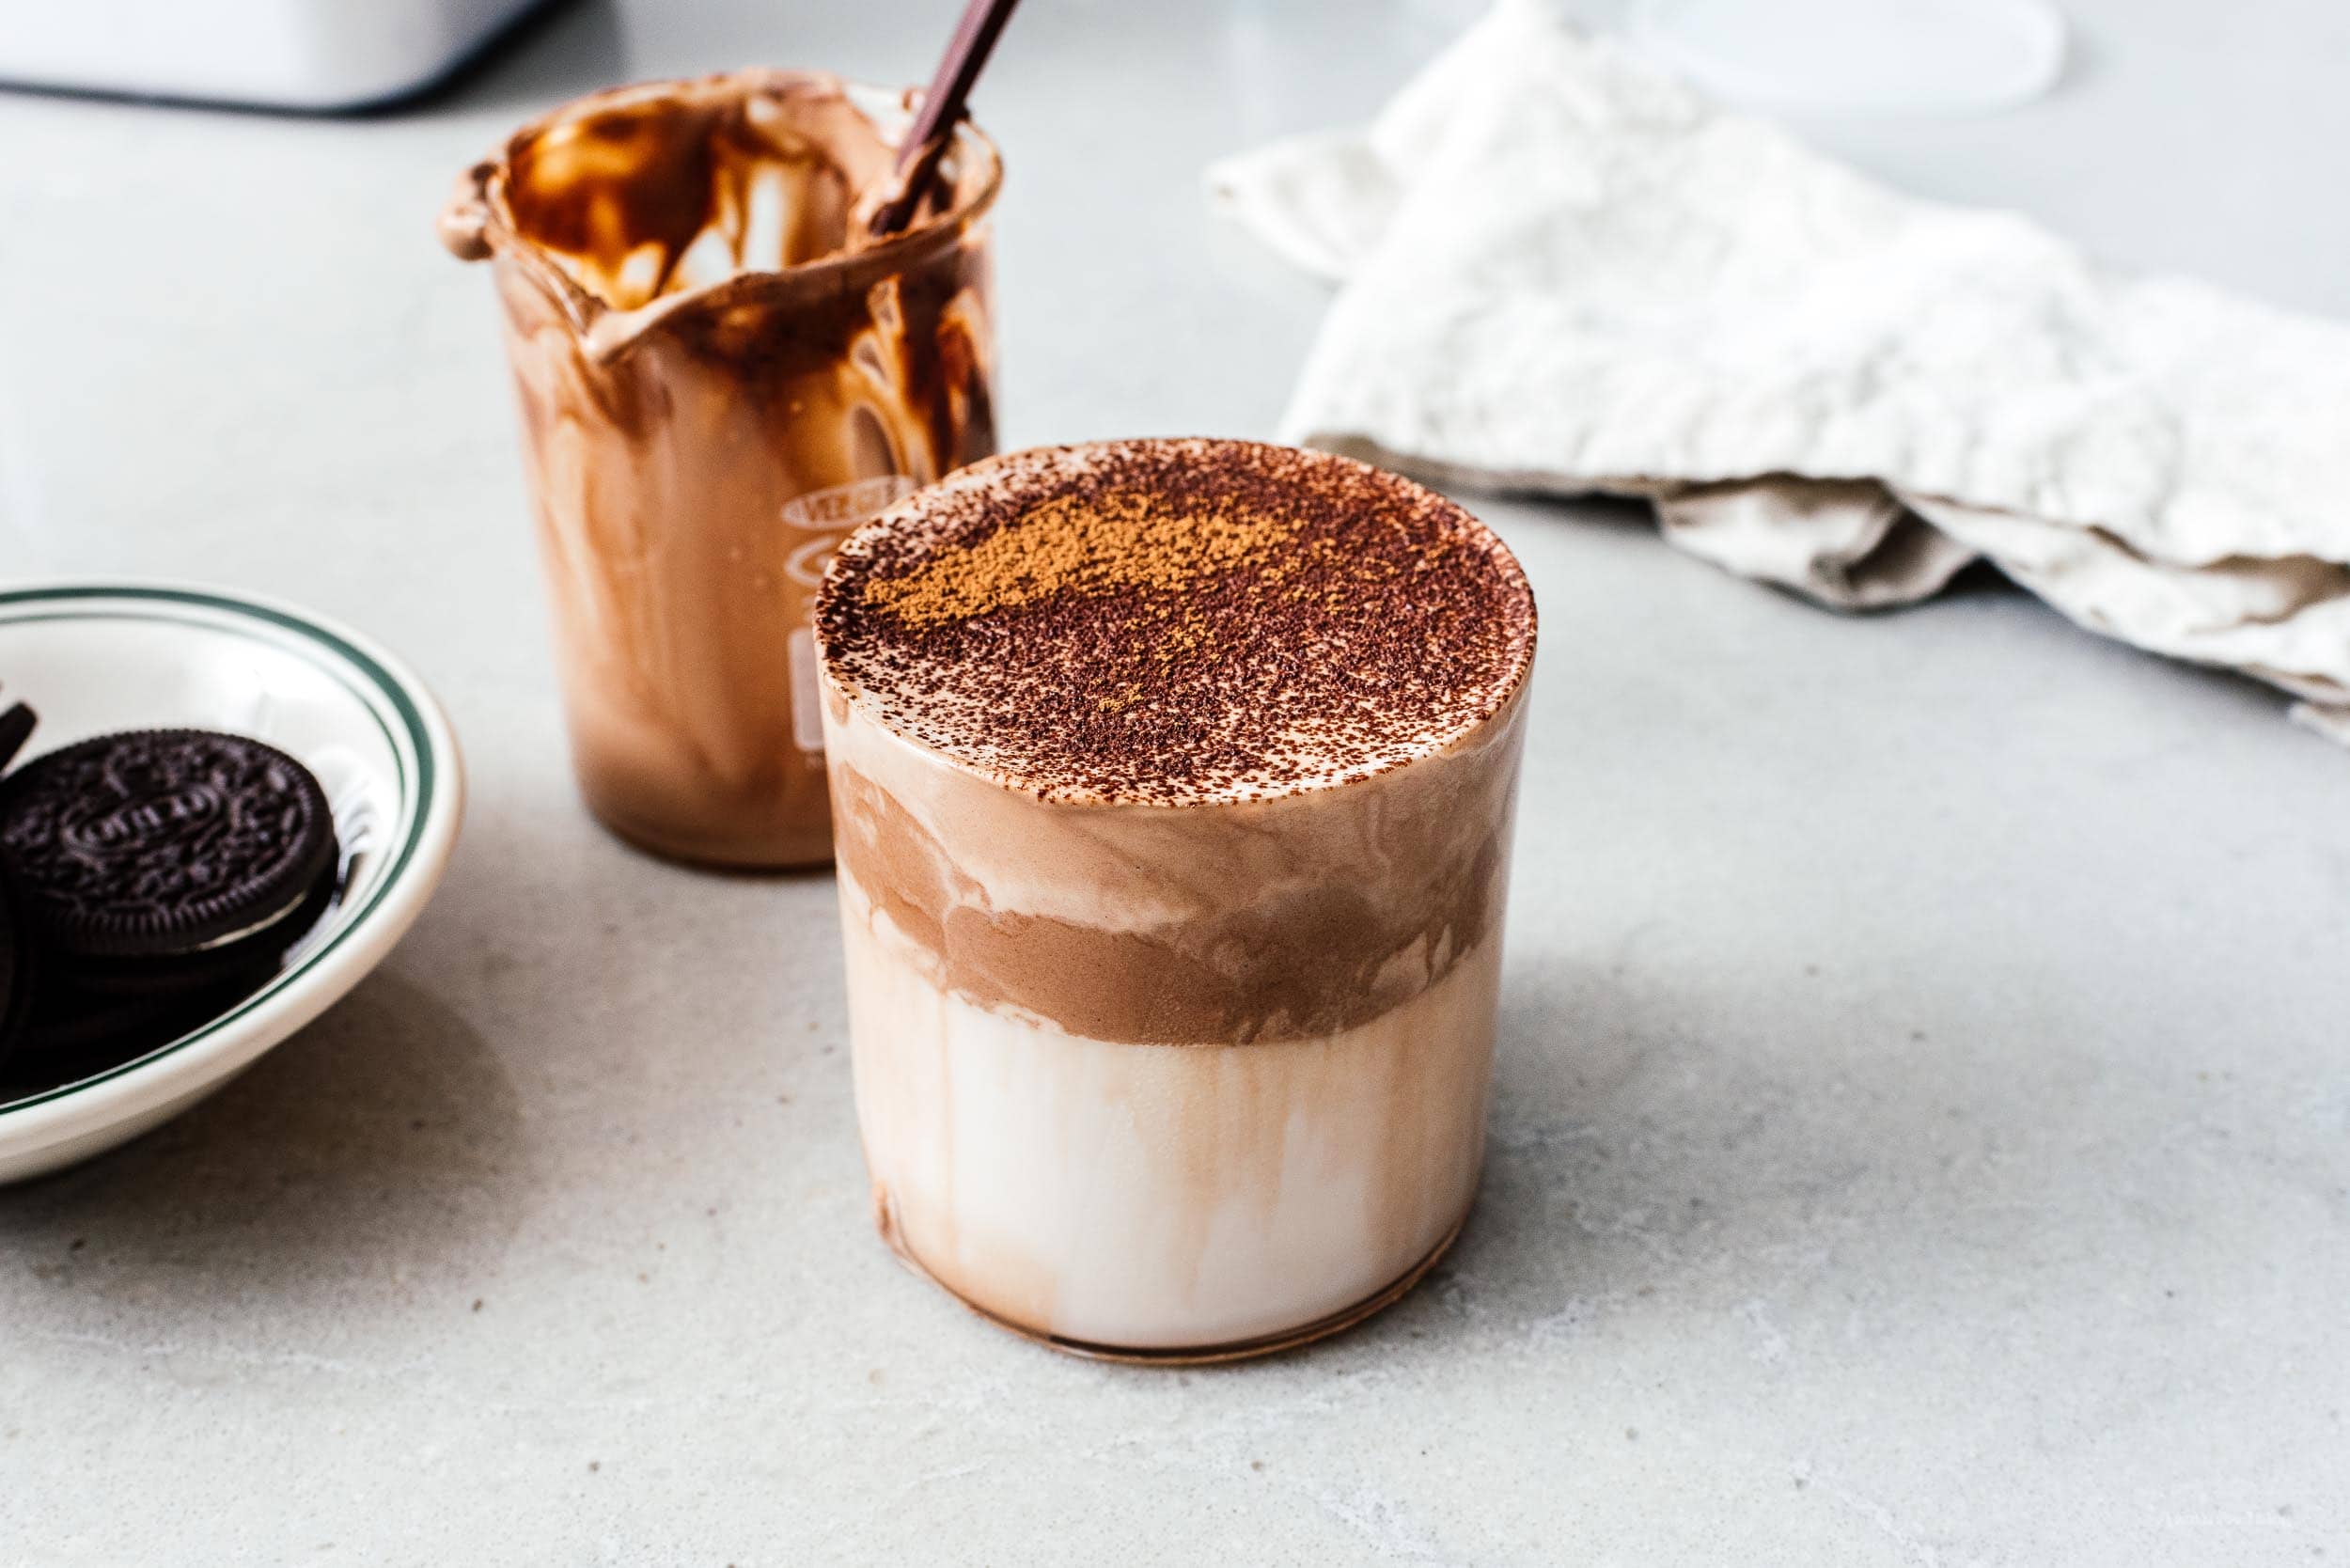
Remember dalgona coffee? The super whipped coffee that took over the internet for a little while back at the beginning of quarantine? Whipped hot chocolate is its chocolate-y cousin: deep, dark, mysterious, and ultimately, delicious. It's cocoa powder that’s been whipped with heavy whipping cream to fluff up into a whipped chocolate topping that you can put on hot or cold milk. Essentially it’s chocolate whipping cream!How to make whipped hot chocolate
Good news, this is super easy to make. Even easier than dalgona. All you need is: cocoa powder, sugar (or sweetener), and heavy whipping cream.- Mix. In a bowl or liquid measuring cup, stir together heavy whipping cream, cocoa powder, and sugar. If you like, you can use a small sieve to get the lumps out of your cocoa powder.
- Fluff. Whip the chocolate mixture up using a whisk, hand mixer, or milk frother until it be comes light, fluffy, and thick. You want it to be whipped but pourable.
- Pour. Add your hot or cold milk to a glass or mug.
- Top. Top the milk with the fluffy hot chocolate. Stir and enjoy!
Whipped hot chocolate ingredients
- Heavy whipping cream: This is what will make your hot chocolate super fluffy. Sometimes it’s just called whipping cream or heavy cream. Either way, you’ll find it next to the milk. It should have 30-36% milk fat.
- Cocoa powder: Ordinary un-sweetened cocoa powder, like what you use in brownies or chocolate mug cake
- Sugar or sweetener: Sweeten to taste using sugar or sweetener of your choice.
Do I have to use cocoa powder?
If you have hot chocolate mix, you can use that, just leave out the sugar!Do I have to use heavy cream?
Yes, the heavy cream (or whipping cream) is what whips up into the fluffy soft cream.Can I make hot chocolate without sugar?
Yes! But if you’re using just cocoa powder it won’t taste sweet. You can use sweetener instead, like honey or maple syrup.What kind of milk can I use?
Any milk is good! I use 2% here. You can substitute your favorite milk: almond milk, soy milk, oat milk, or any milk alternative. It’s the biggest part of the drink so make sure it’s a milk you like!Hot vs cold
You can use hot milk or iced/cold, it’s up to you! I used warm steamed milk because I wanted that warm and cozy hot chocolate feeling.What does whipped hot chocolate taste like?
Like heaven! It’s like regular hot chocolate (if you have it hot) but with a velvety smooth and creamy texture. It’s sweet and chocolate-y and the best on a chilly day.The best way to cream
My favorite way is to use a coffee milk frother. I put everything into a tall liquid measuring cup and whip it in there. Here are some other ways you can whip hot chocolate, from best to worst:- Hand Held Frother – My favorite way to make any whipped drink! This is the frother I have and it works perfectly because it’s very very powerful and it doesn’t take a long time. If you do use a frother, put the mixture in a liquid measuring cup, jar or tall glass instead of a bowl, it’ll make it a tiny bit easier.
- Hand Held Electric Mixer – This is probably the next easiest way because you can press your whisks right up against the mixture and you don’t need to use any arm strength.
- Stand Mixer – This is hands free but you need to make sure you have enough liquid in the bowl so that the whisks actually touch the mixture. You’ll probably need to do a triple or quadruple batch.
- Small Whisk or Matcha Whisk – This is the cheapest way to whip. It works and it works well and you don’t have to get a machine out to do it. It takes some time, but it’s exercise!
- Jar – You can put everything in a jar and shake it up. It takes a while but the whipping cream does whip up.
What can I add to my whipped hot chocolate?
- Pumpkin spice - Two words: PUMPKIN SPICE! Sprinkle on some pumpkin spice for whipped pumpkin spice hot chocolate, it’s the best fall treat out there.
- Marshmallows - Who doesn’t love hot chocolate with marshmallows? Use the marshmallows from Lucky Charms for an even cuter, sweeter treat.
- Extra cocoa powder - Dust on some extra cocoa powder for a pretty chocolatey finish.
- Crushed up oreos - Whipped Oreo hot chocolate is AMAZING. Crush up some oreos on top.
- Crushed up cookies - Don’t stop at oreos, why not try whipped chocolate chip hot chocolate or whipped biscoff hot chocolate.
- Coffee - You can even combine whipped hot chocolate with coffee in the milk for a cute lil whipped mocha.
- Peppermint - Is it too early for winter? Because whipped peppermint hot chocolate is the dreamiest!
Whipped Hot Chocolate Recipe
- 1/2 cup heavy whipping cream (cold)
- 2-4 tbsp sugar
- 2 tbsp unsweetened cocoa powder
- 3 cups milk (of choice)
Place the cream in a bowl or liquid measuring cup.
Sift the cocoa powder on top and then add the sugar.
Whip with a wire whisk, electric mixer, or milk frother until the cream forms soft peaks. Be careful not to over whip or you’ll get whipped cream instead of soft whipped hot chocolate cream.
Fill two glasses or mugs with hot or cold milk of choice. Top the glasses with a generous amount of whipped hot chocolate. Stir throughly before enjoying!
Estimated nutrition assumes 1% (lowfat) milk.
I Am... Instant Pot Brown Rice
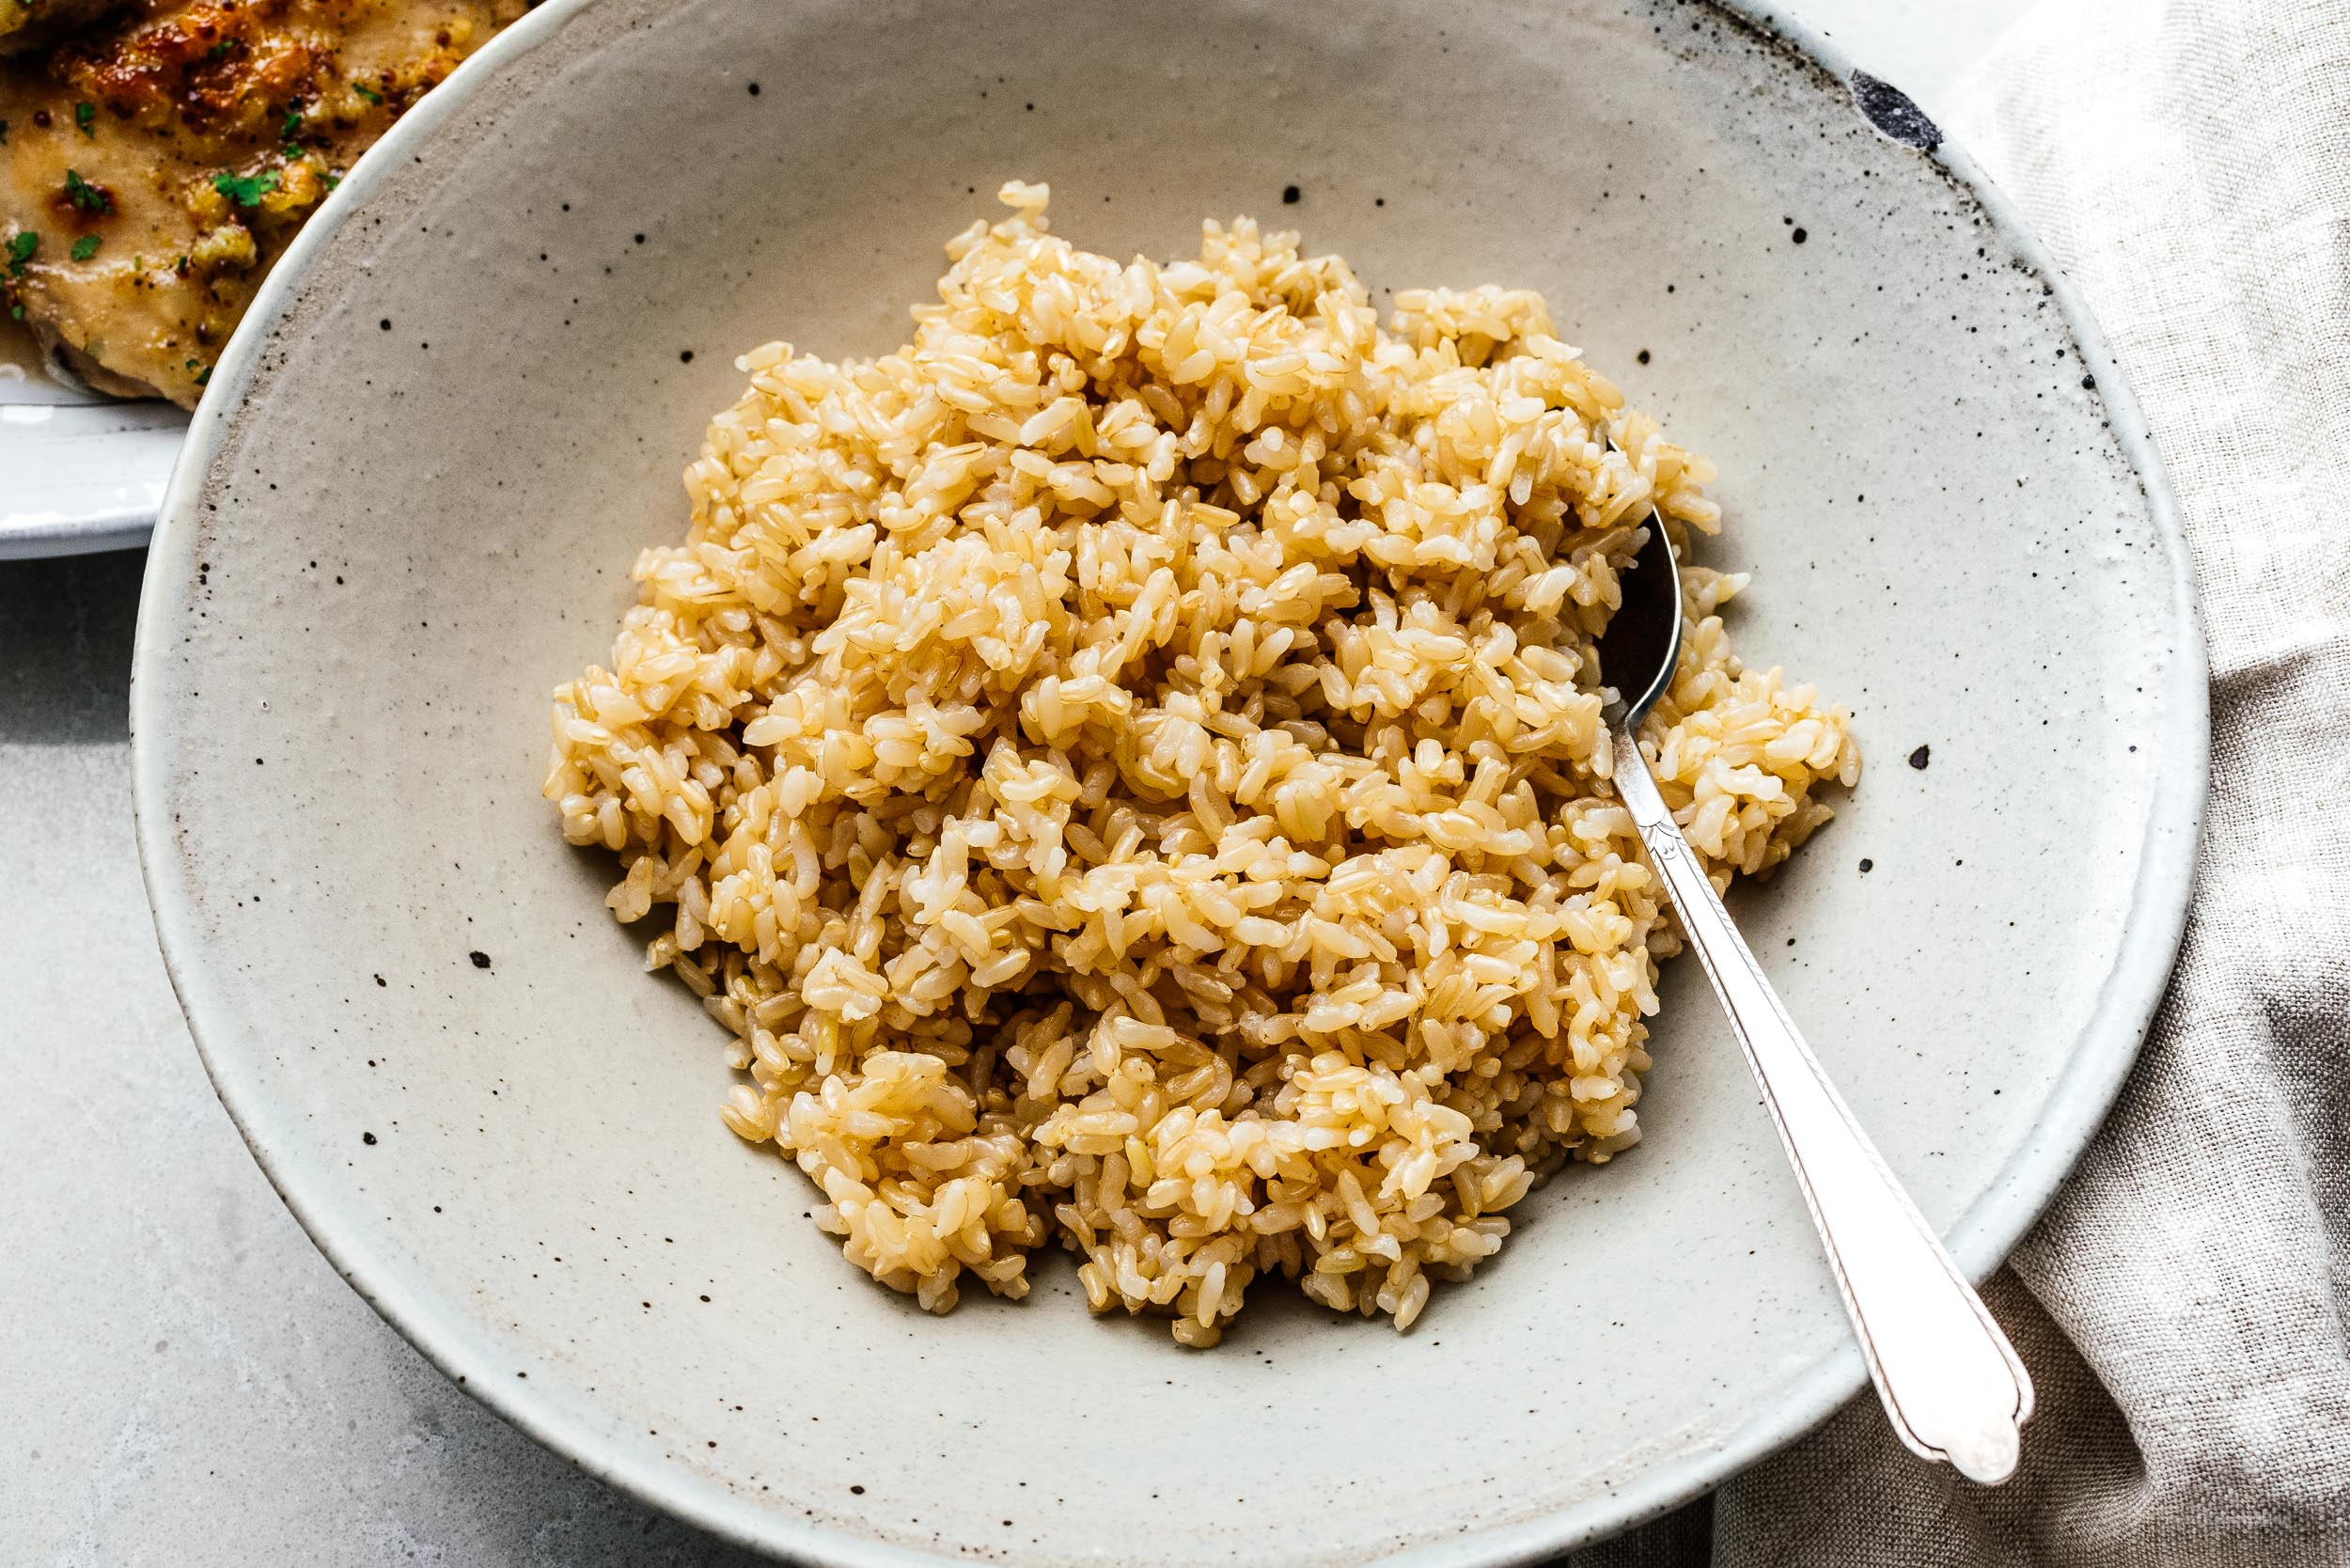
Are you team white rice or team brown rice? I love both, but truth is, I don’t make brown rice as often as I would like because it takes a bit longer to cook than white rice. But with instant pot brown rice, I’m team brown rice all the way. It’s fast, healthy, and best of all, it’s nutty and delicious.
Instant pot rice
If you don’t own a rice cooker, cooking rice can be a bit of a chore. But guess what?!? If you own an Instant pot, you already do own a rice cooker. Ever since we got our instant pot, we haven’t ever pulled out our (really nice, tiny) rice cooker because the instant pot does such a great job.The secret to faster instant pot brown rice
If you want your brown rice faster (doesn’t everyone?!?) the secret is to use really hot water. The instant pot does a lot of things fast but it doesn’t heat up water as fast as a gas stove or even your tap, so we like to use either really hot tap water or boiling water (if you have a gas stove) to give it that little extra boost.How to cook instant pot brown rice
- Rinse your rice. You need to rinse brown rice for cooking in the Instant Pot, it’ll make your rice more tender because it has a bit of extra moisture from rinsing. Generally brown rice needs more water than white rice so rinsing it will add a touch more water to the recipe. Place the brown rice in a bowl, lightly soak, and swirl with your hand then drain with a fine mesh strainer.
- Cook on high pressure. Pop the rice with an equal amount of water into the insert of your Instant Pot. Set your pot to High Pressure for 20 minutes.
- Quick release. When the Instant Pot is done, immediately carefully press the quick release to vent all the steam and pressure.
- Fluff and serve. When the steam and pressure has fully escaped, open the lid, fluff up the rice and enjoy!
Rice to Water Ratio
The best rice to water ratio for the instant pot is 1 cup of brown rice: 1 cup of water. That’s it, it’s just a one to one ratio of rice to water. This means that you can use any sort of measuring tool you want, just make sure the water and rice volume is equal.Should I wash brown rice?
In this case, yes! Brown rice takes longer to cook than white rice and generally needs a bit more moisture so rinsing the rice gives it a bit of a head start with hydrating the rice. By rinsing it, you’ll allowing some moisture to go into the kernel of the rice before it even starts cooking in the Instant Pot.What’s the best brown rice?
We like short grain brown rice because it’s glossy, nutty, and fluffy. This recipe will work for long grain brown rice as well though.Brown rice vs white rice
While brown rice and white rice have a similar amount of carbs and calories (not as much as you'd think!), brown rice is a whole grain that has more vitamins and dietary minerals in it and has a lower glycemic index. But, I just love it because it tastes nutty and has more heft and chew and makes me feel more full when I eat it.What to serve with instant pot brown rice
- Mapo tofu
- Oven baked sweet and sour chicken
- Salted egg yolk fried chicken
- Air fryer char siu
- Garlicky mushrooms
Instant Pot Brown Rice
- 1 cup brown rice
- 1 cup hot water
Rinse the brown rice and drain well.
Add the rice and 1 cup hot water to the insert of the Instant Pot.
Make sure the pressure valve is in the sealed position. Set the Instant Pot to pressure cook high for 20 minutes. When the pot is done, quick release. Open the lid carefully, fluff and enjoy!

Latest Comment
“I have the same issue. Tall at the time of flipping. Stiff peak egg white. I use lime juice.”Doris on Japanese PancakesPopular
 2015 Holiday Giveaway
  One-Pot Lemon Scallop Pea Spaghetti
  Beer Battered Onion Rings, Jalapeno Aioli
  2014 Holiday Gift Guide and a Giveaway
  Easy Gourmet Hot Wings and a Giveaway!
 The Ultimate Veggie Sandwich
  Vegan(!) Creamy Corn Soup Recipe
  Sunday Brunch: Grilled Cheese Eggs Benny
